服务配置现状
配置文件是我们再熟悉不过的,在微服务系统中,每个微服务不仅仅只有代码,还需要连接其他资源 ,例如数据库的配置或功能性的开关 MySQL、Redis 、Security 等相关的配置。除了项目运行的基础配置之外,还有一些配置是与我们业务有关系的,比如说七牛存储、短信和邮件相关,或者一些业务上的开关。
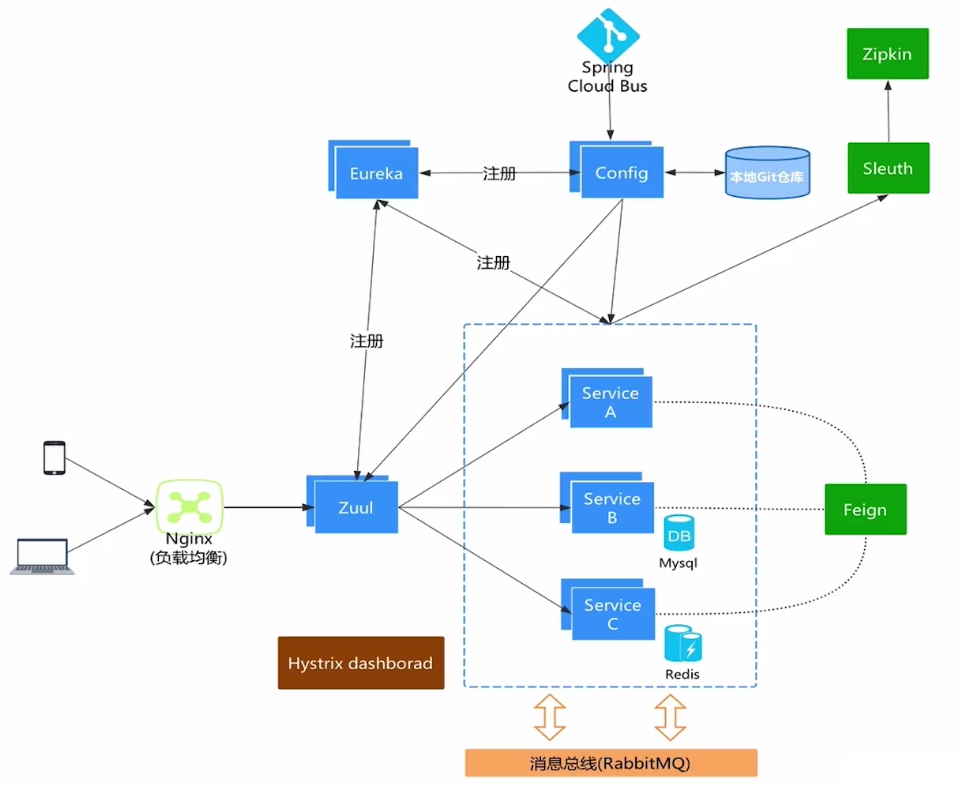
但是随着微服务系统的不断迭代,整个微服务系统可能会成为一个网状结构 ,这个时候就要考虑整个微服务系统的扩展性、伸缩性、耦合性 等等。其中一个很重要的环节就是配置管理 的问题。
常规配置管理解决方案缺点
硬编码(需要修改代码、繁琐、风险大)
properties 或者 yml(集群环境下需要替换和重启)
xml(重新打包和重启)
为什么使用 Spring Cloud Config
由于常规配置管理有很大的缺点,所以采用 Spring Cloud Config 集中式 的配置中心来管理每个服务 的配置信息。
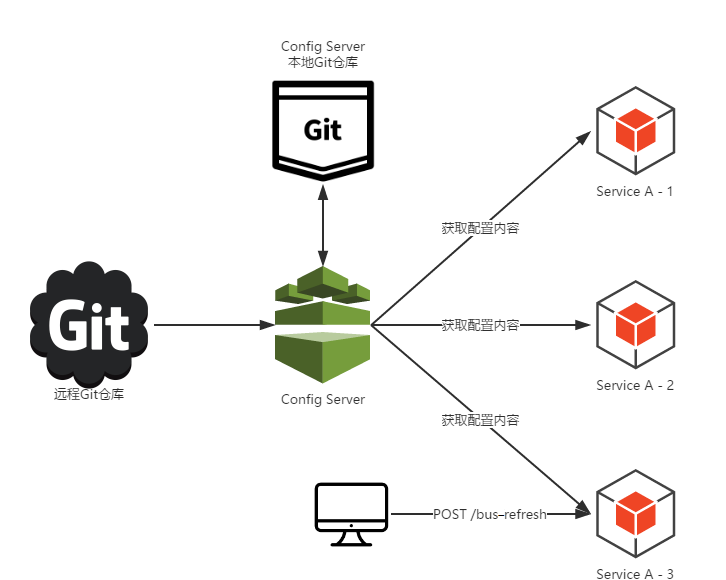
Spring Cloud Config 在微服务分布式系统中,采用 Server 服务端 和 Client 客户端 的方式来提供可扩展的配置服务。服务端提供配置文件的存储,以接口的形式将配置文件的内容提供出去;客户端通过接口获取数据、并依据此数据初始化自己的应用。
配置中心负责管理所有服务 的各种环境配置文件。
配置中心默认采用 Git 的方式存储配置文件,因此我们可以很容易的部署和修改,有助于环境配置进行版本管理。
Spring Cloud Config 解决了什么问题
Spring Cloud Config 解决了微服务配置的中心化、版本控制、平台独立、语言独立 等问题。其特性如下:
提供服务端和客户端支持(Spring Cloud Config Server 和 Spring Cloud Config Client)
集中式管理分布式环境下的应用部署
属性值的加密和解密(对称加密和非对称加密)
基于 Spring 环境,无缝与 Spring 应用集成
可用于任何语言开发的程序
默认实现基于 Git ,可以进行版本管理
接下来,我们主要从以下几块来讲一下 Config 的使用。
基础版的配置中心(不集成 Eureka)
集成 Eureka 版的高可用配置中心
基于 Actuator 实现配置的自动刷新
配置中心属性值的加密和解密(对称加密和非对称加密)
基于 Spring Cloud Bus 实现配置的自动刷新
配置中心用户安全认证
环境准备
项目
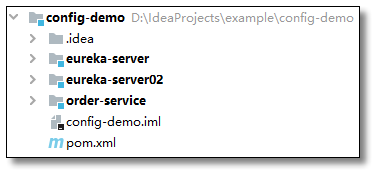
config-demo 聚合工程。SpringBoot 2.2.4.RELEASE、Spring Cloud Hoxton.SR1。
eureka-server:注册中心(用于集成 Eureka 版的配置中心)eureka-server02:注册中心(用于集成 Eureka 版的配置中心)order-service:订单服务(用于集成 Eureka 版的配置中心)
仓库
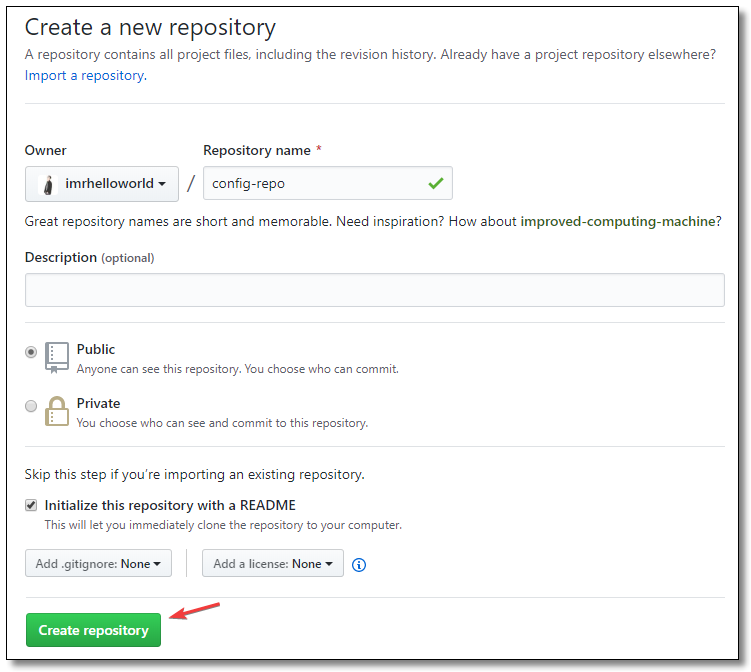
config-repo 仓库。
Repository name:仓库名称Description(可选):仓库描述介绍Public,Private:仓库权限(公开共享,私有或指定合作者)Initialize this repository with a README:添加一个 README.mdAdd .gitignore:不需要进行版本管理的文件类型,生成对应文件 .gitignoreAdd a license:证书类型,生成对应文件 LICENSE
配置文件
不同环境的配置文件,上传至 config-repo 仓库。
配置文件的名称不是乱起的,例如 config-client-dev.yml 和 config-client-prod.yml 这两个文件是同一个项目的不同环境,项目名称为 config-client, 一个对应开发环境,一个对应正式环境。test 表示测试环境。
config-client.yml
1
2
3
4
5
6
7
8
9
server :
port : 7777 # 端口
spring :
application :
name : config-client # 应用名称
# 自定义配置
name : config-client-default
config-client-dev.yml
1
2
3
4
5
6
7
8
9
server :
port : 7778 # 端口
spring :
application :
name : config-client # 应用名称
# 自定义配置
name : config-client-dev
config-client-test.yml
1
2
3
4
5
6
7
8
9
server :
port : 7779 # 端口
spring :
application :
name : config-client # 应用名称
# 自定义配置
name : config-client-test
config-client-prod.yml
1
2
3
4
5
6
7
8
9
server :
port : 7780 # 端口
spring :
application :
name : config-client # 应用名称
# 自定义配置
name : config-client-prod
入门案例
入门案例讲解:基础版的配置中心(不集成 Eureka)
官方文档:https://cloud.spring.io/spring-cloud-static/spring-cloud-config/2.2.2.RELEASE/reference/html/
创建服务端
在 config-demo 父工程下创建子项目 config-server。
添加依赖
添加 spring-cloud-config-server 依赖,完整 pom.xml 文件如下:
 1
 2
 3
 4
 5
 6
 7
 8
 9
10
11
12
13
14
15
16
17
18
19
20
21
22
23
24
25
26
27
28
29
30
31
32
33
34
35
36
37
38
39
40
<?xml version="1.0" encoding="UTF-8"?>
<project xmlns= "http://maven.apache.org/POM/4.0.0" xmlns:xsi= "http://www.w3.org/2001/XMLSchema-instance"
xsi:schemaLocation= "http://maven.apache.org/POM/4.0.0 http://maven.apache.org/xsd/maven-4.0.0.xsd" >
<modelVersion> 4.0.0</modelVersion>
<groupId> com.example</groupId>
<artifactId> config-server</artifactId>
<version> 1.0-SNAPSHOT</version>
<!-- 继承父依赖 -->
<parent>
<groupId> com.example</groupId>
<artifactId> config-demo</artifactId>
<version> 1.0-SNAPSHOT</version>
</parent>
<!-- 项目依赖 -->
<dependencies>
<!-- spring cloud config server 依赖 -->
<dependency>
<groupId> org.springframework.cloud</groupId>
<artifactId> spring-cloud-config-server</artifactId>
</dependency>
<!-- spring boot test 依赖 -->
<dependency>
<groupId> org.springframework.boot</groupId>
<artifactId> spring-boot-starter-test</artifactId>
<scope> test</scope>
<exclusions>
<exclusion>
<groupId> org.junit.vintage</groupId>
<artifactId> junit-vintage-engine</artifactId>
</exclusion>
</exclusions>
</dependency>
</dependencies>
</project>
配置文件
 1
 2
 3
 4
 5
 6
 7
 8
 9
10
11
12
13
14
15
server :
port : 8888 # 端口
spring :
application :
name : config-server # 应用名称
cloud :
config :
server :
git :
uri : https://github.com/imrhelloworld/config-repo # 配置文件所在仓库地址
#username: # Github 等产品的登录账号
#password: # Github 等产品的登录密码
#default-label: master # 配置文件分支
#search-paths: # 配置文件所在根目录
启动类
启动类添加 @EnableConfigServer 注解。
 1
 2
 3
 4
 5
 6
 7
 8
 9
10
11
12
13
14
15
16
package com.example ;
import org.springframework.boot.SpringApplication ;
import org.springframework.boot.autoconfigure.SpringBootApplication ;
import org.springframework.cloud.config.server.EnableConfigServer ;
// 配置中心服务端注解
@EnableConfigServer
@SpringBootApplication
public class ConfigServerApplication {
public static void main ( String [] args ) {
SpringApplication . run ( ConfigServerApplication . class , args );
}
}
访问规则
Spring Cloud Config 有一套访问规则,我们通过这套规则在浏览器上直接访问即可。
1
2
3
4
5
/{ application} /{ profile} [/{ label} ]
/{ application} -{ profile} .yml
/{ label} /{ application} -{ profile} .yml
/{ application} -{ profile} .properties
/{ label} /{ application} -{ profile} .properties
{application}:应用名称(目标服务名称){profile}:获取指定环境配置,项目有开发环境、测试环境、生产环境,对应到配置文件就是以 application-{profile}.yml 加以区分,例如 application-dev.yml、application-test.yml、application-prod.yml。默认值为 default。{label}:表示 git 分支,默认是 master 分支,如果项目是以分支做区分也是可以的,那就可以通过不同的 label 来控制访问不同的配置文件。
测试
http://localhost:8888/config-client/default
http://localhost:8888/config-client/dev/master
http://localhost:8888/config-client-test.yml
http://localhost:8888/master/config-client-prod.yml
访问以上地址,如果可以正常返回数据,说明配置中心服务端一切正常。
创建客户端
在 config-demo 父工程下创建子项目 config-client。
添加依赖
添加 spring-cloud-starter-config 依赖,完整 pom.xml 文件如下:
 1
 2
 3
 4
 5
 6
 7
 8
 9
10
11
12
13
14
15
16
17
18
19
20
21
22
23
24
25
26
27
28
29
30
31
32
33
34
35
36
37
38
39
40
41
42
43
44
45
<?xml version="1.0" encoding="UTF-8"?>
<project xmlns= "http://maven.apache.org/POM/4.0.0" xmlns:xsi= "http://www.w3.org/2001/XMLSchema-instance"
xsi:schemaLocation= "http://maven.apache.org/POM/4.0.0 http://maven.apache.org/xsd/maven-4.0.0.xsd" >
<modelVersion> 4.0.0</modelVersion>
<groupId> com.example</groupId>
<artifactId> config-client</artifactId>
<version> 1.0-SNAPSHOT</version>
<!-- 继承父依赖 -->
<parent>
<groupId> com.example</groupId>
<artifactId> config-demo</artifactId>
<version> 1.0-SNAPSHOT</version>
</parent>
<!-- 项目依赖 -->
<dependencies>
<!-- spring cloud starter config 依赖 -->
<dependency>
<groupId> org.springframework.cloud</groupId>
<artifactId> spring-cloud-starter-config</artifactId>
</dependency>
<!-- spring boot web 依赖 -->
<dependency>
<groupId> org.springframework.boot</groupId>
<artifactId> spring-boot-starter-web</artifactId>
</dependency>
<!-- spring boot test 依赖 -->
<dependency>
<groupId> org.springframework.boot</groupId>
<artifactId> spring-boot-starter-test</artifactId>
<scope> test</scope>
<exclusions>
<exclusion>
<groupId> org.junit.vintage</groupId>
<artifactId> junit-vintage-engine</artifactId>
</exclusion>
</exclusions>
</dependency>
</dependencies>
</project>
配置文件
客户端配置文件名称必须叫 bootstrap.yml
1
2
3
4
5
6
7
spring :
cloud :
config :
name : config-client # 配置文件名称,对应 git 仓库中配置文件前半部分
uri : http://localhost:8888 # config-server 服务端地址
label : master # git 分支
profile : default # 指定环境
控制层
添加一个 RestController 用于测试获取配置文件信息。
 1
 2
 3
 4
 5
 6
 7
 8
 9
10
11
12
13
14
15
16
17
18
package com.example.controller ;
import org.springframework.beans.factory.annotation.Value ;
import org.springframework.web.bind.annotation.GetMapping ;
import org.springframework.web.bind.annotation.RestController ;
@RestController
public class ConfigController {
@Value ( "${name}" )
private String name ;
@GetMapping ( "/name" )
public String getName () {
return name ;
}
}
启动类
 1
 2
 3
 4
 5
 6
 7
 8
 9
10
11
12
13
package com.example ;
import org.springframework.boot.SpringApplication ;
import org.springframework.boot.autoconfigure.SpringBootApplication ;
@SpringBootApplication
public class ConfigClientApplication {
public static void main ( String [] args ) {
SpringApplication . run ( ConfigClientApplication . class , args );
}
}
测试
访问:http://localhost:7777/name 结果如下:
修改配置文件为 dev 环境:
1
2
3
4
5
6
7
spring :
cloud :
config :
name : config-client # 应用名称,对应 git 仓库中配置文件前半部分
uri : http://localhost:8888 # config-server 服务端地址
label : master # git 分支
profile : dev # 指定环境
访问:http://localhost:7778/name 结果如下:
Spring Cloud Config 高可用
以上讲了 Spring Cloud Config 最基础的用法,如果我们的项目中使用了 Eureka 作为服务注册发现中心,那么 Spring Cloud Config 也应该注册到 Eureka,方便其他服务使用,并且可以注册多个配置中心服务端,实现高可用。
接下来就集成 Spring Cloud Config 到 Eureka。关于 Eureka 的相关知识大家可翻阅我的历史文章进行学习。
添加配置文件
在 Github 仓库中增加配置文件。
order-service-dev.yml
 1
 2
 3
 4
 5
 6
 7
 8
 9
10
11
12
13
14
15
16
17
18
server :
port : 9090 # 端口
spring :
application :
name : order-service # 应用名称
# 配置 Eureka Server 注册中心
eureka :
instance :
prefer-ip-address : true # 是否使用 ip 地址注册
instance-id : ${spring.cloud.client.ip-address}:${server.port} # ip:port
client :
service-url : # 设置服务注册中心地址
defaultZone : http://localhost:8761/eureka/,http://localhost:8762/eureka/
# 自定义配置
name : order-service-dev
order-service-prod.yml
 1
 2
 3
 4
 5
 6
 7
 8
 9
10
11
12
13
14
15
16
17
18
server :
port : 9091 # 端口
spring :
application :
name : order-service # 应用名称
# 配置 Eureka Server 注册中心
eureka :
instance :
prefer-ip-address : true # 是否使用 ip 地址注册
instance-id : ${spring.cloud.client.ip-address}:${server.port} # ip:port
client :
service-url : # 设置服务注册中心地址
defaultZone : http://localhost:8761/eureka/,http://localhost:8762/eureka/
# 自定义配置
name : order-service-prod
整合注册中心
案例已经给大家准备好了,无需创建注册中心直接使用即可,为了清楚,把依赖和配置信息给大家贴出来。
依赖
eureka-server 和 eureka-server02 核心依赖部分一致。
 1
 2
 3
 4
 5
 6
 7
 8
 9
10
11
12
13
14
15
16
17
18
19
20
21
22
23
24
25
26
27
28
29
30
31
32
33
34
35
36
37
38
39
40
41
42
43
44
45
<?xml version="1.0" encoding="UTF-8"?>
<project xmlns= "http://maven.apache.org/POM/4.0.0" xmlns:xsi= "http://www.w3.org/2001/XMLSchema-instance"
xsi:schemaLocation= "http://maven.apache.org/POM/4.0.0 http://maven.apache.org/xsd/maven-4.0.0.xsd" >
<modelVersion> 4.0.0</modelVersion>
<groupId> com.example</groupId>
<artifactId> eureka-server</artifactId>
<version> 1.0-SNAPSHOT</version>
<!-- 继承父依赖 -->
<parent>
<groupId> com.example</groupId>
<artifactId> config-demo</artifactId>
<version> 1.0-SNAPSHOT</version>
</parent>
<!-- 项目依赖 -->
<dependencies>
<!-- netflix eureka server 依赖 -->
<dependency>
<groupId> org.springframework.cloud</groupId>
<artifactId> spring-cloud-starter-netflix-eureka-server</artifactId>
</dependency>
<!-- spring boot web 依赖 -->
<dependency>
<groupId> org.springframework.boot</groupId>
<artifactId> spring-boot-starter-web</artifactId>
</dependency>
<!-- spring boot test 依赖 -->
<dependency>
<groupId> org.springframework.boot</groupId>
<artifactId> spring-boot-starter-test</artifactId>
<scope> test</scope>
<exclusions>
<exclusion>
<groupId> org.junit.vintage</groupId>
<artifactId> junit-vintage-engine</artifactId>
</exclusion>
</exclusions>
</dependency>
</dependencies>
</project>
配置文件
eureka-server 的 application.yml
 1
 2
 3
 4
 5
 6
 7
 8
 9
10
11
12
13
14
15
16
17
server :
port : 8761 # 端口
spring :
application :
name : eureka-server # 应用名称(集群下相同)
# 配置 Eureka Server 注册中心
eureka :
instance :
hostname : eureka01 # 主机名,不配置的时候将根据操作系统的主机名来获取
prefer-ip-address : true # 是否使用 ip 地址注册
instance-id : ${spring.cloud.client.ip-address}:${server.port} # ip:port
client :
# 设置服务注册中心地址,指向另一个注册中心
service-url : # 注册中心对外暴露的注册地址
defaultZone : http://localhost:8762/eureka/
eureka-server02 的 application.yml
 1
 2
 3
 4
 5
 6
 7
 8
 9
10
11
12
13
14
15
16
17
server :
port : 8762 # 端口
spring :
application :
name : eureka-server # 应用名称(集群下相同)
# 配置 Eureka Server 注册中心
eureka :
instance :
hostname : eureka02 # 主机名,不配置的时候将根据操作系统的主机名来获取
prefer-ip-address : true # 是否使用 ip 地址注册
instance-id : ${spring.cloud.client.ip-address}:${server.port} # ip:port
client :
# 设置服务注册中心地址,指向另一个注册中心
service-url : # 注册中心对外暴露的注册地址
defaultZone : http://localhost:8761/eureka/
启动类
eureka-server 和 eureka-server02 启动类核心代码一致。
 1
 2
 3
 4
 5
 6
 7
 8
 9
10
11
12
13
14
15
16
package com.example ;
import org.springframework.boot.SpringApplication ;
import org.springframework.boot.autoconfigure.SpringBootApplication ;
import org.springframework.cloud.netflix.eureka.server.EnableEurekaServer ;
@SpringBootApplication
// 开启 EurekaServer 注解
@EnableEurekaServer
public class EurekaServerApplication {
public static void main ( String [] args ) {
SpringApplication . run ( EurekaServerApplication . class , args );
}
}
Spring Cloud Config 服务端
服务端和基础版的配置中心相比多了 Eureka 的配置,其他地方都是一样的。
config-server 服务端构建完成以后再复刻一个 config-server02 实现高可用。
依赖
config-server 和 config-server02 核心依赖部分一致。注意是 spring-cloud-config-server 依赖。
 1
 2
 3
 4
 5
 6
 7
 8
 9
10
11
12
13
14
15
16
17
18
19
20
21
22
23
24
25
26
27
28
29
30
31
32
33
34
35
36
37
38
39
40
41
42
43
44
45
<?xml version="1.0" encoding="UTF-8"?>
<project xmlns= "http://maven.apache.org/POM/4.0.0" xmlns:xsi= "http://www.w3.org/2001/XMLSchema-instance"
xsi:schemaLocation= "http://maven.apache.org/POM/4.0.0 http://maven.apache.org/xsd/maven-4.0.0.xsd" >
<modelVersion> 4.0.0</modelVersion>
<groupId> com.example</groupId>
<artifactId> config-server</artifactId>
<version> 1.0-SNAPSHOT</version>
<!-- 继承父依赖 -->
<parent>
<groupId> com.example</groupId>
<artifactId> config-demo</artifactId>
<version> 1.0-SNAPSHOT</version>
</parent>
<!-- 项目依赖 -->
<dependencies>
<!-- spring cloud config server 依赖 -->
<dependency>
<groupId> org.springframework.cloud</groupId>
<artifactId> spring-cloud-config-server</artifactId>
</dependency>
<!-- netflix eureka client 依赖 -->
<dependency>
<groupId> org.springframework.cloud</groupId>
<artifactId> spring-cloud-starter-netflix-eureka-client</artifactId>
</dependency>
<!-- spring boot test 依赖 -->
<dependency>
<groupId> org.springframework.boot</groupId>
<artifactId> spring-boot-starter-test</artifactId>
<scope> test</scope>
<exclusions>
<exclusion>
<groupId> org.junit.vintage</groupId>
<artifactId> junit-vintage-engine</artifactId>
</exclusion>
</exclusions>
</dependency>
</dependencies>
</project>
配置文件
config-server 的 application.yml
 1
 2
 3
 4
 5
 6
 7
 8
 9
10
11
12
13
14
15
16
17
18
19
20
21
22
23
24
server :
port : 8888 # 端口
spring :
application :
name : config-server # 应用名称
cloud :
config :
server :
git :
uri : https://github.com/imrhelloworld/config-repo # 配置文件所在仓库地址
#username: # Github 等产品的登录账号
#password: # Github 等产品的登录密码
#default-label: master # 配置文件分支
#search-paths: # 配置文件所在根目录
# 配置 Eureka Server 注册中心
eureka :
instance :
prefer-ip-address : true # 是否使用 ip 地址注册
instance-id : ${spring.cloud.client.ip-address}:${server.port} # ip:port
client :
service-url : # 设置服务注册中心地址
defaultZone : http://localhost:8761/eureka/,http://localhost:8762/eureka/
config-server02 的 application.yml
 1
 2
 3
 4
 5
 6
 7
 8
 9
10
11
12
13
14
15
16
17
18
19
20
21
22
23
24
server :
port : 8889 # 端口
spring :
application :
name : config-server # 应用名称
cloud :
config :
server :
git :
uri : https://github.com/imrhelloworld/config-repo # 配置文件所在仓库地址
#username: # Github 等产品的登录账号
#password: # Github 等产品的登录密码
#default-label: master # 配置文件分支
#search-paths: # 配置文件所在根目录
# 配置 Eureka Server 注册中心
eureka :
instance :
prefer-ip-address : true # 是否使用 ip 地址注册
instance-id : ${spring.cloud.client.ip-address}:${server.port} # ip:port
client :
service-url : # 设置服务注册中心地址
defaultZone : http://localhost:8761/eureka/,http://localhost:8762/eureka/
启动类
config-server 和 config-server02 启动类核心代码一致。
 1
 2
 3
 4
 5
 6
 7
 8
 9
10
11
12
13
14
15
16
17
18
package com.example ;
import org.springframework.boot.SpringApplication ;
import org.springframework.boot.autoconfigure.SpringBootApplication ;
import org.springframework.cloud.config.server.EnableConfigServer ;
// 开启 EurekaClient 注解,当前版本如果配置了 Eureka 注册中心,默认会开启该注解
//@EnableEurekaClient
// 配置中心服务端注解
@EnableConfigServer
@SpringBootApplication
public class ConfigServerApplication {
public static void main ( String [] args ) {
SpringApplication . run ( ConfigServerApplication . class , args );
}
}
Spring Cloud Config 客户端
客户端加入 Eureka 以后,就不用直接和配置中心服务端打交道了,而是通过 Eureka 来访问。
依赖
order-service 的 pom.xml。注意是 spring-cloud-starter-config 依赖。
 1
 2
 3
 4
 5
 6
 7
 8
 9
10
11
12
13
14
15
16
17
18
19
20
21
22
23
24
25
26
27
28
29
30
31
32
33
34
35
36
37
38
39
40
41
42
43
44
45
46
47
48
49
50
<?xml version="1.0" encoding="UTF-8"?>
<project xmlns= "http://maven.apache.org/POM/4.0.0" xmlns:xsi= "http://www.w3.org/2001/XMLSchema-instance"
xsi:schemaLocation= "http://maven.apache.org/POM/4.0.0 http://maven.apache.org/xsd/maven-4.0.0.xsd" >
<modelVersion> 4.0.0</modelVersion>
<groupId> com.example</groupId>
<artifactId> order-service</artifactId>
<version> 1.0-SNAPSHOT</version>
<!-- 继承父依赖 -->
<parent>
<groupId> com.example</groupId>
<artifactId> config-demo</artifactId>
<version> 1.0-SNAPSHOT</version>
</parent>
<!-- 项目依赖 -->
<dependencies>
<!-- spring boot web 依赖 -->
<dependency>
<groupId> org.springframework.boot</groupId>
<artifactId> spring-boot-starter-web</artifactId>
</dependency>
<!-- netflix eureka client 依赖 -->
<dependency>
<groupId> org.springframework.cloud</groupId>
<artifactId> spring-cloud-starter-netflix-eureka-client</artifactId>
</dependency>
<!-- spring cloud starter config 依赖 -->
<dependency>
<groupId> org.springframework.cloud</groupId>
<artifactId> spring-cloud-starter-config</artifactId>
</dependency>
<!-- spring boot test 依赖 -->
<dependency>
<groupId> org.springframework.boot</groupId>
<artifactId> spring-boot-starter-test</artifactId>
<scope> test</scope>
<exclusions>
<exclusion>
<groupId> org.junit.vintage</groupId>
<artifactId> junit-vintage-engine</artifactId>
</exclusion>
</exclusions>
</dependency>
</dependencies>
</project>
配置文件
order-service 的 bootstrap.yml,Eureka 注册中心的配置在远程 Git 仓库的 order-service-dev.yml 中。
1
2
3
4
5
6
7
8
9
spring :
cloud :
config :
name : order-service # 配置文件名称,对应 git 仓库中配置文件前半部分
label : master # git 分支
profile : dev # 指定环境
discovery :
enabled : true # 开启
service-id : config-server # 指定配置中心服务端的 service-id
控制层
添加一个 RestController 用于测试获取配置文件信息。
 1
 2
 3
 4
 5
 6
 7
 8
 9
10
11
12
13
14
15
16
17
18
package com.example.controller ;
import org.springframework.beans.factory.annotation.Value ;
import org.springframework.web.bind.annotation.GetMapping ;
import org.springframework.web.bind.annotation.RestController ;
@RestController
public class ConfigController {
@Value ( "${name}" )
private String name ;
@GetMapping ( "/name" )
public String getName () {
return name ;
}
}
启动类
 1
 2
 3
 4
 5
 6
 7
 8
 9
10
11
12
13
14
15
package com.example ;
import org.springframework.boot.SpringApplication ;
import org.springframework.boot.autoconfigure.SpringBootApplication ;
// 开启 EurekaClient 注解,当前版本如果配置了 Eureka 注册中心,默认会开启该注解
//@EnableEurekaClient
@SpringBootApplication
public class OrderServiceApplication {
public static void main ( String [] args ) {
SpringApplication . run ( OrderServiceApplication . class , args );
}
}
测试
启动注册中心 eureka-server 和 eureka-server02。
启动配置中心服务端 config-server。
启动配置中心客户端 order-service。
当前环境在 Eureka UI 界面中如下:
访问:http://localhost:9090/name 结果如下:
配置中心工作原理
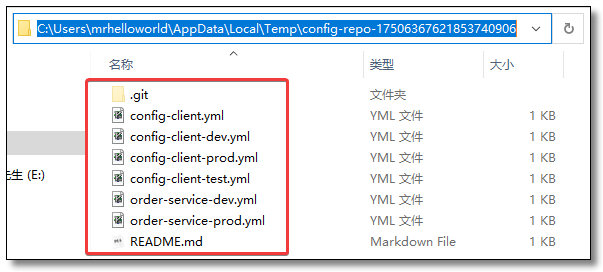
开发人员将配置文件存储至 Git 远程仓库,或后期对 Git 远程仓库的文件进行修改。如果远程仓库发生了版本改变,Config Server 会将 Git 远程仓库中的文件同步至本地仓库中。大家仔细观察 Config Server 的控制台可以看到类似如下信息。
1
[ nio-8888-exec-1] o.s.c.c.s.e.NativeEnvironmentRepository : Adding property source: file:/C:/Users/MRHELL~1/AppData/Local/Temp/config-repo-17506367621853740906/order-service-dev.yml
根据控制台信息打开对应的本地目录,会发现 Git 远程仓库中的文件已同步至本地仓库中。
为什么要这么做呢?因为我们要考虑网络波动的情况下,无法访问远程仓库的问题。
配置中心自动刷新
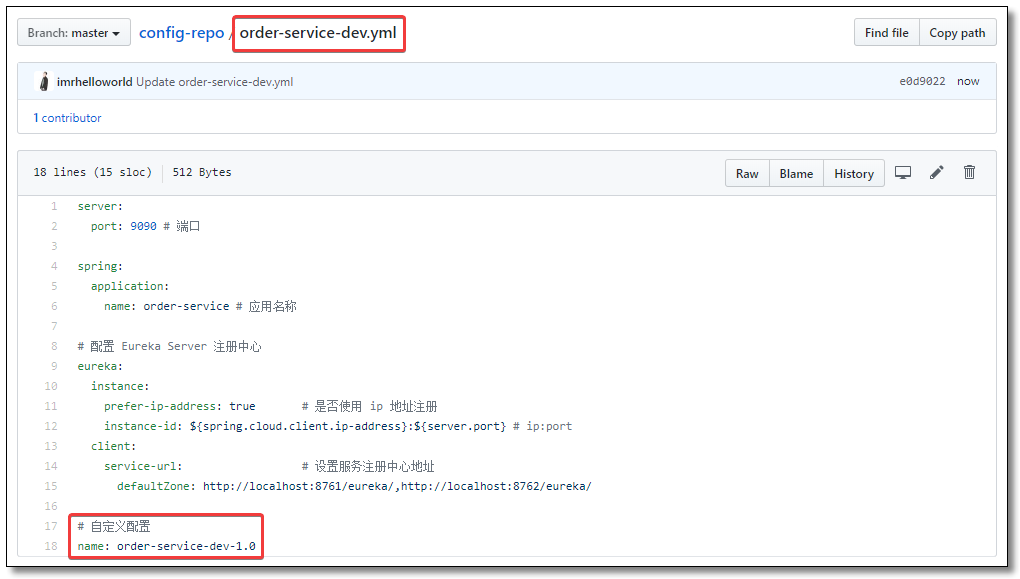
Spring Cloud Config 在项目启动时才会加载配置内容这一机制,导致了它存在一个缺陷,修改配置文件内容后,不会自动刷新。例如我们上面的项目,当服务已经启动的时候,修改 Github 上的配置文件内容,这时候,再次刷新页面,对不起,还是旧的配置内容,新内容不会主动刷新过来。
访问:http://localhost:9090/name 结果如下:
重启 Config Client 以后,访问:http://localhost:9090/name 结果如下:
但是,总不能每次修改了配置后重启服务吧。如果是那样的话,还是不要用它为好,直接用本地配置文件岂不更快。
它提供了一个刷新机制,但是需要我们主动触发。那就是 @RefreshScope 注解并结合 Actuator,注意要引入 spring-boot-starter-actuator。
添加依赖
Config Client 添加 spring-boot-starter-actuator 依赖。
1
2
3
4
5
<!-- spring boot actuator 依赖 -->
<dependency>
<groupId> org.springframework.boot</groupId>
<artifactId> spring-boot-starter-actuator</artifactId>
</dependency>
配置文件
其实这里主要用到的是 refresh 这个端点。以下为 Config Client 的 bootstrap.yml
 1
 2
 3
 4
 5
 6
 7
 8
 9
10
11
12
13
14
15
16
17
18
19
spring :
cloud :
config :
name : order-service # 配置文件名称,对应 git 仓库中配置文件前半部分
uri : http://localhost:8888 # config-server 服务端地址
label : master # git 分支
profile : dev # 指定环境
discovery :
enabled : true # 开启
service-id : config-server # 指定配置中心服务端的 service-id
# 度量指标监控与健康检查
management :
endpoints :
web :
base-path : /actuator # 访问端点根路径,默认为 /actuator
exposure :
include : '*' # 需要开启的端点,这里主要用到的是 refresh 这个端点
#exclude: # 不需要开启的端点
控制层
在需要读取配置的类上增加 @RefreshScope 注解。
 1
 2
 3
 4
 5
 6
 7
 8
 9
10
11
12
13
14
15
16
17
18
19
20
package com.example.controller ;
import org.springframework.beans.factory.annotation.Value ;
import org.springframework.cloud.context.config.annotation.RefreshScope ;
import org.springframework.web.bind.annotation.GetMapping ;
import org.springframework.web.bind.annotation.RestController ;
@RefreshScope
@RestController
public class ConfigController {
@Value ( "${name}" )
private String name ;
@GetMapping ( "/name" )
public String getName () {
return name ;
}
}
测试
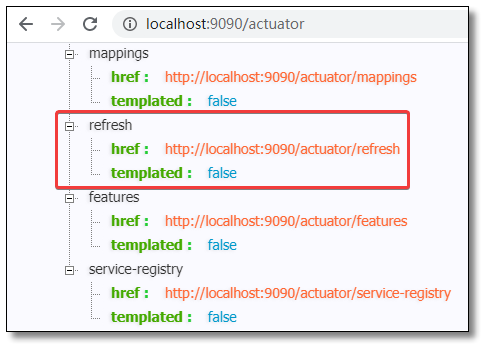
重启 Config Client,访问:http://localhost:9090/actuator 可以看到 refresh 端点已开启。
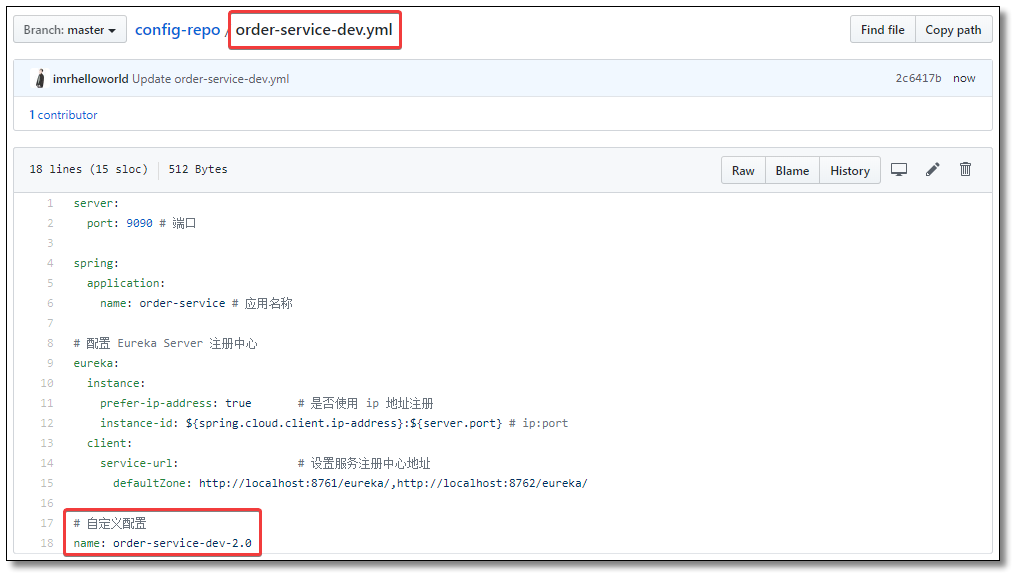
修改 Github 上的配置文件内容并提交,访问:http://localhost:9090/name,没有反应,不慌。
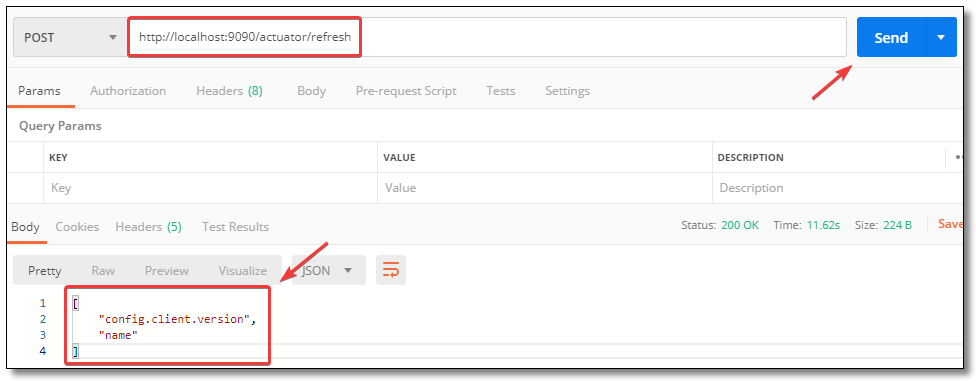
接下来,我们发送 POST 请求到 http://localhost:9090/actuator/refresh 这个接口,用 Postman 之类的工具即可。
再次访问:http://localhost:9090/name 结果如下:
在 Github 中配置 Webhook
这就结束了吗,并没有,总不能每次改了配置后,就用 Postman 访问一下 refresh 接口吧,还是不够方便呀。
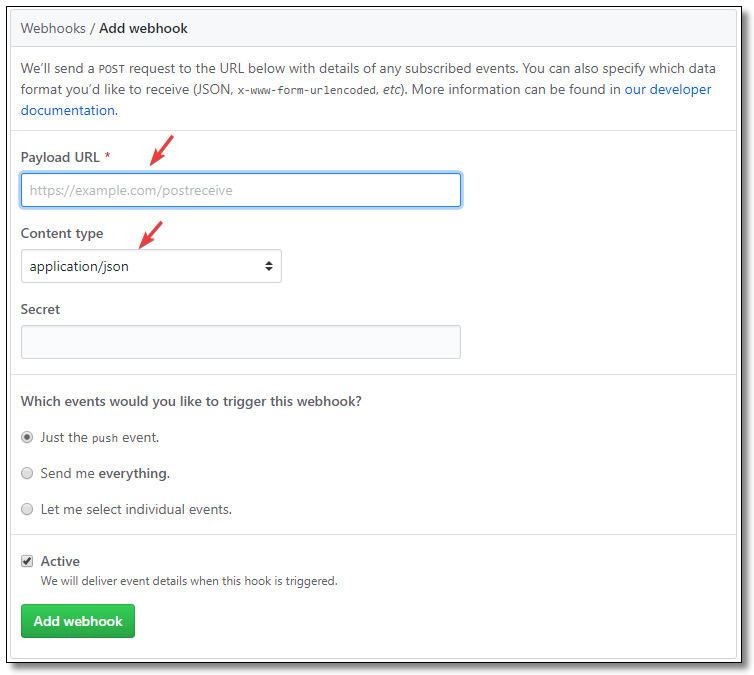
Github 提供了一种 Webhook 的方式,当有代码变更的时候,会调用我们设置的地址,来实现我们想达到的目的。
进入 Github 仓库配置页面,选择 Webhooks ,并点击 Add webhook。
填写回调的地址,也就是上面提到的 actuator/refresh 这个地址,但是必须保证这个地址是可以被 Github 访问的。如果是内网就没办法了。一般公司内的项目都会有自己的代码管理工具,例如自建的 gitlab,gitlab 也有 webhook 的功能,这样就可以调用到内网的地址了。
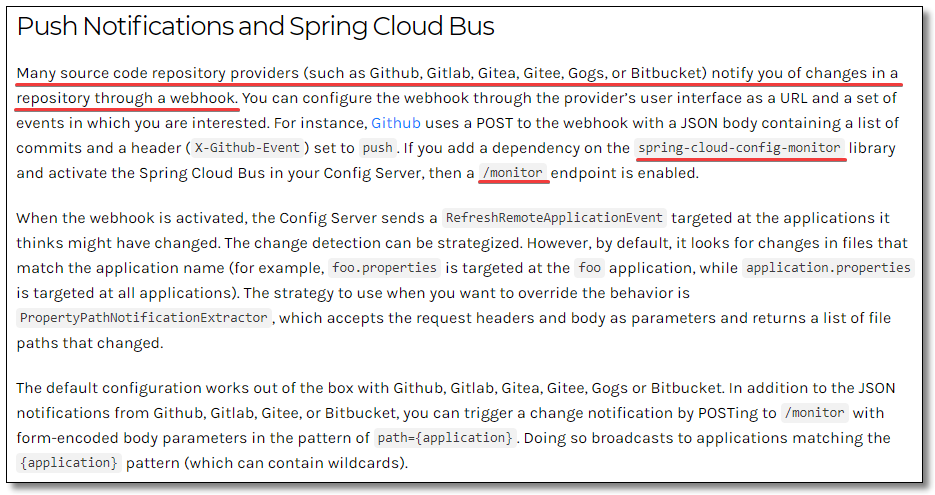
还有一种办法就是使用 spring-cloud-config-monitor,然后调用 /monitor 接口完成动态刷新。
Spring Cloud Bus 自动刷新
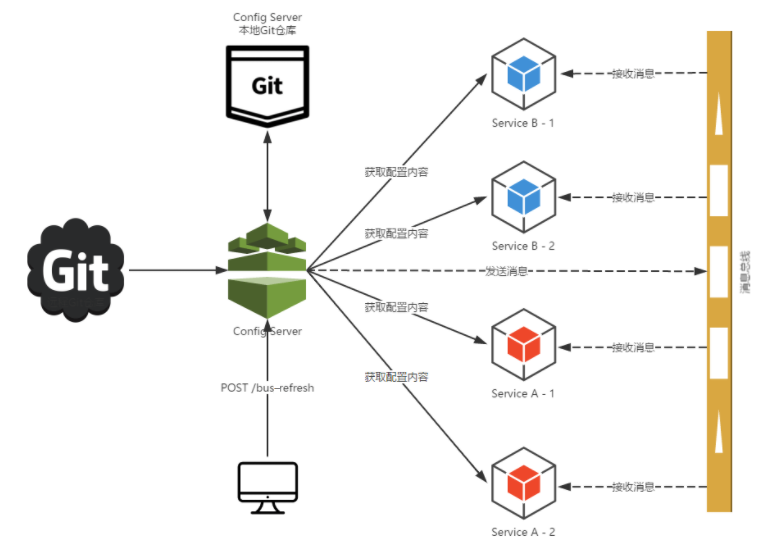
如果只有一个 Config Client 的话,那我们用 Webhook,设置手动刷新都不算太费事,但是如果客户端比较多的情况下,一个一个去手动刷新未免有点复杂。我们可以借助 Spring Cloud Bus 的广播功能,让 Config Client 都订阅配置更新事件,当配置更新时,触发其中一个端的更新事件,Spring Cloud Bus 就把此事件广播到其他订阅客户端,以此来达到批量更新。
为了方便大家学习和整理,这部分的知识我会在微服务系列之 Spring Cloud Bus 中单独给大家讲解。记得关注噢 ~
配置中心加解密
考虑这样一个问题:所有的配置文件都存储在 Git 远程仓库,配置文件中的一些信息又是比较敏感的。所以,我们需要对这些敏感信息进行加密处理。主要的加密方法分为两种:一种是共享密钥加密(对称密钥加密),一种是公开密钥加密(非对称密钥加密)。
对称加解密 Symmetric encryption
对称加密是最快速、最简单的一种加密方式,加密(encryption)与解密(decryption)用的是同样的密钥(secret key)。
检查加密环境
版本问题
访问 Config Server:http://localhost:8888/encrypt/status
检查结果如果是:{"description":"No key was installed for encryption service","status":"NO_KEY"} 说明没有为加密服务安装密钥,也说明你使用的是较低的 JDK 版本。
比较简单的解决办法:更换高版本 JDK,比如使用最新版的 LTS 版本 JDK-11.0.6。
复杂的解决办法:从 Oracle 官网下载对应 JCE,下载链接:https://www.oracle.com/java/technologies/javase-jce-all-downloads.html
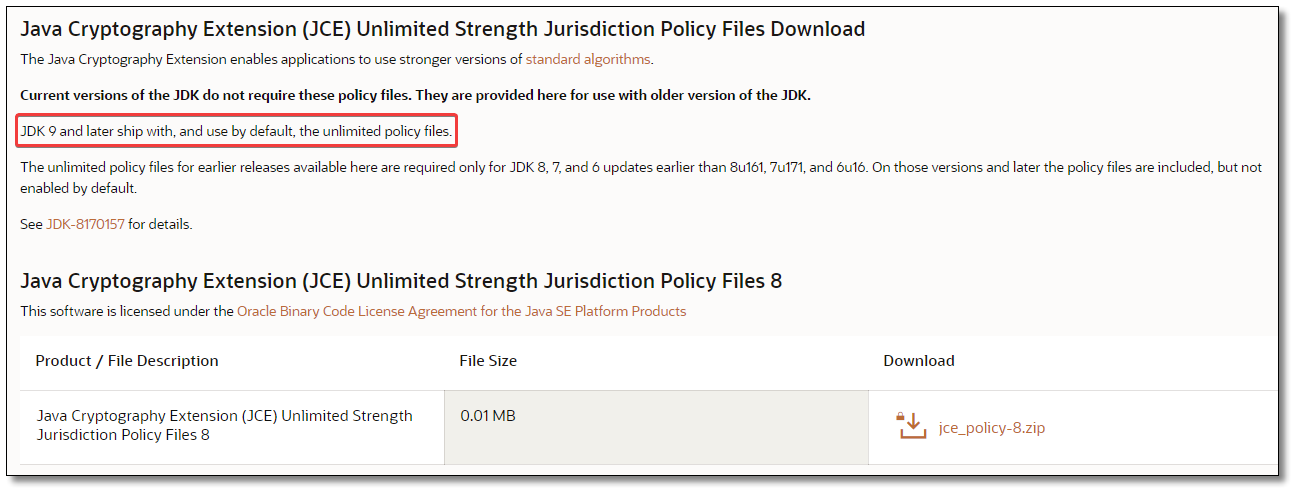
下图红色框中内容已经足够说明原因:JDK 9 以及更高版本已附带策略文件,并在默认情况下启用。
如果你的当前环境必须使用低版本 JDK,那么请下载对应 JCE 压缩包,下载解压后把 local_policy.jar 和 US_export_policy.jar 文件安装到需要安装 JCE 机器上的 JDK 或 JRE 的 security 目录下即可。
配置问题
检查结果如果是:{"description":"The encryption algorithm is not strong enough","status":"INVALID"} 说明服务端未配置加密。
Config Server 创建配置文件,注意必须叫 bootstrap.yml,配置密钥信息即可。
1
2
3
# 密钥
encrypt :
key : example
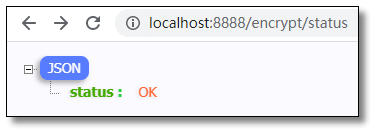
重启 Config Server 访问:http://localhost:8888/encrypt/status 结果如下:
加解密演示
配置中心服务端
使用 curl 命令访问 /encrypt 端点对属性值 root 进行加密。反向操作 /decrypt 可解密。
1
curl http://localhost:8888/encrypt -d root
加密结果:bfb5cf8d7cab63e4b770b76d4e96c3a57d40f7c9df13612cb3134e2f7ed26123
解密
Git 仓库
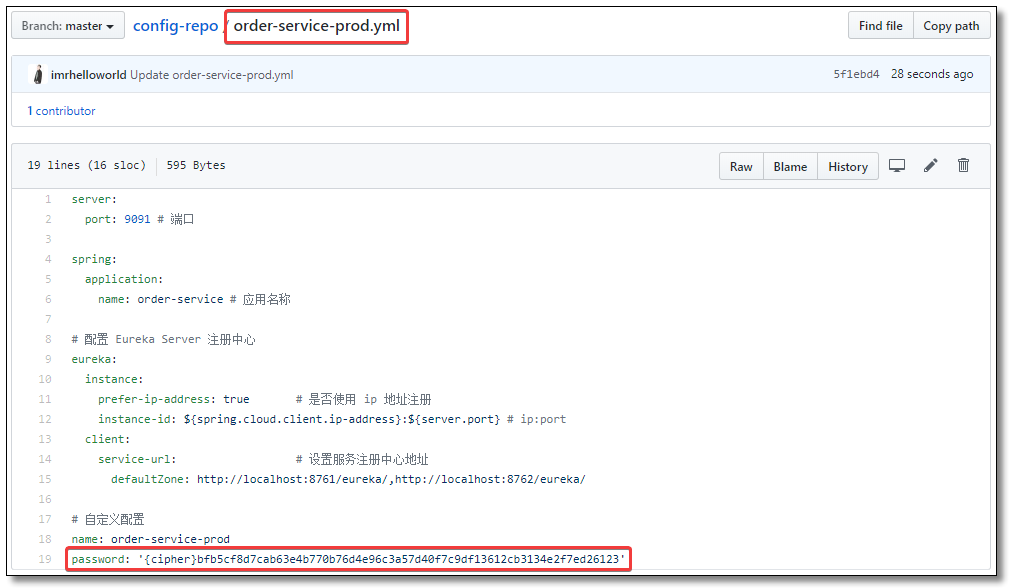
把加密后的数据更新到 Git 远程仓库的配置文件中。值得注意的是需要在加密结果前添加 {cipher} 串,如果远程属性源包含加密的内容(以开头的值{cipher}),则将其解密,然后再通过HTTP发送给客户端。
配置中心客户端
Config Client 控制层添加获取配置信息代码。
 1
 2
 3
 4
 5
 6
 7
 8
 9
10
11
12
13
14
15
16
17
18
19
20
21
22
23
24
25
26
27
28
package com.example.controller ;
import org.springframework.beans.factory.annotation.Value ;
import org.springframework.cloud.context.config.annotation.RefreshScope ;
import org.springframework.web.bind.annotation.GetMapping ;
import org.springframework.web.bind.annotation.RestController ;
@RefreshScope
@RestController
public class ConfigController {
@Value ( "${name}" )
private String name ;
@Value ( "${password}" )
private String password ;
@GetMapping ( "/name" )
public String getName () {
return name ;
}
@GetMapping ( "/password" )
public String getPassword () {
return password ;
}
}
修改 Config Client 配置文件,重启测试。
 1
 2
 3
 4
 5
 6
 7
 8
 9
10
11
12
13
14
15
16
17
18
spring :
cloud :
config :
name : order-service # 配置文件名称,对应 git 仓库中配置文件前半部分
label : master # git 分支
profile : prod # 指定环境
discovery :
enabled : true # 开启
service-id : config-server # 指定配置中心服务端的 service-id
# 度量指标监控与健康检查
management :
endpoints :
web :
base-path : /actuator # 访问端点根路径,默认为 /actuator
exposure :
include : '*' # 需要开启的端点,这里主要用到的是 refresh 这个端点
#exclude: # 不需要开启的端点
访问:http://localhost:9091/password 返回解密后的结果。
非对称加解密 Asymmetric encryption
对称加密和非对称加密的区别
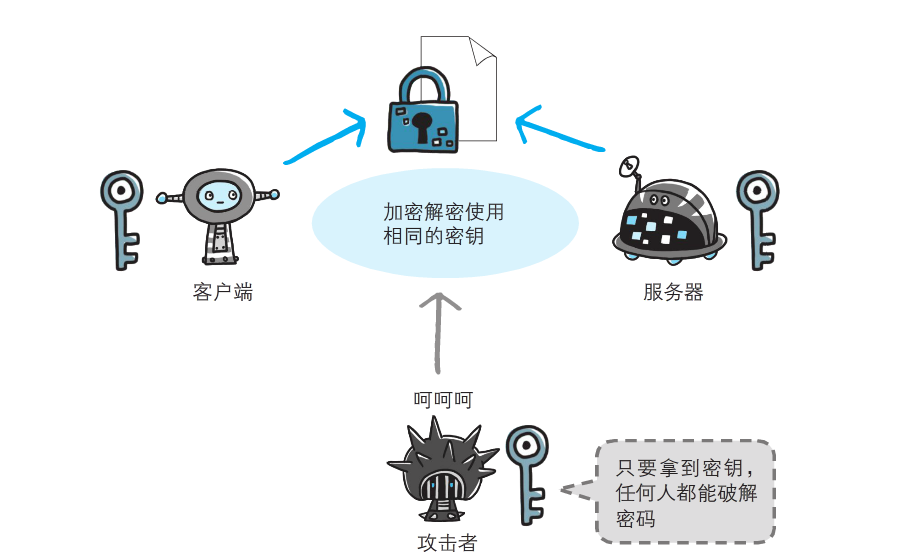
对称加密算法在加密和解密时使用的是同一个密钥。只要拿到密钥,任何人都能破解。
非对称加密算法需要两个密钥来进行加密和解密,这两个密钥分别是公开密钥(public key 简称公钥)和私有密钥(private key 简称私钥)。在传输过程中,即使攻击者截获了传输的密文,并得到了公钥,也无法破解密文,因为使用专用密钥才能破解密文。
图片取自图解HTTP一书。
Keytool 用来管理私钥仓库(keystore)和与之相关的X.509证书链(用以验证与私钥对应的公钥),也可以用来管理其他信任实体。
默认大家都配置了 Java 的环境变量,打开 CMD 窗口运行以下命令。
1
2
# 生成名为 config.keystore 的 keystore 文件,别名为 config,加密算法类型使用 RSA,密钥库口令和密钥口令均为:config
keytool -genkeypair -keystore config.keystore -alias config -keyalg RSA -keypass config -storepass config
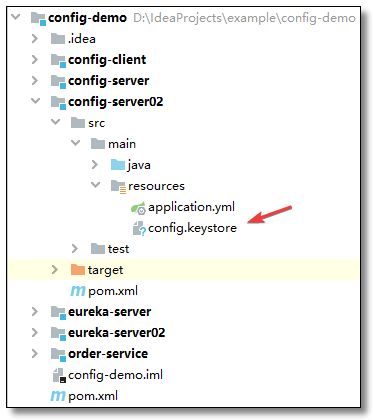
此时在我的 D 盘下会生成一个 config.keystore 文件。
加解密演示
配置中心服务端
将 config.keystore 文件添加至 Config Server 项目 resources 目录中。
创建 bootstrap.yml 添加非对称加解密配置。注意:值要跟 CMD 里输入的值对应不然会出错。
1
2
3
4
5
6
7
# 非对称加解密
encrypt :
key-store :
location : classpath:config.keystore # keystore 文件存储路径
alias : config # 密钥对别名
password : config # storepass 密钥仓库
secret : config # keypass 用来保护所生成密钥对中的私钥
pom.xml 添加避免 maven 过滤文件的配置。
 1
 2
 3
 4
 5
 6
 7
 8
 9
10
11
12
13
14
15
16
17
18
19
<!-- build标签 常用于添加插件及编译配置 -->
<build>
<!-- 读取配置文件 -->
<resources>
<resource>
<directory> src/main/resources</directory>
</resource>
<resource>
<directory> src/main/java</directory>
<includes>
<include> **/*.xml</include>
<include> **/*.properties</include>
<include> **/*.tld</include>
<include> **/*.keystore</include>
</includes>
<filtering> false</filtering>
</resource>
</resources>
</build>
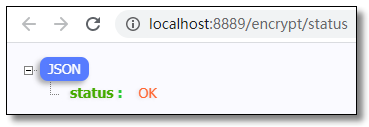
检查加密环境,访问:http://localhost:8889/encrypt/status 结果如下:
使用 curl 命令访问 /encrypt 端点对属性值 root 进行加密。反向操作 /decrypt 可解密。
1
curl http://localhost:8889/encrypt -d root
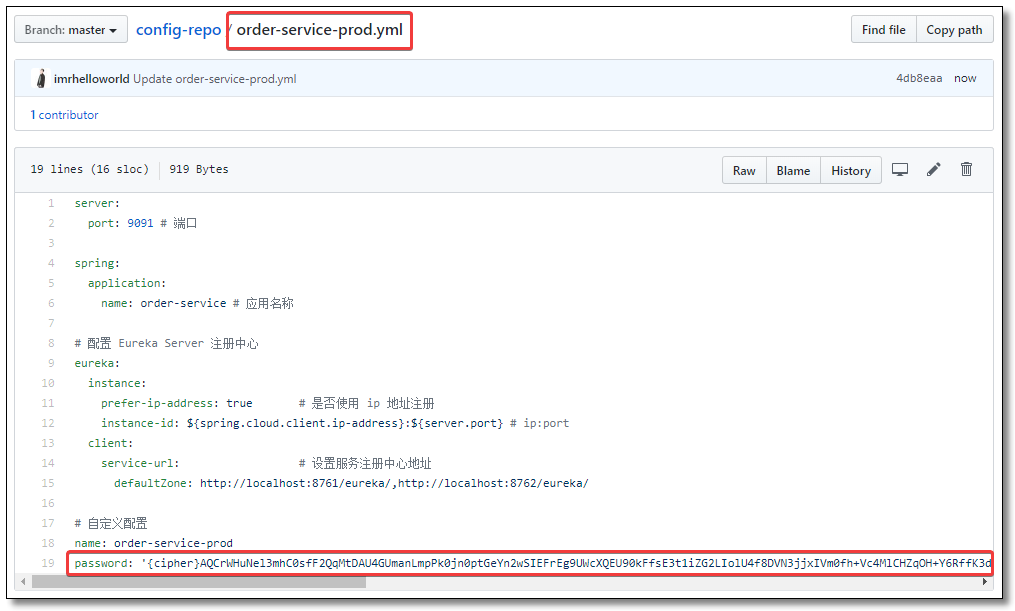
加密结果:AQCrWHuNel3mhC0sfF2QqMtDAU4GUmanLmpPk0jn0ptGeYn2wSIEFrEg9UWcXQEU90kFfsE3t1iZG2LIolU4f8DVN3jjxIVm0fh+Vc4MlCHZqOH+Y6RffK3dS09ixmOpMK5otdMrfC/IR0od6xXJshcu5rwFBR7PN5CW+Gb97Tcjw+ooy51pLBCtVo9Xqu9qNrYdiYMnq7vb++PaGpZZcLhIht1YjIrlcDepW9N9Wlhy9Vg1CDI0mWM07nVbEh5yEmCyIiTuA41baRsQrcR4TLOtF3kSRUPi/ysTO/NEJ1lpO/VcuQri/YQOZ20WYNr5MnBrAfjdXPg6uonGyIAF8dIpVEdWut8BWl3Dp+qeoLv8HHV0R7njABvoCZK8ZhFzIC0=
解密
Git 仓库
把加密后的数据更新到 Git 远程仓库的配置文件中。值得注意的是需要在加密结果前添加 {cipher} 串,如果远程属性源包含加密的内容(以开头的值{cipher}),则将其解密,然后再通过HTTP发送给客户端。
配置中心客户端
Config Client 配置文件如下。
 1
 2
 3
 4
 5
 6
 7
 8
 9
10
11
12
13
14
15
16
17
18
spring :
cloud :
config :
name : order-service # 配置文件名称,对应 git 仓库中配置文件前半部分
label : master # git 分支
profile : prod # 指定环境
discovery :
enabled : true # 开启
service-id : config-server # 指定配置中心服务端的 service-id
# 度量指标监控与健康检查
management :
endpoints :
web :
base-path : /actuator # 访问端点根路径,默认为 /actuator
exposure :
include : '*' # 需要开启的端点,这里主要用到的是 refresh 这个端点
#exclude: # 不需要开启的端点
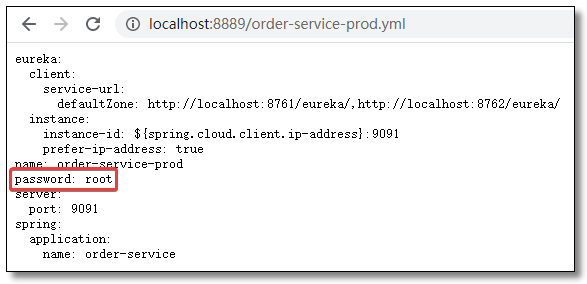
访问:http://localhost:9091/password 返回解密后的结果。
配置中心用户安全认证
折腾了大半天终于给大家把加解密讲完了,但是如果你够仔细,你会发现此时的 Config Server 谁都可以访问,而且直接通过 Config Server 访问配置文件信息,加密的内容就会解密后直接显示在浏览器中,这岂不是又白折腾了?当然不是,我们只需要添加用户安全认证即可。
添加依赖
Config Server 添加 security 依赖。
1
2
3
4
5
<!-- spring boot security 依赖 -->
<dependency>
<groupId> org.springframework.boot</groupId>
<artifactId> spring-boot-starter-security</artifactId>
</dependency>
配置文件
Config Server 的 application.yml 添加安全认证配置。
1
2
3
4
5
6
spring :
# 安全认证
security :
user :
name : user
password : 123456
Config Client 的 bootstrap.yml 添加安全认证配置。
1
2
3
4
5
6
spring :
cloud :
config :
# 安全认证
username : user
password : 123456
测试
服务端
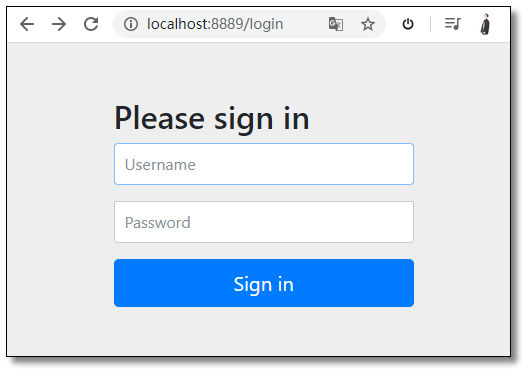
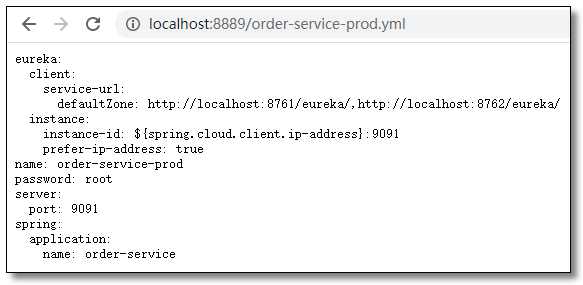
Config Server 访问:http://localhost:8889/order-service-prod.yml 被重定向至登录页。
输入用户名和密码后,结果如下:
客户端
Config Client 访问:http://localhost:9091/password 结果如下:
至此 Config 配置中心所有的知识点就讲解结束了。
本文采用 知识共享「署名-非商业性使用-禁止演绎 4.0 国际」许可协议
大家可以通过 分类Spring Cloud
🤗 您的点赞和转发是对我最大的鼓励和支持。
📢 扫码关注 哈喽沃德先生「文档 + 视频」每篇文章都配有专门视频讲解,学习更轻松噢 ~

