使用 Docker 搭建 Redis Cluster,最重要的环节就是容器通信的问题,这一块我们在之前的文章中已经给大家解决了《Docker 网络模式详解及容器间网络通信 》,本篇文章主要练习使用多个容器完成 Redis Cluster 集群环境的搭建,顺便为学习 Docker Compose 铺铺路。俗话说没有对比就没有伤害,通过对比才能感受到 Docker Compose 的好处 😄。
关于 Redis Cluster 集群更多的内容请阅读《最通俗易懂的 Redis 架构模式详解 》。
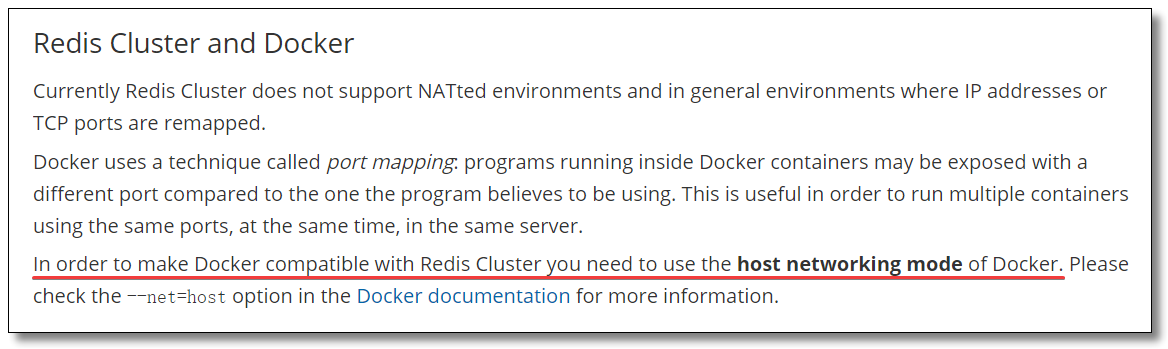
按照 Redis 官网:https://redis.io/topics/cluster-tutorial 的提示,为了使 Docker 与 Redis Cluster 兼容,您需要使用 Docker 的 host 网络模式。
host 网络模式需要在创建容器时通过参数 --net host 或者 --network host 指定,host 网络模式可以让容器共享宿主机网络栈 ,容器将不会虚拟出自己的网卡,配置自己的 IP 等,而是使用宿主机的 IP 和端口。
环境
为了让环境更加真实,本文使用多机 环境:
192.168.10.10192.168.10.11
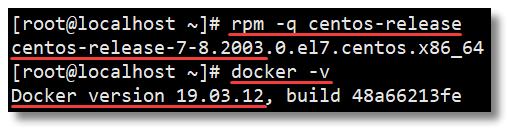
每台机器所使用的基础设施环境如下:
CentOS 7.8.2003Docker version 19.03.12
搭建
整体搭建步骤主要分为以下几步:
下载 Redis 镜像(其实这步可以省略,因为创建容器时,如果本地镜像不存在,就会去远程拉取);
编写 Redis 配置文件;
创建 Redis 容器;
创建 Redis Cluster 集群。
编写 Redis 配置文件
创建目录及文件
分别在 192.168.10.10 和 192.168.10.11 两台机器上执行以下操作。
1
2
3
4
5
6
# 创建目录
mkdir -p /usr/local/docker-redis/redis-cluster
# 切换至指定目录
cd /usr/local/docker-redis/redis-cluster/
# 编写 redis-cluster.tmpl 文件
vi redis-cluster.tmpl
编写配置文件
192.168.10.10 机器的 redis-cluster.tmpl 文件内容如下:
 1
 2
 3
 4
 5
 6
 7
 8
 9
10
11
12
port ${ PORT }
requirepass 1234
masterauth 1234
protected-mode no
daemonize no
appendonly yes
cluster-enabled yes
cluster-config-file nodes.conf
cluster-node-timeout 15000
cluster-announce-ip 192.168.10.10
cluster-announce-port ${ PORT }
cluster-announce-bus-port 1 ${ PORT }
192.168.10.11 机器的 redis-cluster.tmpl 文件内容如下:
 1
 2
 3
 4
 5
 6
 7
 8
 9
10
11
12
port ${ PORT }
requirepass 1234
masterauth 1234
protected-mode no
daemonize no
appendonly yes
cluster-enabled yes
cluster-config-file nodes.conf
cluster-node-timeout 15000
cluster-announce-ip 192.168.10.11
cluster-announce-port ${ PORT }
cluster-announce-bus-port 1 ${ PORT }
port:节点端口;requirepass:添加访问认证;masterauth:如果主节点开启了访问认证,从节点访问主节点需要认证;protected-mode:保护模式,默认值 yes,即开启。开启保护模式以后,需配置 bind ip 或者设置访问密码;关闭保护模式,外部网络可以直接访问;daemonize:是否以守护线程的方式启动(后台启动),默认 no;appendonly:是否开启 AOF 持久化模式,默认 no;cluster-enabled:是否开启集群模式,默认 no;cluster-config-file:集群节点信息文件;cluster-node-timeout:集群节点连接超时时间;cluster-announce-ip:集群节点 IP,填写宿主机的 IP;cluster-announce-port:集群节点映射端口;cluster-announce-bus-port:集群节点总线端口。
每个 Redis 集群节点都需要打开两个 TCP 连接 。一个用于为客户端提供服务的正常 Redis TCP 端口,例如 6379。还有一个基于 6379 端口加 10000 的端口,比如 16379。
第二个端口用于集群总线,这是一个使用二进制协议的节点到节点通信通道。节点使用集群总线进行故障检测、配置更新、故障转移授权等等。客户端永远不要尝试与集群总线端口通信,与正常的 Redis 命令端口通信即可,但是请确保防火墙中的这两个端口都已经打开,否则 Redis 集群节点将无法通信。
在 192.168.10.10 机器的 redis-cluster 目录下执行以下命令:
1
2
3
4
5
for port in ` seq 6371 6373` ; do \
${ port } /conf \
&& PORT = ${ port } envsubst < redis-cluster.tmpl > ${ port } /conf/redis.conf \
&& mkdir -p ${ port } /data; \
done
在 192.168.10.11 机器的 redis-cluster 目录下执行以下命令:
1
2
3
4
5
for port in ` seq 6374 6376` ; do \
${ port } /conf \
&& PORT = ${ port } envsubst < redis-cluster.tmpl > ${ port } /conf/redis.conf \
&& mkdir -p ${ port } /data; \
done
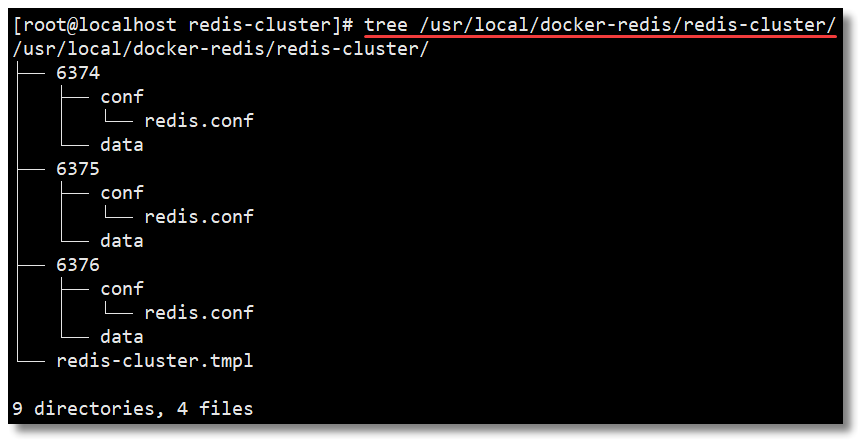
上面两段 shell for 语句,意思就是循环创建 6371 ~ 6376 相关的目录及文件。
在 192.168.10.10 机器执行查看命令结果如下,如果没有 tree 命令先安装 yum install -y tree。
在 192.168.10.11 机器执行查看命令结果如下。
以下内容为每个节点的配置文件详细信息。
 1
 2
 3
 4
 5
 6
 7
 8
 9
10
11
12
13
14
15
16
17
18
19
20
21
22
23
24
25
26
27
28
29
30
31
32
33
34
35
36
37
38
39
40
41
42
43
44
45
46
47
48
49
50
51
52
53
54
55
56
57
58
59
60
61
62
63
64
65
66
67
68
69
70
71
72
73
74
75
76
77
78
79
80
81
82
83
============================== 192.168.10.10 ==============================
[ root@localhost redis-cluster] # cat /usr/local/docker-redis/redis-cluster/637{1..3}/conf/redis.conf
port 6371
requirepass 1234
masterauth 1234
protected-mode no
daemonize no
appendonly yes
cluster-enabled yes
cluster-config-file nodes.conf
cluster-node-timeout 15000
cluster-announce-ip 192.168.10.10
cluster-announce-port 6371
cluster-announce-bus-port 16371
port 6372
requirepass 1234
masterauth 1234
protected-mode no
daemonize no
appendonly yes
cluster-enabled yes
cluster-config-file nodes.conf
cluster-node-timeout 15000
cluster-announce-ip 192.168.10.10
cluster-announce-port 6372
cluster-announce-bus-port 16372
port 6373
requirepass 1234
masterauth 1234
protected-mode no
daemonize no
appendonly yes
cluster-enabled yes
cluster-config-file nodes.conf
cluster-node-timeout 15000
cluster-announce-ip 192.168.10.10
cluster-announce-port 6373
cluster-announce-bus-port 16373
============================== 192.168.10.10 ==============================
============================== 192.168.10.11 ==============================
[ root@localhost redis-cluster] # cat /usr/local/docker-redis/redis-cluster/637{4..6}/conf/redis.conf
port 6374
requirepass 1234
masterauth 1234
protected-mode no
daemonize no
appendonly yes
cluster-enabled yes
cluster-config-file nodes.conf
cluster-node-timeout 15000
cluster-announce-ip 192.168.10.11
cluster-announce-port 6374
cluster-announce-bus-port 16374
port 6375
requirepass 1234
masterauth 1234
protected-mode no
daemonize no
appendonly yes
cluster-enabled yes
cluster-config-file nodes.conf
cluster-node-timeout 15000
cluster-announce-ip 192.168.10.11
cluster-announce-port 6375
cluster-announce-bus-port 16375
port 6376
requirepass 1234
masterauth 1234
protected-mode no
daemonize no
appendonly yes
cluster-enabled yes
cluster-config-file nodes.conf
cluster-node-timeout 15000
cluster-announce-ip 192.168.10.11
cluster-announce-port 6376
cluster-announce-bus-port 16376
============================== 192.168.10.11 ==============================
创建 Redis 容器
创建容器
将宿主机的 6371 ~ 6376 之间的端口与 6 个 Redis 容器映射,并将宿主机的目录与容器内的目录进行映射(目录挂载)。记得指定网络模式,使用 host 网络模式。
在 192.168.10.10 机器执行以下命令:
1
2
3
4
5
6
for port in $( seq 6371 6373) ; do \
${ port } --net host \
${ port } /conf/redis.conf:/usr/local/etc/redis/redis.conf \
${ port } /data:/data \
; \
done
在 192.168.10.11 机器执行以下命令:
1
2
3
4
5
6
for port in $( seq 6374 6376) ; do \
${ port } --net host \
${ port } /conf/redis.conf:/usr/local/etc/redis/redis.conf \
${ port } /data:/data \
; \
done
在 192.168.10.10 机器执行 docker ps -n 3 查看容器是否创建成功。
在 192.168.10.11 机器执行 docker ps -n 3 查看容器是否创建成功。
创建 Redis Cluster 集群
随便进入一个容器节点,并进入 /usr/local/bin/ 目录:
1
2
3
4
# 进入容器
docker exec -it redis-6371 bash
# 切换至指定目录
cd /usr/local/bin/
接下来我们就可以通过以下命令实现 Redis Cluster 集群的创建。
1
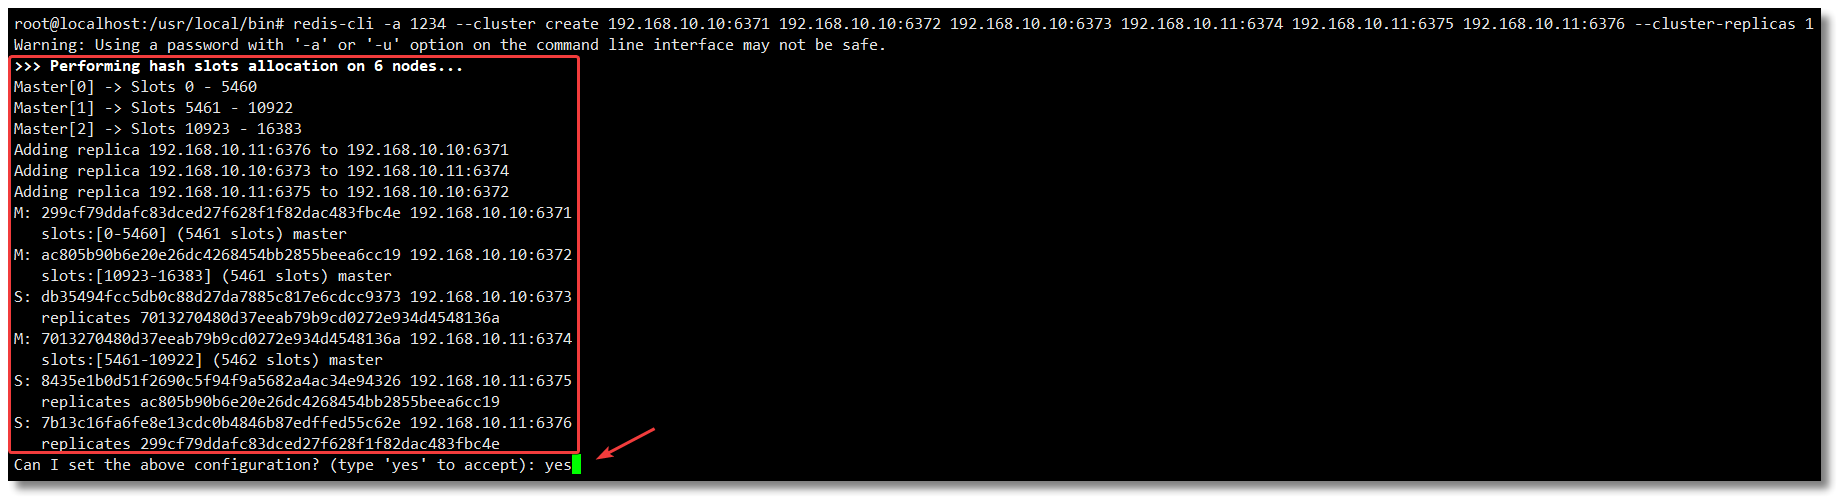
redis-cli -a 1234 --cluster create 192.168.10.10:6371 192.168.10.10:6372 192.168.10.10:6373 192.168.10.11:6374 192.168.10.11:6375 192.168.10.11:6376 --cluster-replicas 1
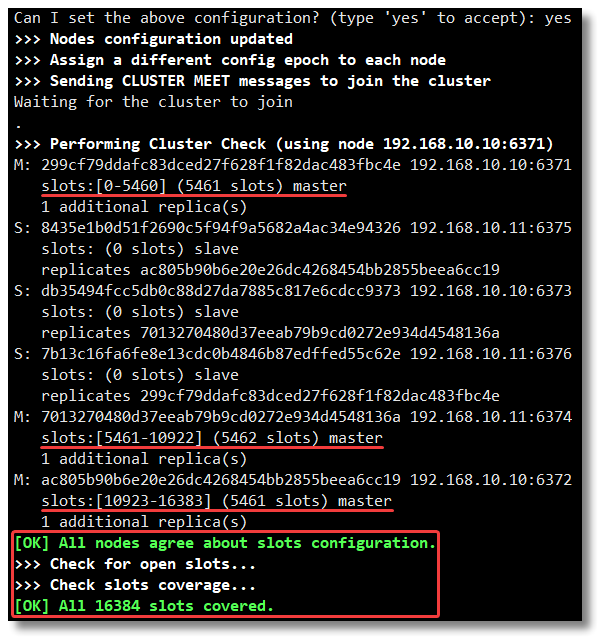
出现选择提示信息,输入 yes ,结果如下所示:
集群创建成功如下:
以下内容是创建集群时返回的详细信息,也就是上两幅图中的所有内容。
 1
 2
 3
 4
 5
 6
 7
 8
 9
10
11
12
13
14
15
16
17
18
19
20
21
22
23
24
25
26
27
28
29
30
31
32
33
34
35
36
37
38
39
40
41
42
43
44
45
46
47
48
49
50
root@localhost:/usr/local/bin# redis-cli -a 1234 --cluster create 192.168.10.10:6371 192.168.10.10:6372 192.168.10.10:6373 192.168.10.11:6374 192.168.10.11:6375 192.168.10.11:6376 --cluster-replicas 1
Warning: Using a password with '-a' or '-u' option on the command line interface may not be safe.
>>> Performing hash slots allocation on 6 nodes...
Master[ 0] -> Slots 0 - 5460
Master[ 1] -> Slots 5461 - 10922
Master[ 2] -> Slots 10923 - 16383
Adding replica 192.168.10.11:6376 to 192.168.10.10:6371
Adding replica 192.168.10.10:6373 to 192.168.10.11:6374
Adding replica 192.168.10.11:6375 to 192.168.10.10:6372
M: 299cf79ddafc83dced27f628f1f82dac483fbc4e 192.168.10.10:6371
slots:[ 0-5460] ( 5461 slots) master
M: ac805b90b6e20e26dc4268454bb2855beea6cc19 192.168.10.10:6372
slots:[ 10923-16383] ( 5461 slots) master
S: db35494fcc5db0c88d27da7885c817e6cdcc9373 192.168.10.10:6373
replicates 7013270480d37eeab79b9cd0272e934d4548136a
M: 7013270480d37eeab79b9cd0272e934d4548136a 192.168.10.11:6374
slots:[ 5461-10922] ( 5462 slots) master
S: 8435e1b0d51f2690c5f94f9a5682a4ac34e94326 192.168.10.11:6375
replicates ac805b90b6e20e26dc4268454bb2855beea6cc19
S: 7b13c16fa6fe8e13cdc0b4846b87edffed55c62e 192.168.10.11:6376
replicates 299cf79ddafc83dced27f628f1f82dac483fbc4e
Can I set the above configuration? ( type 'yes' to accept) : yes
>>> Nodes configuration updated
>>> Assign a different config epoch to each node
>>> Sending CLUSTER MEET messages to join the cluster
Waiting for the cluster to join
.
>>> Performing Cluster Check ( using node 192.168.10.10:6371)
M: 299cf79ddafc83dced27f628f1f82dac483fbc4e 192.168.10.10:6371
slots:[ 0-5460] ( 5461 slots) master
1 additional replica( s)
S: 8435e1b0d51f2690c5f94f9a5682a4ac34e94326 192.168.10.11:6375
slots: ( 0 slots) slave
replicates ac805b90b6e20e26dc4268454bb2855beea6cc19
S: db35494fcc5db0c88d27da7885c817e6cdcc9373 192.168.10.10:6373
slots: ( 0 slots) slave
replicates 7013270480d37eeab79b9cd0272e934d4548136a
S: 7b13c16fa6fe8e13cdc0b4846b87edffed55c62e 192.168.10.11:6376
slots: ( 0 slots) slave
replicates 299cf79ddafc83dced27f628f1f82dac483fbc4e
M: 7013270480d37eeab79b9cd0272e934d4548136a 192.168.10.11:6374
slots:[ 5461-10922] ( 5462 slots) master
1 additional replica( s)
M: ac805b90b6e20e26dc4268454bb2855beea6cc19 192.168.10.10:6372
slots:[ 10923-16383] ( 5461 slots) master
1 additional replica( s)
[ OK] All nodes agree about slots configuration.
>>> Check for open slots...
>>> Check slots coverage...
[ OK] All 16384 slots covered.
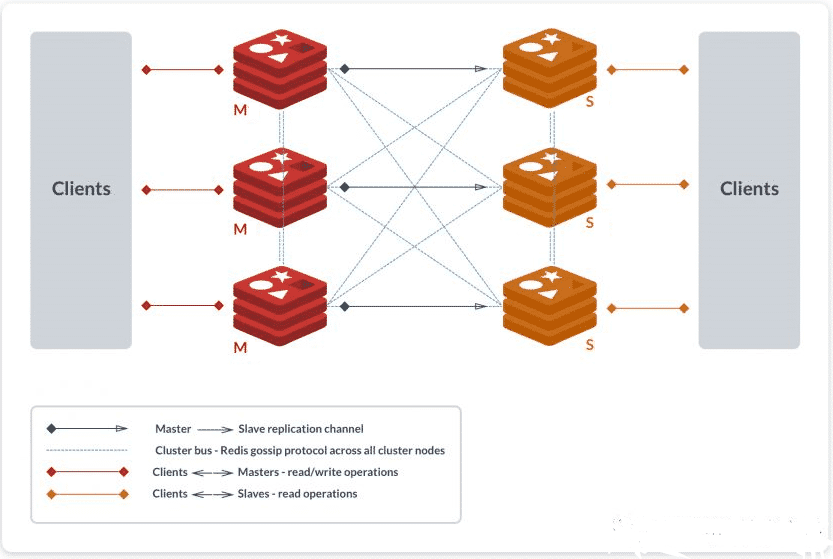
至此一个高可用的 Redis Cluster 集群搭建完成,如下图所示,该集群中包含 6 个 Redis 节点,3 主 3 从。三个主节点会分配槽,处理客户端的命令请求,而从节点可用在主节点故障后,顶替主节点。
查看集群状态
我们先进入容器,然后通过一些集群常用的命令查看一下集群的状态。
1
2
3
4
# 进入容器
docker exec -it redis-6371 bash
# 切换至指定目录
cd /usr/local/bin/
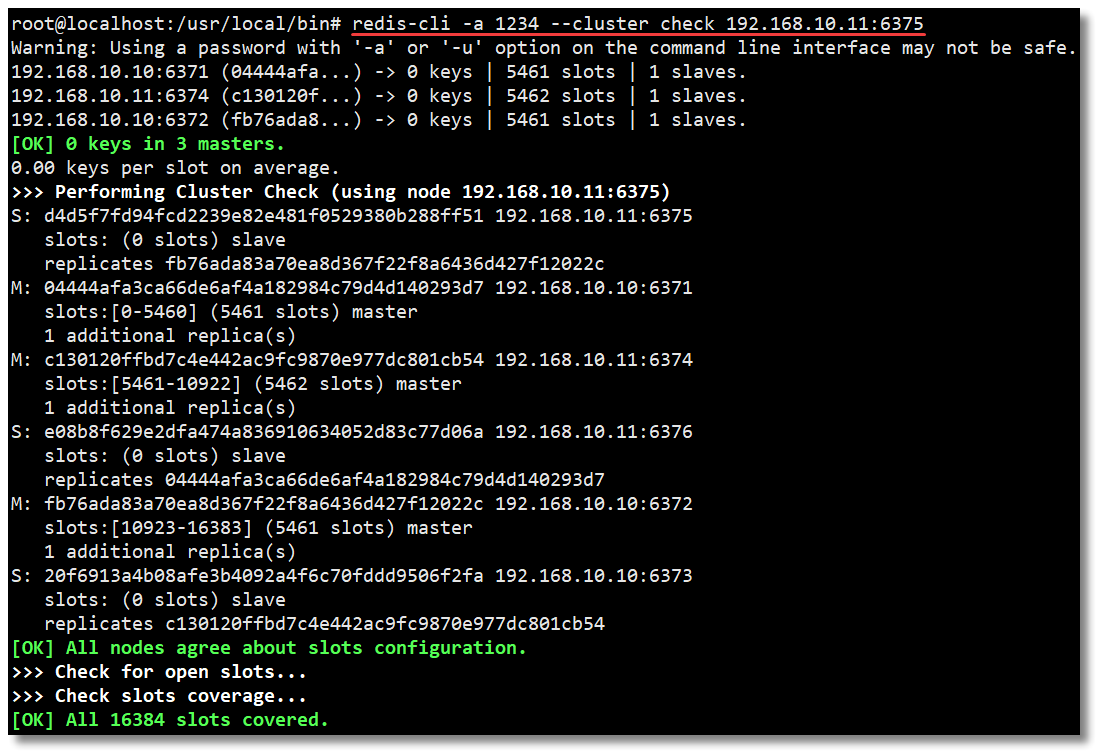
检查集群状态
1
redis-cli -a 1234 --cluster check 192.168.10.11:6375
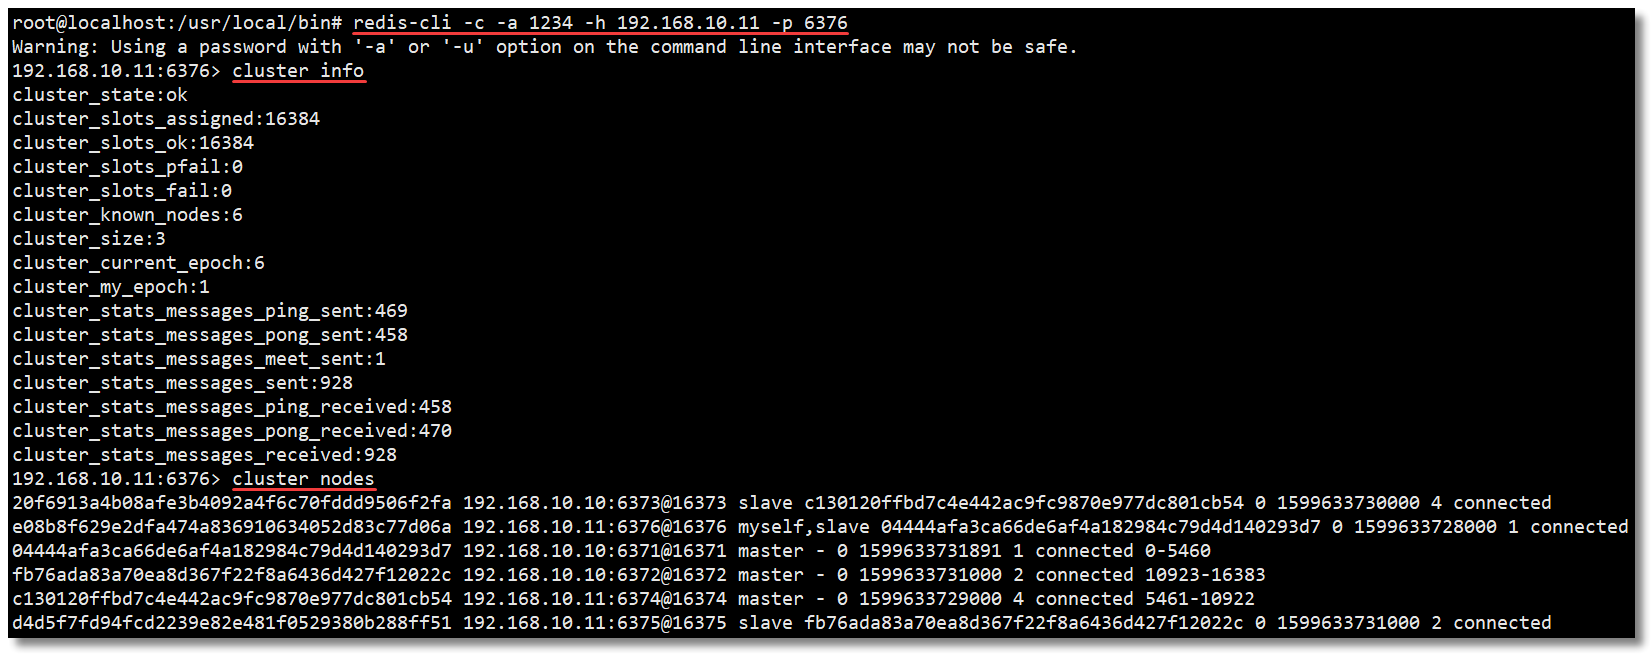
查看集群信息和节点信息
1
2
3
4
5
6
# 连接至集群某个节点
redis-cli -c -a 1234 -h 192.168.10.11 -p 6376
# 查看集群信息
cluster info
# 查看集群结点信息
cluster nodes
SET/GET
在 6371 节点中执行写入和读取,命令如下:
 1
 2
 3
 4
 5
 6
 7
 8
 9
10
# 进入容器并连接至集群某个节点
docker exec -it redis-6371 /usr/local/bin/redis-cli -c -a 1234 -h 192.168.10.10 -p 6371
# 写入数据
set name mrhelloworld
set aaa 111
set bbb 222
# 读取数据
get name
get aaa
get bbb
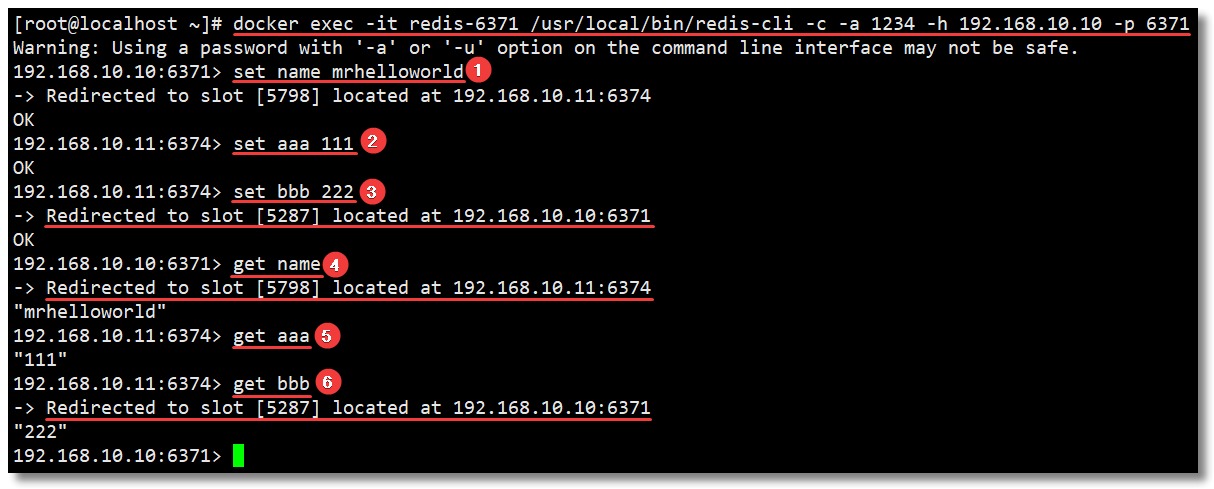
别着急,让我来解释一下上图中的操作过程:
首先进入容器并连接至集群某个节点;
然后执行第一个 set 命令 set name mrhelloworld,name 键根据哈希函数运算以后得到的值为 [5798]。当前集群环境的槽分配情况为:[0-5460] 6371节点,[5461-10922] 6374节点,[10923-16383] 6372节点,所以该键的存储就被分配到了 6374 节点上;
再来看第二个 set 命令 set aaa,这里大家可能会有一些疑问,为什么看不到 aaa 键根据哈希函数运算以后得到的值?因为刚才重定向至 6374 节点插入了数据,此时如果还有数据插入,正好键根据哈希函数运算以后得到的值也还在该节点的范围内,那么直接插入数据即可;
接着是第三个 set 命令 set bbb,bbb 键根据哈希函数运算以后得到的值为 [5287],所以该键的存储就被分配到了 6371 节点上;
然后是读取操作,第四个 命令 get name,name 键根据哈希函数运算以后得到的值为 [5798],被重定向至 6374 节点读取;
第五个 命令 get aaa,aaa 键根据哈希函数运算以后得到的值也在 6374 节点,直接读取;第六个 命令 get bbb,bbb 键根据哈希函数运算以后得到的值为 [5287],被重定向至 6371 节点读取。
通过以上操作我们得知 name 键的存储被分配到了 6374 节点,如果直接连接 6374 节点并获取该值会怎么样?没错,不需要重定向节点,因为数据就在该节点,所以直接读取返回。
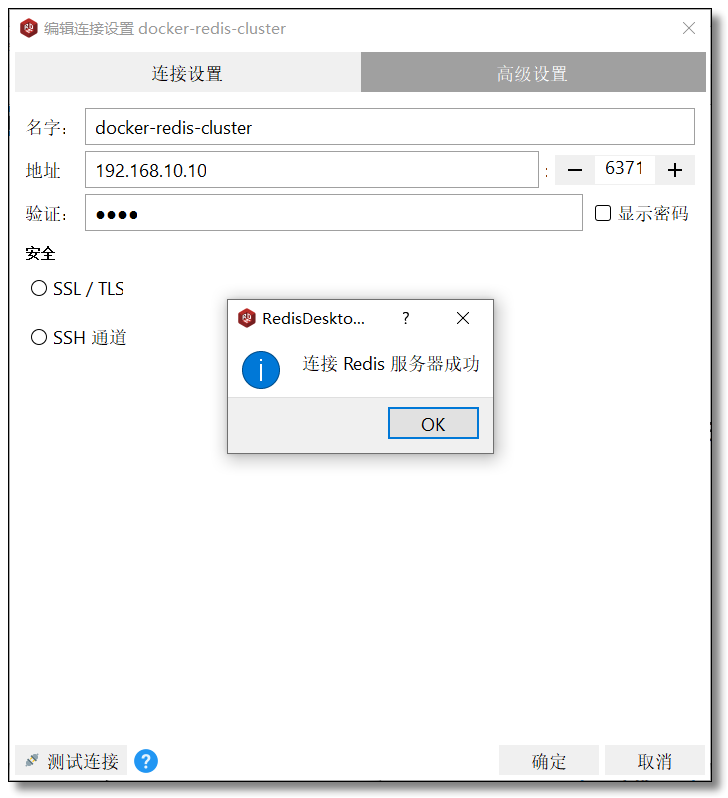
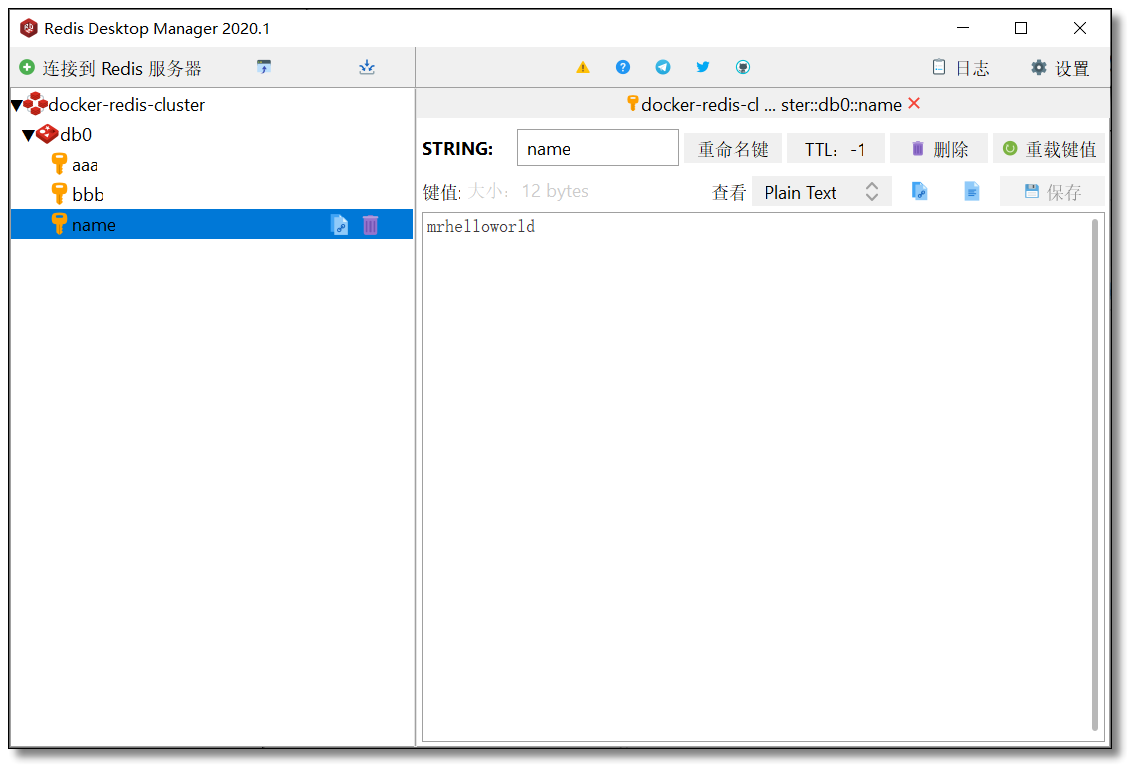
客户端连接
最后来一波客户端连接操作,随便哪个节点,看看可否通过外部访问 Redis Cluster 集群。
至此使用多机环境多个容器搭建 Redis Cluster 集群环境就到这里,其实整体搭建过程不算特别麻烦,因为:
创建 Redis 集群需要用到 Ruby,否则就得自己关联节点构建集群,自己分配槽;
如果使用 Ruby 构建 Redis 集群,就需要安装 Ruby 环境;
而 Redis 从 5 版本开始可以直接使用 redis-cli 命令创建集群了,就省去了很多麻烦事;
我们还使用了 shell for 循环语句简化了构建过程,否则那些语句一条条执行也够你闹心的。
综上所述,有没有更简单的办法呢?当然有了,不然我在这跟你卖什么关子。
Docker Compose 就可以解决这个问题。后面我们先学习一下什么是 Docker Compose,然后使用 Docker Compose 再来搭建一遍 Redis Cluster 集群环境,感受感受这前后的区别。
本文采用 知识共享「署名-非商业性使用-禁止演绎 4.0 国际」许可协议
大家可以通过 分类Docker
🤗 您的点赞和转发是对我最大的鼓励和支持。
📢 扫码关注 哈喽沃德先生「文档 + 视频」每篇文章都配有专门视频讲解,学习更轻松噢 ~