温馨提示:本案例图文并茂,代码齐全(包括前端)大家只需要跟着文章一步步学习即可实现。想要一步到位直接获取代码的同学,请关注微信公众号「哈喽沃德先生」回复 sign 即可。
如今的很多互联网应用,都会有签到的功能,而一个好的签到功能,可以带来以下好处:
- 签到是激励用户活跃的一种手段,可以保持产品活跃度
- 签到可以搭配积分或者优惠券吸引用户购买商品,提升付费率,带来营收
- 签到可以促进用户分享,实现拉新从而扩大用户群体
既然这个功能这么重要,身为一名合格的程序员必须搞清楚其背后的实现原理。安排!
本文将通过 Spring Boot + Redis + Layui 实现一个简易版的用户签到系统,方便大家理解其背后的原理。

案例分析
之前开发一款美食社交应用时就遇到了签到的需求:
- 签到 1 天送 10 积分,连续签到 2 天送 20 积分,3 天送 30 积分,4 天以上均送 50 积分。
- 如果连续签到中断,则重置计数,每月初重置计数。
- 用户分享应用拉新以后可以额外获得一次补签机会。
- 显示用户某个月的连续签到次数和总签到次数。
- 在日历控件上展示用户每月签到情况,可以切换年月显示。
今天我带着大家再将这个功能的开发流程走一遍,安排!
MySQL
如果使用关系型数据库来实现签到功能,核心表(user_sign)如下:
| 字段名 |
描述 |
| id |
数据表主键(AUTO_INCREMENT) |
| user_id |
用户ID |
| sign_date |
签到日期(如 2021-03-09) |
| amount |
连续签到天数 |
- 签到:插入一条记录,并更新连续签到天数
- 查询:根据签到日期查询
- 统计:根据 amount 统计
如果这样存数据的话,对于用户量比较大的应用,数据库可能就扛不住了,比如 1000W 用户,一天一条,那么一个月就是 3 亿条数据,这是非常庞大的。在这样的体量下,肯定会有性能瓶颈而需要优化,最关键的是这种数据它本身就不是重要数据,存储在关系型数据库费钱(存储成本)又费力(优化成本)。
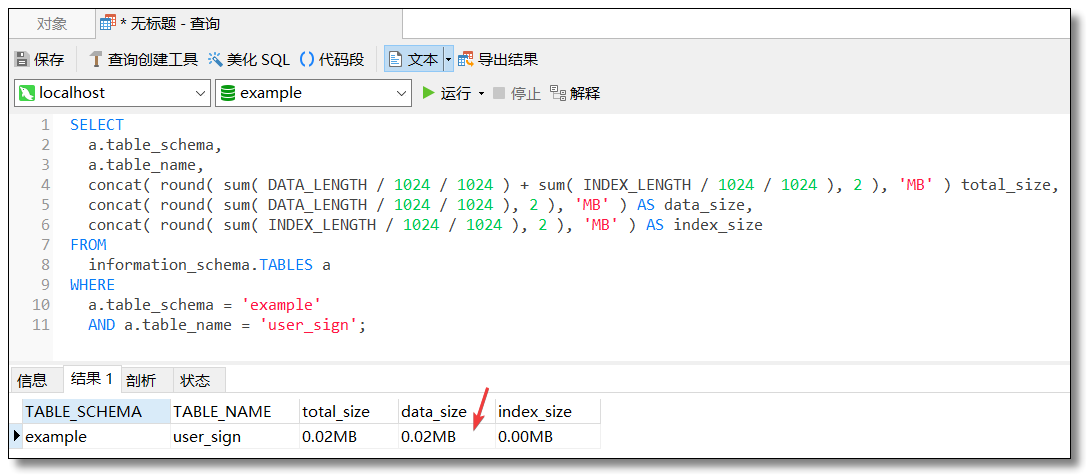
插入一条签到记录以后,根据下面这条 SQL 可以查看特定数据库特定表的数据部分大小,索引部分大小和总占用磁盘大小。
 1
 2
 3
 4
 5
 6
 7
 8
 9
10
11
|
SELECT
	a.table_schema,
	a.table_name,
	concat( round( sum( DATA_LENGTH / 1024 / 1024 ) + sum( INDEX_LENGTH / 1024 / 1024 ), 2 ), 'MB' ) total_size,
	concat( round( sum( DATA_LENGTH / 1024 / 1024 ), 2 ), 'MB' ) AS data_size,
	concat( round( sum( INDEX_LENGTH / 1024 / 1024 ), 2 ), 'MB' ) AS index_size
FROM
	information_schema.TABLES a
WHERE
	a.table_schema = 'example'
	AND a.table_name = 'user_sign';
|
根据查询结果我们做一个简单的计算:
- 1 个用户签到一天会产生
0.02MB 数据
- 每个月都按 30 天来计算的话,1 个用户连续签到一个月会产生
0.60MB 数据
- 1 个用户连续签到一年会产生
7.20MB 数据
- 1000W 签到狂魔连续签到一年会产生
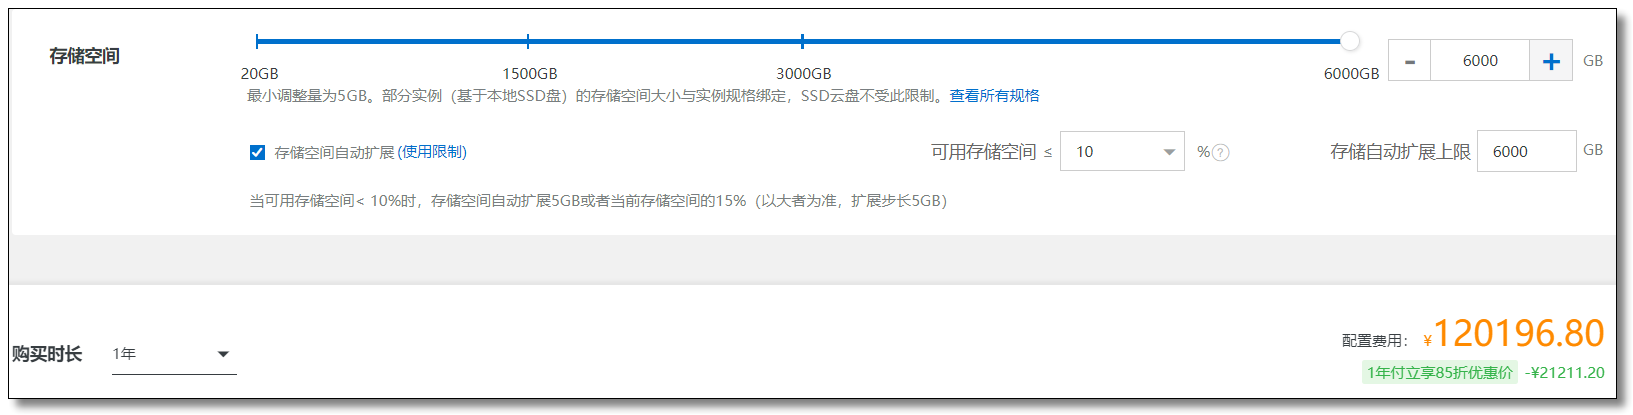
7200W MB 数据(7200W MB ÷ 1024 ÷ 1024 ≈ 68.66TB)
根据结果大家自行查询各大云厂商的数据库存储空间,对下面这个结果你还满意吗🤣?P.S. 我都没怎么选配置,只是选了 6000GB(大约 5.86TB)
Redis
如果使用 Redis 来做这件事,上述问题都会迎刃而解:
- 体量问题(支持单机、主从、集群分片,提供冗余及自动故障转移,可以动态添加或移除节点)
- 成本问题(可以利用 BitMap 位图来存储签到数据,节省空间)
- 性能问题(底层 C 编写,性能优秀)
- 学习问题(部署简单,Java 程序员配合 Spring Data 轻松上手)
BitMap
BitMap 叫位图,它不是 Redis 的基本数据类型(String、Hash、List、Set、Stored Set),而是基于 String 数据类型的按位操作,高阶数据类型的一种。BitMap 支持的最大位数是 2^32 位。使用 512M 内存就可以存储多达 42.9 亿的字节信息(2^32 = 4,294,967,296)。
它是由一组 bit 位组成的,每个 bit 位对应 0 和 1 两个状态,虽然内部还是采用 String 类型存储,但 Redis 提供了一些指令用于直接操作位图,可以把它看作是一个 bit 数组,数组的下标就是偏移量。它的优点是内存开销小、效率高且操作简单,很适合用于签到这类场景。
比如按月进行存储,一个月最多 31 天,那么我们将该月用户的签到缓存二进制就是 00000000000000000000000000000000,当用户某天签到时将 0 改成 1 即可,而且 Redis 提供对 BitMap 的很多操作比如存储、获取、统计等指令,使用起来非常方便。
| 命令 |
功能 |
参数 |
| SETBIT |
指定偏移量 bit 位置设置值 |
key offset value【0 =< offset < 2^32】 |
| GETBIT |
查询指定偏移位置的 bit 值 |
key offset |
| BITCOUNT |
统计指定区间被设置为 1 的 bit 数 |
key [start end] |
| BITFIELD |
操作多字节位域 |
key [GET type offset] [SET type offset value] [INCRBY type offset increment] [OVERFLOW WRAP|SAT|FAIL] |
| BITPOS |
查询指定区间第一个被设置为 1 或者 0 的 bit 位 |
key bit [start] [end] |
考虑到每月初需要重置连续签到次数,最简单的方式是按用户每月存一条签到数据(也可以每年存一条数据)。Redis Key 的格式为 user:sign:userId:yyyyMM,Value 则采用长度为 4 个字节(32位)的位图(因为最大月份只有 31 天)。位图的每一位代表一天的签到,1 表示已签到,0 表示未签到。从高位插入,也就是说左边位是开始日期。
例如 user:sign:5:202103 表示用户 id=5 的用户在 2021 年 3 月的签到记录。那么:
 1
 2
 3
 4
 5
 6
 7
 8
 9
10
11
12
13
14
15
16
17
18
19
20
21
22
23
24
25
26
27
28
29
30
31
|
# 2021年3月1号签到
127.0.0.1:6379> SETBIT user:sign:5:202103 0 1
(integer) 0

# 2021年3月2号签到
127.0.0.1:6379> SETBIT user:sign:5:202103 1 1
(integer) 0

# 2021年3月3号签到
127.0.0.1:6379> SETBIT user:sign:5:202103 2 1
(integer) 0

# 获取2021年3月3号签到情况
127.0.0.1:6379> GETBIT user:sign:5:202103 2
(integer) 1

# 获取2021年3月4号签到情况
127.0.0.1:6379> GETBIT user:sign:5:202103 3
(integer) 0

# 统计2021年3月签到次数
127.0.0.1:6379> BITCOUNT user:sign:5:202103
(integer) 3

# 获取2021年3月首次签到(返回索引)
127.0.0.1:6379> BITPOS user:sign:5:202103 1
(integer) 0

# 获取2021年3月前3天签到情况,返回7,二进制111,意味着前三天都签到了
127.0.0.1:6379> BITFIELD user:sign:5:202103 get u3 0
(integer) 7
|
使用 BitMap 以后我们再做一个简单的计算:
- 1 个用户连续签到一月会产生
31bit 大约 4byte 数据(每个月咱都按 31 天算,免得说我们欺负关系型数据库😂)
- 1 个用户签到一年会产生
48byte 数据
- 1000W 签到狂魔签到一年会产生
48000W byte 数据(48000W byte ÷ 1024 ÷ 1024 ≈ 457.76MB)
关系型数据库:1000W 签到狂魔连续签到一年大约会产生 68.66TB 数据。
Redis:1000W 签到狂魔连续签到一年大约会产生 457.76MB 数据。
就这样一个选择如何存储的问题,就省下了这么多的成本。综上所述,你懂的,废话不多说,下面进入实战环节。
下图来自:https://db-engines.com/en/ranking
准备工作
环境
- Redis:6.2.1
- Spring Boot:2.4.3
- JDK:11.0.7
- 前端:Layui 2.5.7,文中配有详细代码
- IDE:IntelliJ IDEA
Redis
为了方便省事,本文采用单节点 Redis。
Spring Boot
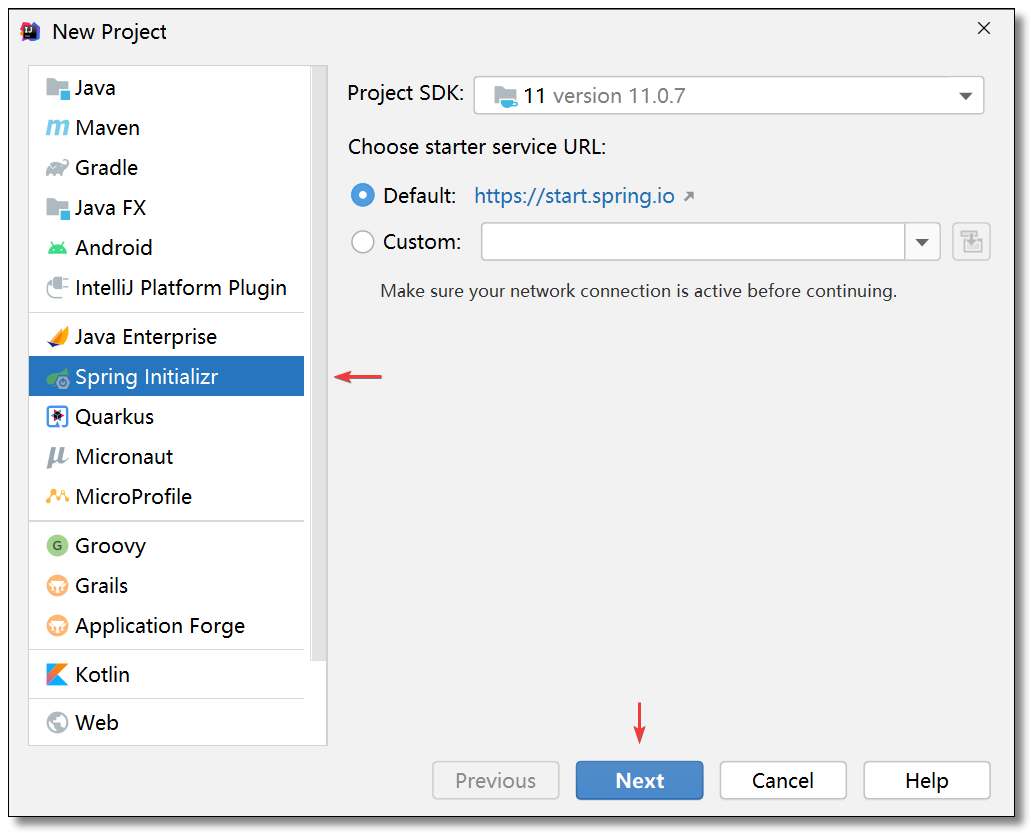
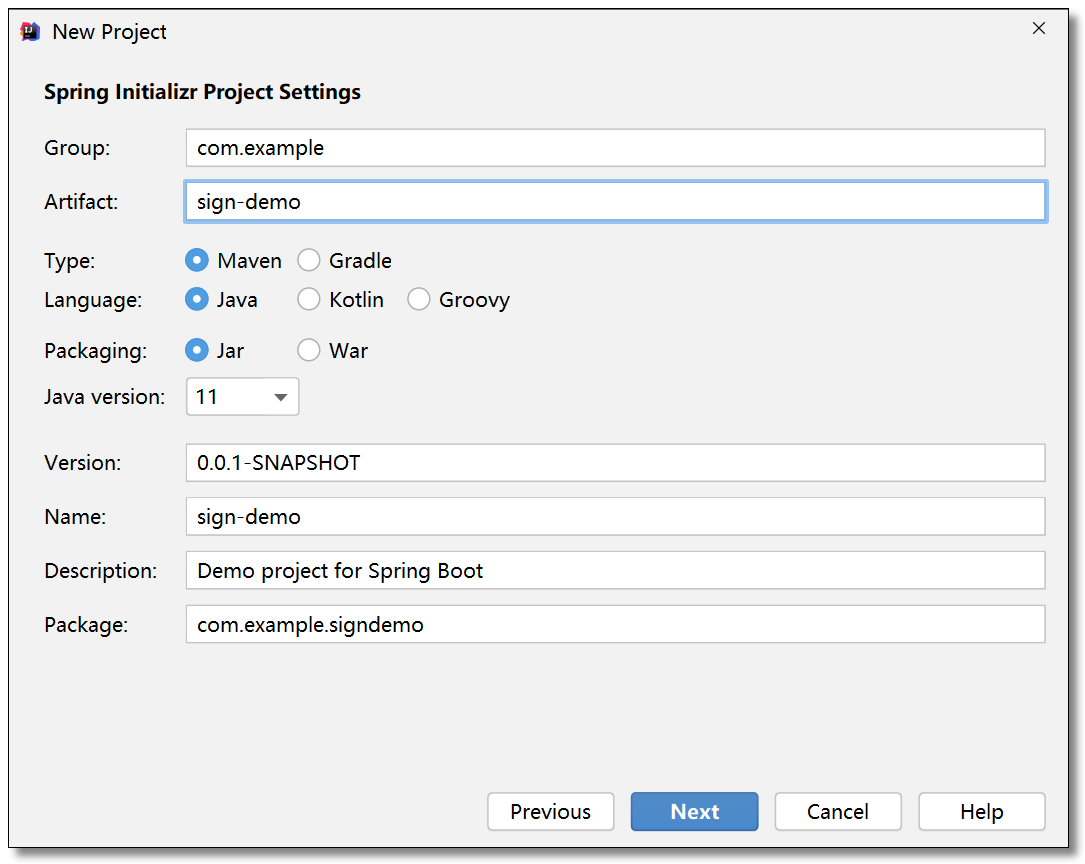
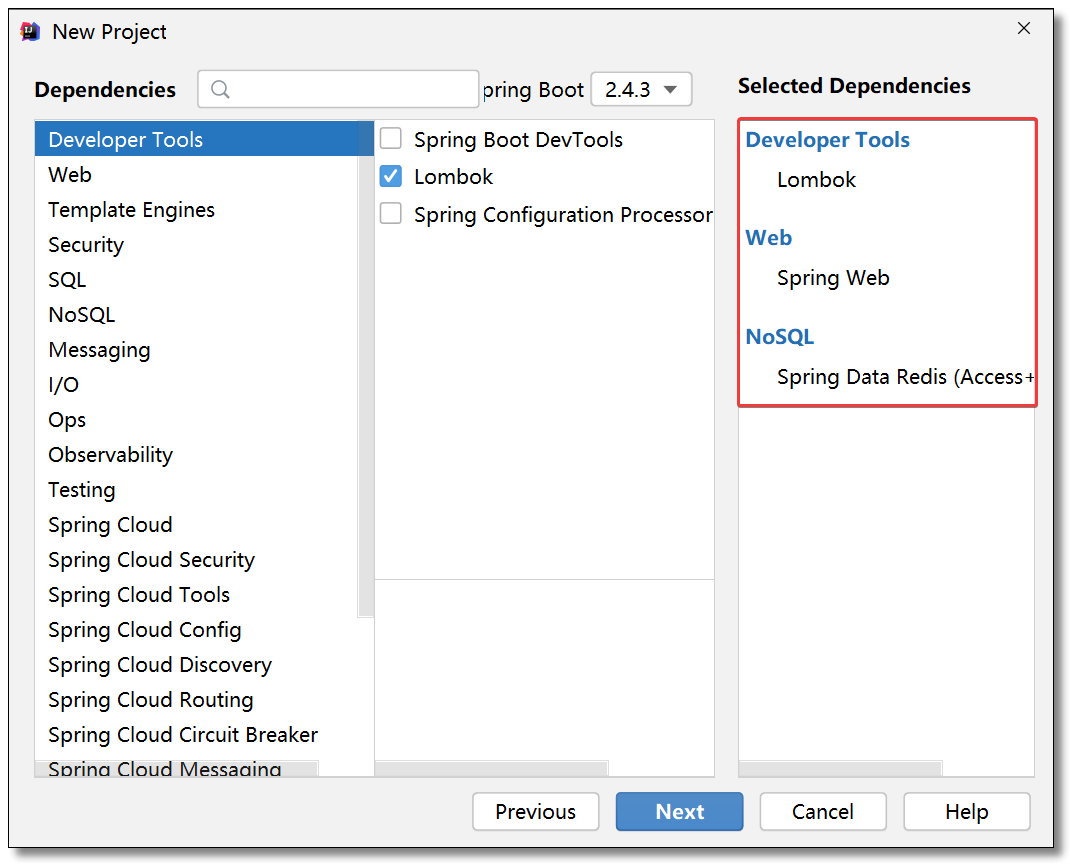
创建项目
使用 Spring Initializr 初始化 Spring Boot 项目,添加 Spring Web,Spring Data Redis,Lombok。
顺便再添加 hutool 工具集,方便使用日期时间工具类。
1
2
3
4
5
|
<dependency>
    <groupId>cn.hutool</groupId>
    <artifactId>hutool-all</artifactId>
    <version>5.5.9</version>
</dependency>
|
配置文件
application.yml 配置 Redis 服务器相关信息。
1
2
3
4
5
6
7
|
spring:
  redis:
    host: 192.168.10.101 # Redis 服务器地址
    port: 6379 # Redis 服务器端口
    password: 123456 # Redis 服务器密码
    timeout: 3000 # 连接超时时间
    database: 0 # 几号库
|
Redis 配置类
RedisTemplate 序列化默认使用 JdkSerializationRedisSerializer 存储二进制字节码,为了方便使用,自定义序列化策略。
 1
 2
 3
 4
 5
 6
 7
 8
 9
10
11
12
13
14
15
16
17
18
19
20
21
22
23
24
25
26
27
28
29
30
31
32
33
34
35
36
37
38
39
40
41
42
43
44
45
46
47
48
49
50
|
package com.example.config;

import com.fasterxml.jackson.annotation.JsonAutoDetect;
import com.fasterxml.jackson.annotation.PropertyAccessor;
import com.fasterxml.jackson.databind.ObjectMapper;
import org.springframework.context.annotation.Bean;
import org.springframework.context.annotation.Configuration;
import org.springframework.data.redis.connection.RedisConnectionFactory;
import org.springframework.data.redis.core.RedisTemplate;
import org.springframework.data.redis.serializer.Jackson2JsonRedisSerializer;
import org.springframework.data.redis.serializer.StringRedisSerializer;

/**
 * @author 哈喽沃德先生
 * @微信公众号 哈喽沃德先生
 * @website https://mrhelloworld.com
 * @wechat 124059770
 */
@Configuration
public class RedisTemplateConfiguration {

    /**
     * RedisTemplate 序列化默认使用 JdkSerializationRedisSerializer 存储二进制字节码
     * 为了方便使用,自定义序列化策略
     *
     * @param redisConnectionFactory
     * @return
     */
    @Bean
    public RedisTemplate<String, Object> redisTemplate(RedisConnectionFactory redisConnectionFactory) {
        RedisTemplate<String, Object> redisTemplate = new RedisTemplate<>();
        redisTemplate.setConnectionFactory(redisConnectionFactory);
        // 使用 Jackson2JsonRedisSerialize 替换默认序列化
        Jackson2JsonRedisSerializer jackson2JsonRedisSerializer =
                new Jackson2JsonRedisSerializer(Object.class);
        // JSON 对象处理
        ObjectMapper objectMapper = new ObjectMapper();
        objectMapper.setVisibility(PropertyAccessor.ALL, JsonAutoDetect.Visibility.ANY);
        jackson2JsonRedisSerializer.setObjectMapper(objectMapper);
        // 为 String 类型 key/value 设置序列化器
        redisTemplate.setKeySerializer(new StringRedisSerializer());
        redisTemplate.setValueSerializer(jackson2JsonRedisSerializer);
        // 为 Hash 类型 key/value 设置序列化器
        redisTemplate.setHashKeySerializer(new StringRedisSerializer());
        redisTemplate.setHashValueSerializer(jackson2JsonRedisSerializer);
        redisTemplate.afterPropertiesSet();
        return redisTemplate;
    }

}
|
前端
使用 CDN 替换 CSS、JS 免去下载文件的过程。
1
2
|
<link href="//lib.baomitu.com/layui/2.5.7/css/layui.min.css" rel="stylesheet">
<script src="//lib.baomitu.com/layui/2.5.7/layui.min.js"></script>
|
index.html
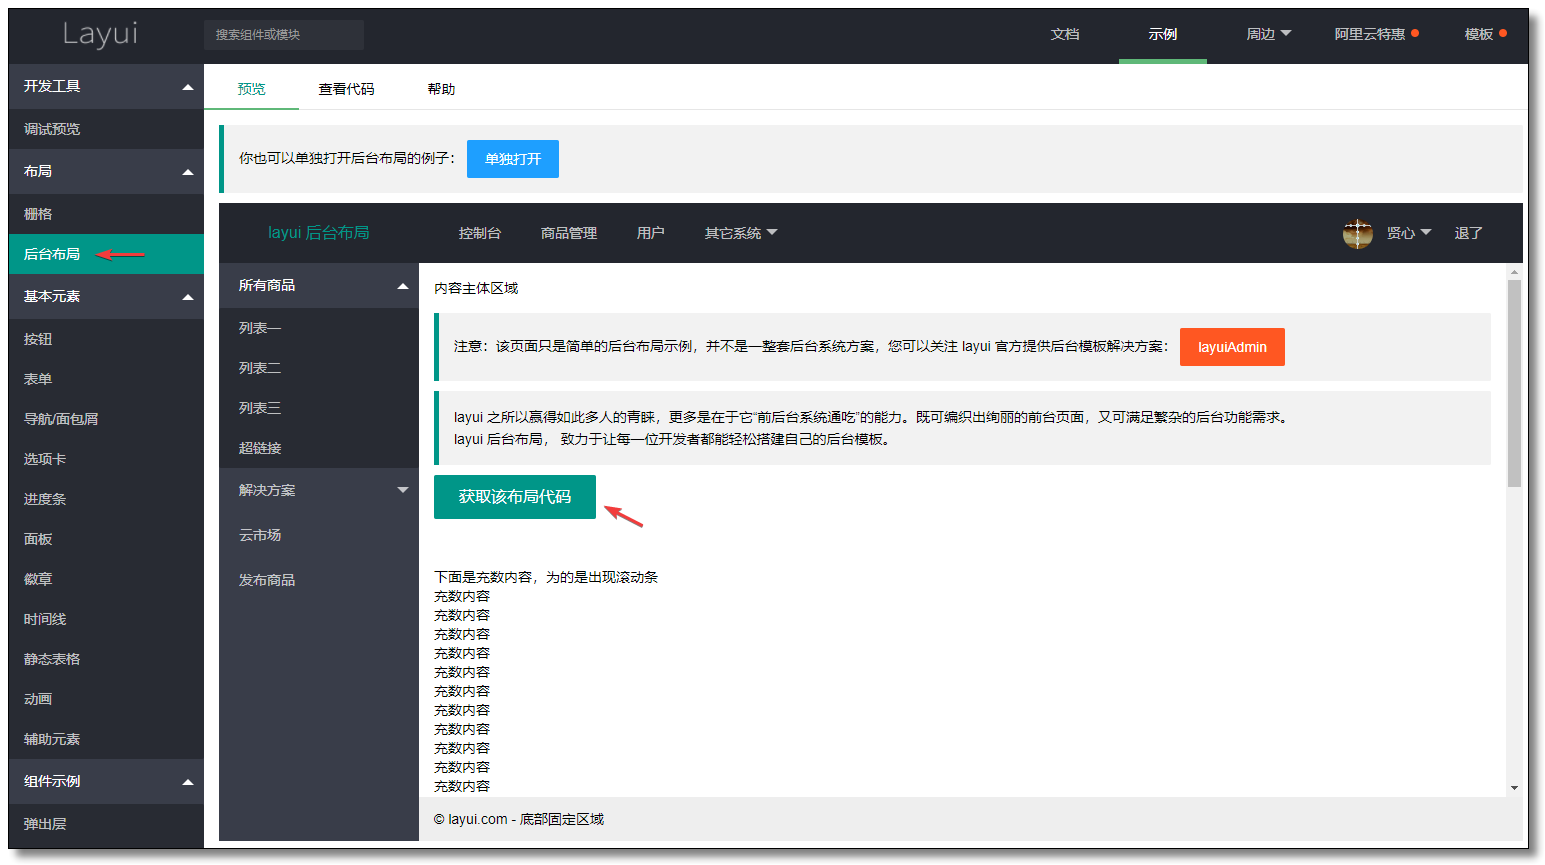
参考:https://www.layui.com/doc/element/layout.html#admin
index.html 最终修改如下,将该文件放入项目 resources 目录下的 static 目录中。
 1
 2
 3
 4
 5
 6
 7
 8
 9
10
11
12
13
14
15
16
17
18
19
20
21
22
23
24
25
26
27
28
29
30
31
32
33
34
35
36
37
38
39
40
41
42
43
44
45
46
47
48
49
50
51
52
53
54
55
56
57
58
59
60
61
62
63
64
65
66
67
68
69
70
71
72
73
74
75
76
|
<!DOCTYPE html>
<html>
<head>
  <meta charset="utf-8">
  <meta name="viewport" content="width=device-width, initial-scale=1, maximum-scale=1">
  <title>用户签到系统</title>
  <link href="//lib.baomitu.com/layui/2.5.7/css/layui.min.css" rel="stylesheet">
</head>
<body class="layui-layout-body">
<div class="layui-layout layui-layout-admin">
  <div class="layui-header">
    <div class="layui-logo">用户签到系统</div>
    <!-- 头部区域(可配合layui已有的水平导航) -->
    <ul class="layui-nav layui-layout-right">
      <li class="layui-nav-item">
        <a href="javascript:;">
          <img src="https://mrhelloworld.com/resources/mrhelloworld/logo/avatar.jpg" class="layui-nav-img">
          哈喽沃德先生
        </a>
        <dl class="layui-nav-child">
          <dd><a href="welcome.html" target="container">个人中心</a></dd>
          <dd><a href="">基本资料</a></dd>
          <dd><a href="">安全设置</a></dd>
        </dl>
      </li>
      <li class="layui-nav-item"><a href="">安全退出</a></li>
    </ul>
  </div>

  <div class="layui-side layui-bg-black">
    <div class="layui-side-scroll">
      <!-- 左侧导航区域(可配合layui已有的垂直导航) -->
      <ul class="layui-nav layui-nav-tree" lay-filter="test">
        <li class="layui-nav-item layui-nav-itemed">
          <a class="" href="javascript:;">所有商品</a>
          <dl class="layui-nav-child">
            <dd><a href="javascript:;">列表一</a></dd>
            <dd><a href="javascript:;">列表二</a></dd>
            <dd><a href="javascript:;">列表三</a></dd>
            <dd><a href="">超链接</a></dd>
          </dl>
        </li>
        <li class="layui-nav-item">
          <a href="javascript:;">解决方案</a>
          <dl class="layui-nav-child">
            <dd><a href="javascript:;">列表一</a></dd>
            <dd><a href="javascript:;">列表二</a></dd>
            <dd><a href="">超链接</a></dd>
          </dl>
        </li>
        <li class="layui-nav-item"><a href="">云市场</a></li>
        <li class="layui-nav-item"><a href="">发布商品</a></li>
      </ul>
    </div>
  </div>

  <div class="layui-body">
    <!-- 内容主体区域 -->
    <iframe src="welcome.html" name="container" width="100%" height="100%"></iframe>
  </div>

  <div class="layui-footer">
    <!-- 底部固定区域 -->
    https://mrhelloworld.com - 哈喽沃德先生
  </div>
</div>
<script src="//lib.baomitu.com/layui/2.5.7/layui.min.js"></script>
<script>
  //JavaScript代码区域
  layui.use('element', function () {
    var element = layui.element;

  });
</script>
</body>
</html>
|
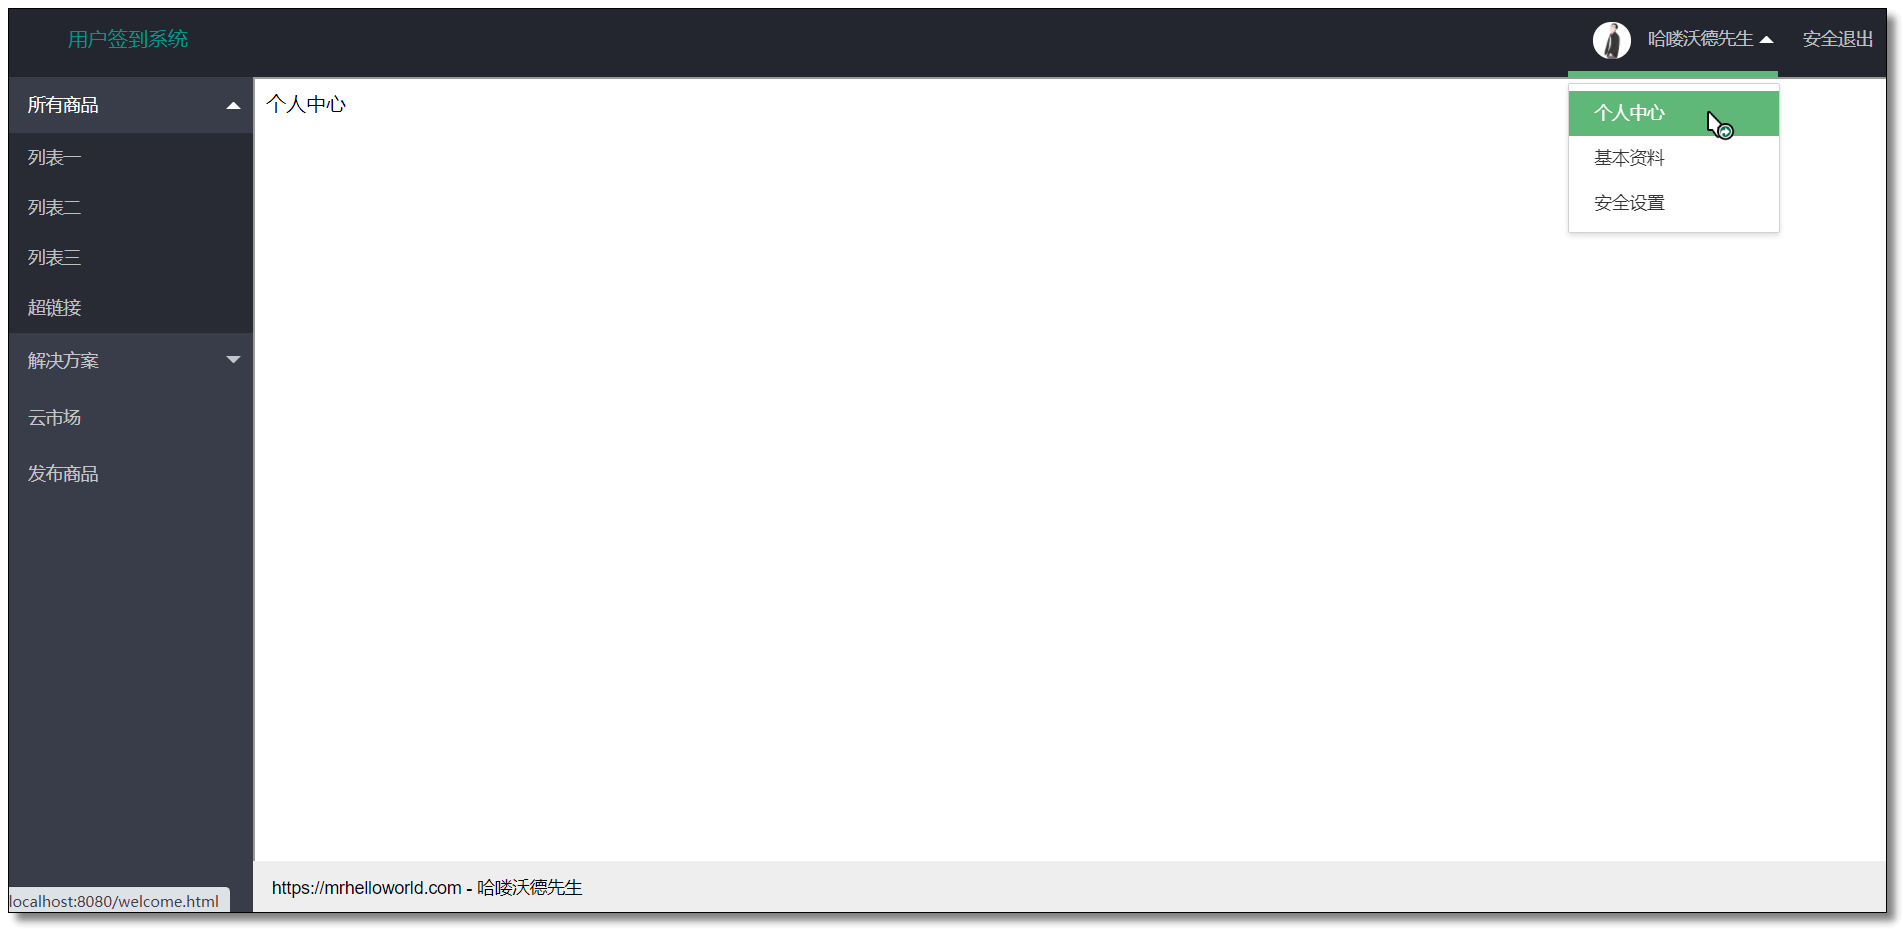
welcome.html
创建文件先写个个人中心等后续功能开发时再做处理。
将该文件放入项目 resources 目录下的 static 目录中。
启动
访问:http://localhost:8080/index.html 效果如下:
功能开发
该功能主要用于存储用户的签到数据至 Redis,无需实体类,我们只需要知道用户 ID 即可,用于构建 Redis Key。
签到(补签)
需求说明
用户签到,默认当天,可以通过传入日期补签(比如拉新活动赠送额外签到次数),返回用户连续签到次数和总签到次数(如果后续有积分规则,再返回用户此次签到后的积分情况)。
SignService.java
业务逻辑层主要关注以下细节:
- 根据日期获取当前是多少号,不传入日期默认当天(使用 BITSET 操作时注意:offset 从 0 开始计算,0 就代表 1 号)
- Redis Key:
user:sign:用户ID:月份 用户签到信息按月存储
- 判断用户是否签到(
GETBIT user:sign:5:202103 0:获取用户2021年03月01日签到情况)
- 用户签到(
SETBIT user:sign:5:202103 0 1:用户2021年03月01日进行签到)
- 返回用户连续签到次数。获取用户从当前日期开始到 1 号的所有签到状态,然后进行位移操作,返回连续签到天数(
BITFIELD user:sign:5:202103 GET u31 0:获取用户2021年03月01日到31日的签到情况)
- 返回用户总签到次数(
BITCOUNT user:sign:5:202103 0 31)
核心代码如下,为了方便多次调用,将以下业务逻辑封装为私有方法:
- 获取日期
- 构建 Redis Key
- 统计连续签到次数
- 统计总签到次数
  1
  2
  3
  4
  5
  6
  7
  8
  9
 10
 11
 12
 13
 14
 15
 16
 17
 18
 19
 20
 21
 22
 23
 24
 25
 26
 27
 28
 29
 30
 31
 32
 33
 34
 35
 36
 37
 38
 39
 40
 41
 42
 43
 44
 45
 46
 47
 48
 49
 50
 51
 52
 53
 54
 55
 56
 57
 58
 59
 60
 61
 62
 63
 64
 65
 66
 67
 68
 69
 70
 71
 72
 73
 74
 75
 76
 77
 78
 79
 80
 81
 82
 83
 84
 85
 86
 87
 88
 89
 90
 91
 92
 93
 94
 95
 96
 97
 98
 99
100
101
102
103
104
105
106
107
108
109
110
111
112
113
114
115
116
117
118
119
120
121
122
123
124
125
126
127
128
129
130
131
132
133
134
135
136
137
138
139
140
141
142
143
144
145
|
package com.example.service;

import cn.hutool.core.date.DateUtil;
import cn.hutool.core.util.StrUtil;
import org.springframework.data.redis.connection.BitFieldSubCommands;
import org.springframework.data.redis.core.RedisCallback;
import org.springframework.data.redis.core.RedisTemplate;
import org.springframework.stereotype.Service;

import javax.annotation.Resource;
import java.util.Date;
import java.util.HashMap;
import java.util.List;
import java.util.Map;

/**
 * @author 哈喽沃德先生
 * @微信公众号 哈喽沃德先生
 * @website https://mrhelloworld.com
 * @wechat 124059770
 */
@Service
public class SignService {

    @Resource
    private RedisTemplate redisTemplate;

    /**
     * 用户签到,可以补签
     *
     * @param userId  用户ID
     * @param dateStr 查询的日期,默认当天 yyyy-MM-dd
     * @return 连续签到次数和总签到次数
     */
    public Map<String, Object> doSign(Integer userId, String dateStr) {
        Map<String, Object> result = new HashMap<>();
        // 获取日期
        Date date = getDate(dateStr);
        // 获取日期对应的天数,多少号
        int day = DateUtil.dayOfMonth(date) - 1; // 从 0 开始
        // 构建 Redis Key
        String signKey = buildSignKey(userId, date);
        // 查看指定日期是否已签到
        boolean isSigned = redisTemplate.opsForValue().getBit(signKey, day);
        if (isSigned) {
            result.put("message", "当前日期已完成签到,无需再签");
            result.put("code", 400);
            return result;
        }
        // 签到
        redisTemplate.opsForValue().setBit(signKey, day, true);
        // 根据当前日期统计签到次数
        Date today = new Date();
        // 统计连续签到次数
        int continuous = getContinuousSignCount(userId, today);
        // 统计总签到次数
        long count = getSumSignCount(userId, today);
        result.put("message", "签到成功");
        result.put("code", 200);
        result.put("continuous", continuous);
        result.put("count", count);
        return result;
    }

    /**
     * 统计连续签到次数
     *
     * @param userId 用户ID
     * @param date   查询的日期
     * @return
     */
    private int getContinuousSignCount(Integer userId, Date date) {
        // 获取日期对应的天数,多少号,假设是 31
        int dayOfMonth = DateUtil.dayOfMonth(date);
        // 构建 Redis Key
        String signKey = buildSignKey(userId, date);
        // e.g. bitfield user:sign:5:202103 u31 0
        BitFieldSubCommands bitFieldSubCommands = BitFieldSubCommands.create()
                .get(BitFieldSubCommands.BitFieldType.unsigned(dayOfMonth))
                .valueAt(0);
        // 获取用户从当前日期开始到 1 号的所有签到状态
        List<Long> list = redisTemplate.opsForValue().bitField(signKey, bitFieldSubCommands);
        if (list == null || list.isEmpty()) {
            return 0;
        }
        // 连续签到计数器
        int signCount = 0;
        long v = list.get(0) == null ? 0 : list.get(0);
        // 位移计算连续签到次数
        for (int i = dayOfMonth; i > 0; i--) {// i 表示位移操作次数
            // 右移再左移,如果等于自己说明最低位是 0,表示未签到
            if (v >> 1 << 1 == v) {
                // 用户可能当前还未签到,所以要排除是否是当天的可能性
                // 低位 0 且非当天说明连续签到中断了
                if (i != dayOfMonth) break;
            } else {
                // 右移再左移,如果不等于自己说明最低位是 1,表示签到
                signCount++;
            }
            // 右移一位并重新赋值,相当于把最低位丢弃一位然后重新计算
            v >>= 1;
        }
        return signCount;
    }

    /**
     * 统计总签到次数
     *
     * @param userId 用户ID
     * @param date   查询的日期
     * @return
     */
    private Long getSumSignCount(Integer userId, Date date) {
        // 构建 Redis Key
        String signKey = buildSignKey(userId, date);
        // e.g. BITCOUNT user:sign:5:202103
        return (Long) redisTemplate.execute(
                (RedisCallback<Long>) con -> con.bitCount(signKey.getBytes())
        );
    }

    /**
     * 获取日期
     *
     * @param dateStr yyyy-MM-dd
     * @return
     */
    private Date getDate(String dateStr) {
        return StrUtil.isBlank(dateStr) ?
                new Date() : DateUtil.parseDate(dateStr);
    }

    /**
     * 构建 Redis Key - user:sign:userId:yyyyMM
     *
     * @param userId 用户ID
     * @param date   日期
     * @return
     */
    private String buildSignKey(Integer userId, Date date) {
        return String.format("user:sign:%d:%s", userId,
                DateUtil.format(date, "yyyyMM"));
    }

}
|
SignController.java
 1
 2
 3
 4
 5
 6
 7
 8
 9
10
11
12
13
14
15
16
17
18
19
20
21
22
23
24
25
26
27
28
29
30
31
32
33
34
35
36
|
package com.example.controller;

import com.example.service.SignService;
import org.springframework.web.bind.annotation.PostMapping;
import org.springframework.web.bind.annotation.RequestMapping;
import org.springframework.web.bind.annotation.RestController;

import javax.annotation.Resource;
import java.util.Map;

/**
 * @author 哈喽沃德先生
 * @微信公众号 哈喽沃德先生
 * @website https://mrhelloworld.com
 * @wechat 124059770
 */
@RestController
@RequestMapping("sign")
public class SignController {

    @Resource
    private SignService signService;

    /**
     * 用户签到,可以补签
     *
     * @param userId  用户ID
     * @param dateStr 查询的日期,默认当天 yyyy-MM-dd
     * @return 连续签到次数和总签到次数
     */
    @PostMapping
    public Map<String, Object> doSign(Integer userId, String dateStr) {
        return signService.doSign(userId, dateStr);
    }

}
|
welcome.html
参考:
welcome.html 最终修改如下。
  1
  2
  3
  4
  5
  6
  7
  8
  9
 10
 11
 12
 13
 14
 15
 16
 17
 18
 19
 20
 21
 22
 23
 24
 25
 26
 27
 28
 29
 30
 31
 32
 33
 34
 35
 36
 37
 38
 39
 40
 41
 42
 43
 44
 45
 46
 47
 48
 49
 50
 51
 52
 53
 54
 55
 56
 57
 58
 59
 60
 61
 62
 63
 64
 65
 66
 67
 68
 69
 70
 71
 72
 73
 74
 75
 76
 77
 78
 79
 80
 81
 82
 83
 84
 85
 86
 87
 88
 89
 90
 91
 92
 93
 94
 95
 96
 97
 98
 99
100
101
102
103
104
105
106
107
108
109
|
<!DOCTYPE html>
<html>
<head>
<meta charset="utf-8">
<meta name="viewport" content="width=device-width, initial-scale=1, maximum-scale=1">
<title>个人中心</title>
<link href="//lib.baomitu.com/layui/2.5.7/css/layui.min.css" rel="stylesheet">
</head>
<body>
<fieldset class="layui-elem-field layui-field-title" style="margin-top: 20px;">
<legend>个人中心</legend>
</fieldset>
<div style="padding: 20px;">
<div class="layui-col-md3">
<div class="layui-tab layui-tab-card">
<ul class="layui-tab-title">
<li class="layui-this">签到</li>
<li>补签</li>
<li id="recordLi">签到记录</li>
</ul>
<div class="layui-tab-content">
<!-- 签到 -->
<div class="layui-tab-item layui-show">
<button type="button" class="layui-btn" id="signBtn">今日签到</button>
<hr/>
<p>您已签到 <span style="color: red;" id="count">0</span> 天</p>
<p>连续签到 <span style="color: red;" id="continuous">0</span> 天</p>
</div>
<!-- 补签 -->
<div class="layui-tab-item">
<div class="layui-inline">
<input type="text" class="layui-input" id="reissue" placeholder="请选择日期">
</div>
<button type="button" class="layui-btn" id="reissueBtn">补签</button>
</div>
<!-- 签到记录 -->
<div class="layui-tab-item">
<div class="layui-inline" id="record"></div>
</div>
</div>
</div>
</div>
</div>
<script src="//lib.baomitu.com/jquery/3.6.0/jquery.min.js"></script>
<script src="//lib.baomitu.com/layui/2.5.7/layui.min.js"></script>
<script src="//lib.baomitu.com/layui/2.5.7/lay/modules/element.min.js"></script>
<script>
// 补签日历元素
layui.use('laydate', function () {
var laydate = layui.laydate;
//执行一个laydate实例
laydate.render({
elem: '#reissue' //指定元素
});
});
layui.use('layer', function () {
// 签到
$("#signBtn").on("click", function () {
$.ajax({
url: "/sign",
type: "POST",
data: {"userId": 5}, // 模拟用户ID
dataType: "JSON",
success: function (result) {
layer.msg(result.message);
if (200 == result.code) {
// 设置总签到次数
$("#count").text(result.count);
// 设置连续签到次数
$("#continuous").text(result.continuous);
// 设置签到按钮文本
$("#signBtn").text("今日已签到");
// 禁用签到按钮
$("#signBtn").addClass("layui-btn-disabled");
$("#signBtn").attr("disabled", "true");
}
}
});
});
// 补签
$("#reissueBtn").on("click", function () {
$.ajax({
url: "/sign",
type: "POST",
data: {
"userId": 5, // 模拟用户ID
"dateStr": $("#reissue").val()
},
dataType: "JSON",
success: function (result) {
layer.msg(result.message);
if (200 == result.code) {
// 设置总签到次数
$("#count").text(result.count);
// 设置连续签到次数
$("#continuous").text(result.continuous);
}
}
});
});
});
</script>
</body>
</html>
|
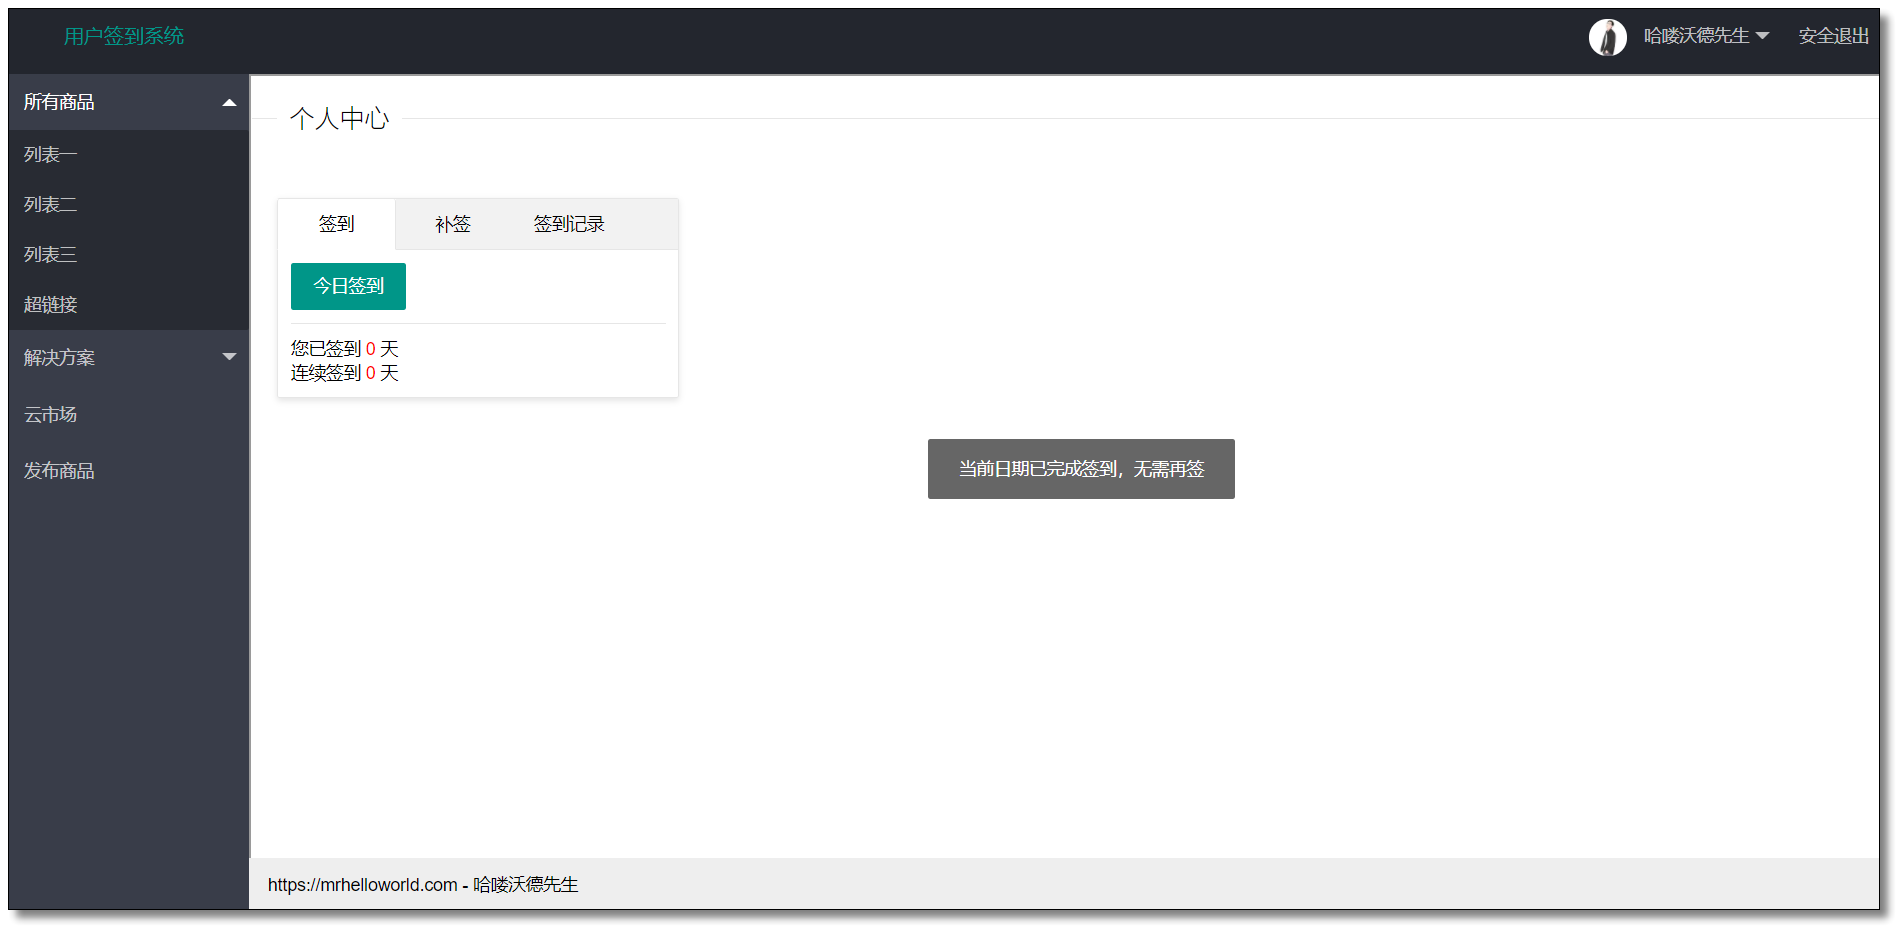
测试签到
访问:http://localhost:8080/index.html 点击今日签到。
Redis 数据库。
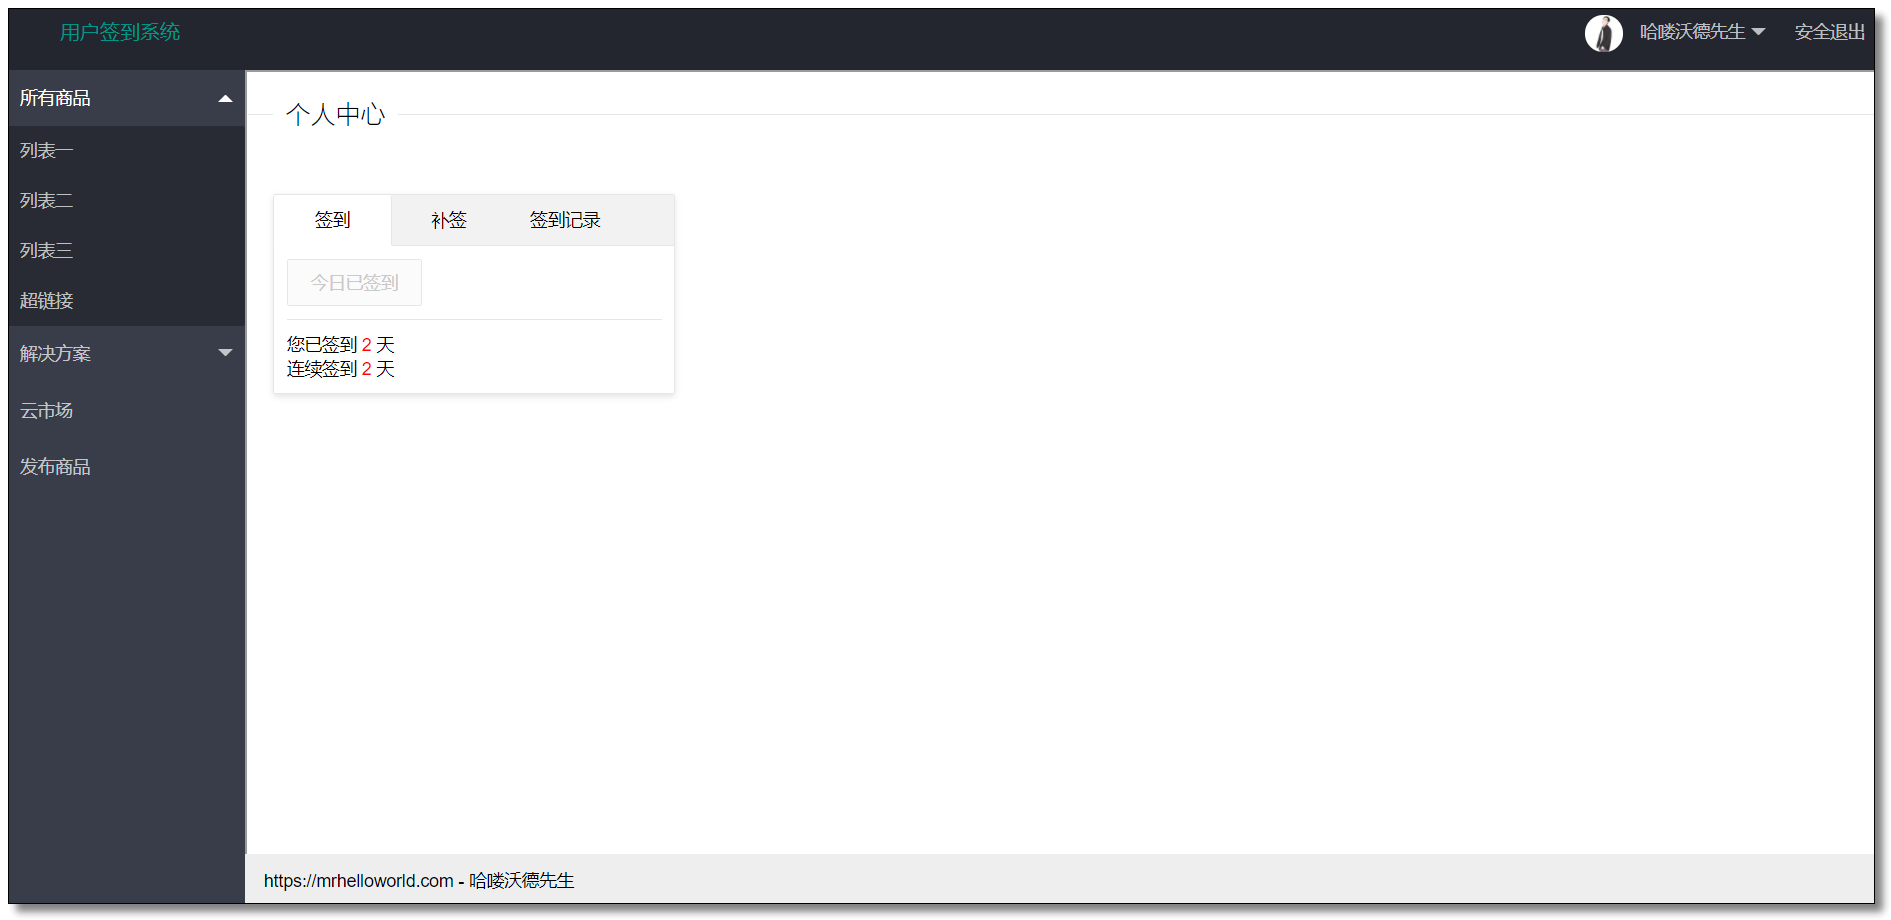
需要注意的是,签到成功以后刷新页面还能继续点击今日签到按钮,不过好在后台做了代码健壮性处理,但是总签到次数和连续签到次数需要从后台获取并显示至页面。别着急,下一步就去解决这个问题。
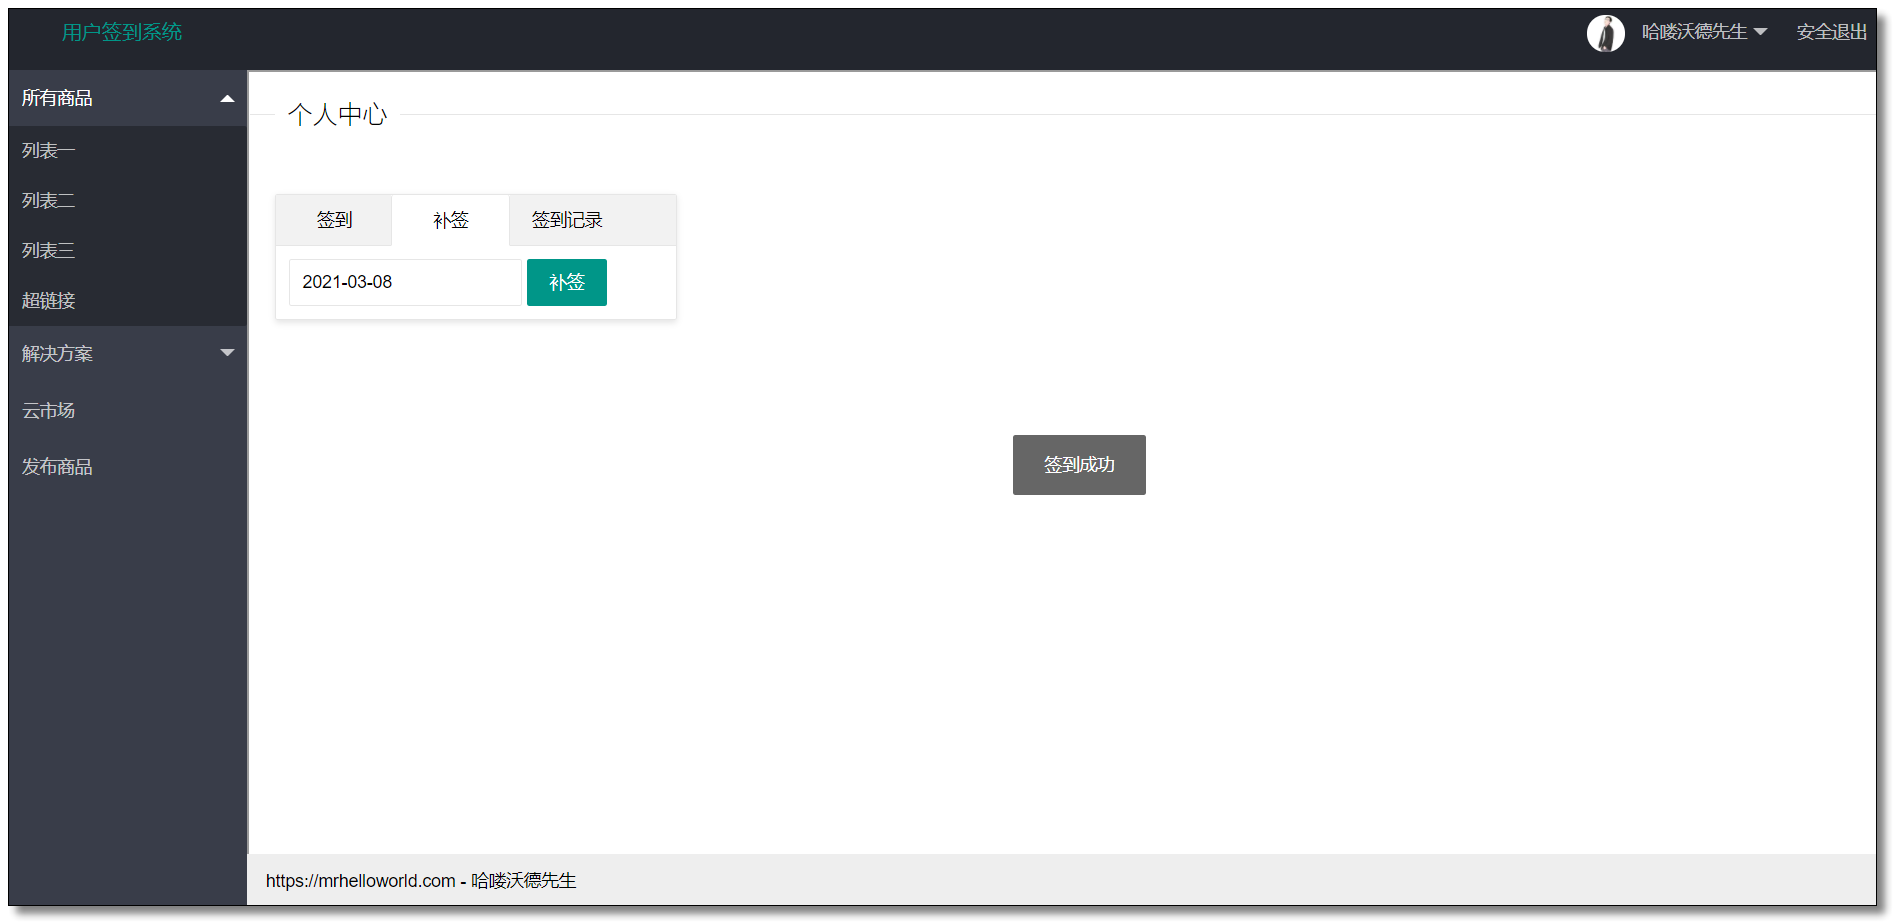
测试补签
访问:http://localhost:8080/index.html 切换选项卡,选择日期,点击补签。
Redis 数据库。
获取当天签到情况
需求说明
为了增强用户体验,初始化个人中心页面时我们获取一下当天的签到情况以及连续签到次数和总签到次数返回页面显示。
SignService.java
提供 String dateStr 参数是为了让该方法适用于多种场景,比如查看指定日期的签到情况。
 1
 2
 3
 4
 5
 6
 7
 8
 9
10
11
12
13
14
15
16
17
18
19
20
21
22
23
24
25
26
27
28
|
/**
 * 获取用户当天签到情况
 *
 * @param userId  用户ID
 * @param dateStr 查询的日期,默认当天 yyyy-MM-dd
 * @return 当天签到情况,连续签到次数和总签到次数
 */
public Map<String, Object> getSignByDate(Integer userId, String dateStr) {
    Map<String, Object> result = new HashMap<>();
    // 获取日期
    Date date = getDate(dateStr);
    // 获取日期对应的天数,多少号
    int day = DateUtil.dayOfMonth(date) - 1; // 从 0 开始
    // 构建 Redis Key
    String signKey = buildSignKey(userId, date);
    // 查看是否已签到
    boolean isSigned = redisTemplate.opsForValue().getBit(signKey, day);
    // 根据当前日期统计签到次数
    Date today = new Date();
    // 统计连续签到次数
    int continuous = getContinuousSignCount(userId, today);
    // 统计总签到次数
    long count = getSumSignCount(userId, today);
    result.put("today", isSigned);
    result.put("continuous", continuous);
    result.put("count", count);
    return result;
}
|
SignController.java
 1
 2
 3
 4
 5
 6
 7
 8
 9
10
11
|
/**
 * 获取用户当天签到情况
 *
 * @param userId  用户ID
 * @param dateStr 查询的日期,默认当天 yyyy-MM-dd
 * @return 当天签到情况,连续签到次数和总签到次数
 */
@GetMapping("today")
public Map<String, Object> getSignByDate(Integer userId, String dateStr) {
    return signService.getSignByDate(userId, dateStr);
}
|
welcome.html
welcome.html 添加以下代码。
 1
 2
 3
 4
 5
 6
 7
 8
 9
10
11
12
13
14
15
16
17
18
19
20
21
22
23
24
25
|
<script>
  // 页面加载时获取当天签到情况以及连续签到次数和总签到次数
  // 如果已签到则将签到按钮禁用
  $(function () {
    $.ajax({
      url: "/sign/today",
      type: "GET",
      data: {"userId": 5}, // 模拟用户ID
      dataType: "JSON",
      success: function (result) {
        // 设置总签到次数
        $("#count").text(result.count);
        // 设置连续签到次数
        $("#continuous").text(result.continuous);
        if (true == result.today) {
          // 设置签到按钮文本
          $("#signBtn").text("今日已签到");
          // 禁用签到按钮
          $("#signBtn").addClass("layui-btn-disabled");
          $("#signBtn").attr("disabled", "true");
        }
      }
    });
  });
</script>
|
测试
访问:http://localhost:8080/index.html 效果如下。
获取当月签到情况
需求说明
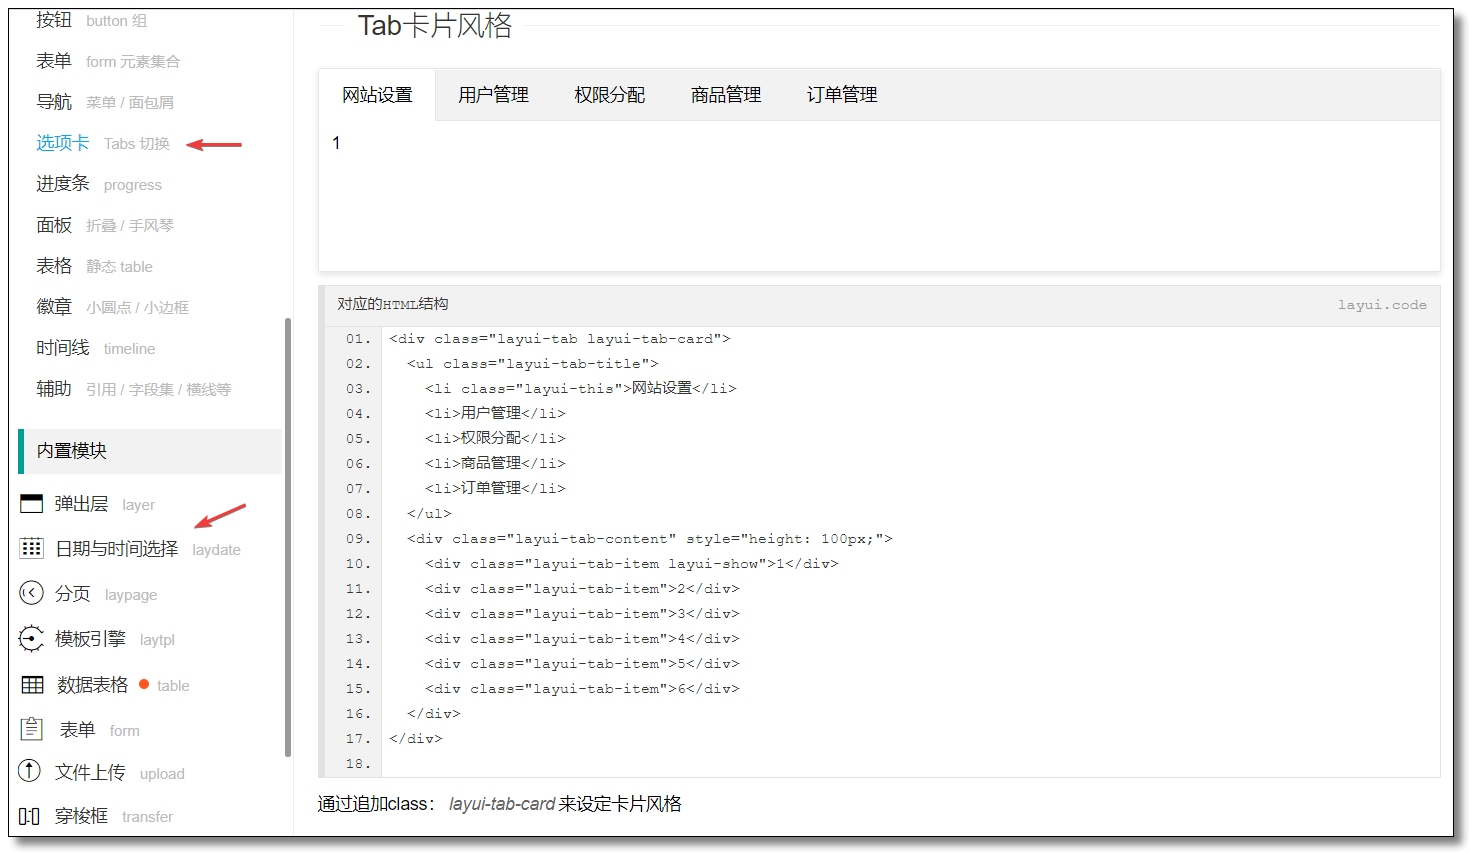
为了增强用户体验,我们还需在日历元素中显示当前用户的签到情况,将已签到的日期标记为✅。
参考:https://www.layui.com/doc/modules/laydate.html#mark (日期与时间选择#标注重要日子)
SignService.java
 1
 2
 3
 4
 5
 6
 7
 8
 9
10
11
12
13
14
15
16
17
18
19
20
21
22
23
24
25
26
27
28
29
30
31
32
33
34
35
36
37
38
39
40
41
42
43
44
45
46
47
|
/**
 * 获取用户当月签到情况
 *
 * @param userId  用户ID
 * @param dateStr 查询的日期,默认当月 yyyy-MM
 * @return
 */
public Map<String, Object> getSignInfo(Integer userId, String dateStr) {
    // 获取日期
    Date date = getDate(dateStr);
    // 构建 Redis Key
    String signKey = buildSignKey(userId, date);
    // 构建一个自动排序的 Map
    Map<String, Object> signInfo = new TreeMap<>();
    // 获取某月的总天数(考虑闰年)
    int dayOfMonth = DateUtil.lengthOfMonth(DateUtil.month(date) + 1,
            DateUtil.isLeapYear(DateUtil.dayOfYear(date)));
    // e.g. bitfield user:sign:5:202103 u31 0
    BitFieldSubCommands bitFieldSubCommands = BitFieldSubCommands.create()
            .get(BitFieldSubCommands.BitFieldType.unsigned(dayOfMonth))
            .valueAt(0);
    // 获取用户从当前日期开始到 1 号的所有签到数据
    List<Long> list = redisTemplate.opsForValue().bitField(signKey, bitFieldSubCommands);
    if (list == null || list.isEmpty()) {
        return signInfo;
    }
    long v = list.get(0) == null ? 0 : list.get(0);
    // 从低位到高位进行遍历,为 0 表示未签到,为 1 表示已签到
    for (int i = dayOfMonth; i > 0; i--) {
        /*
            Map 存储格式:
                签到:  yyyy-MM-01 "✅"
                未签到:yyyy-MM-02 不做任何处理
         */
        // 获取日期
        LocalDateTime localDateTime = LocalDateTimeUtil.of(date).withDayOfMonth(i);
        // 右移再左移,如果不等于自己说明最低位是 1,表示已签到
        boolean flag = v >> 1 << 1 != v;
        // 如果已签到,添加标记
        if (flag) {
            signInfo.put(DateUtil.format(localDateTime, "yyyy-MM-dd"), "✅");
        }
        // 右移一位并重新赋值,相当于把最低位丢弃一位然后重新计算
        v >>= 1;
    }
    return signInfo;
}
|
SignController.java
 1
 2
 3
 4
 5
 6
 7
 8
 9
10
11
|
/**
 * 获取用户当月签到情况
 *
 * @param userId  用户ID
 * @param dateStr 查询的日期,默认当月 yyyy-MM
 * @return
 */
@GetMapping
public Map<String, Object> getSignInfo(Integer userId, String dateStr) {
    return signService.getSignInfo(userId, dateStr);
}
|
welcome.html
welcome.html 添加以下代码。
 1
 2
 3
 4
 5
 6
 7
 8
 9
10
11
12
13
14
15
16
17
18
19
20
21
22
23
24
25
26
27
|
<script>
  // 签到记录日历元素
  $("#recordLi").on("click", function () {
    layui.use('laydate', function () {
      var laydate = layui.laydate;

      // 签到记录日历元素
      $.ajax({
        url: "/sign",
        type: "GET",
        data: {"userId": 5}, // 模拟用户ID
        dataType: "JSON",
        success: function (result) {
          // 清空签到记录日历元素
          $("#record").html("");
          // 直接嵌套显示
          laydate.render({
            elem: '#record', // 元素ID
            position: 'static', // 静态定位,控件将直接嵌套在指定容器中。
            showBottom: false, // 如果设置 false,将不会显示控件的底部栏区域
            mark: result // 标注
          });
        }
      });
    });
  });
</script>
|
测试
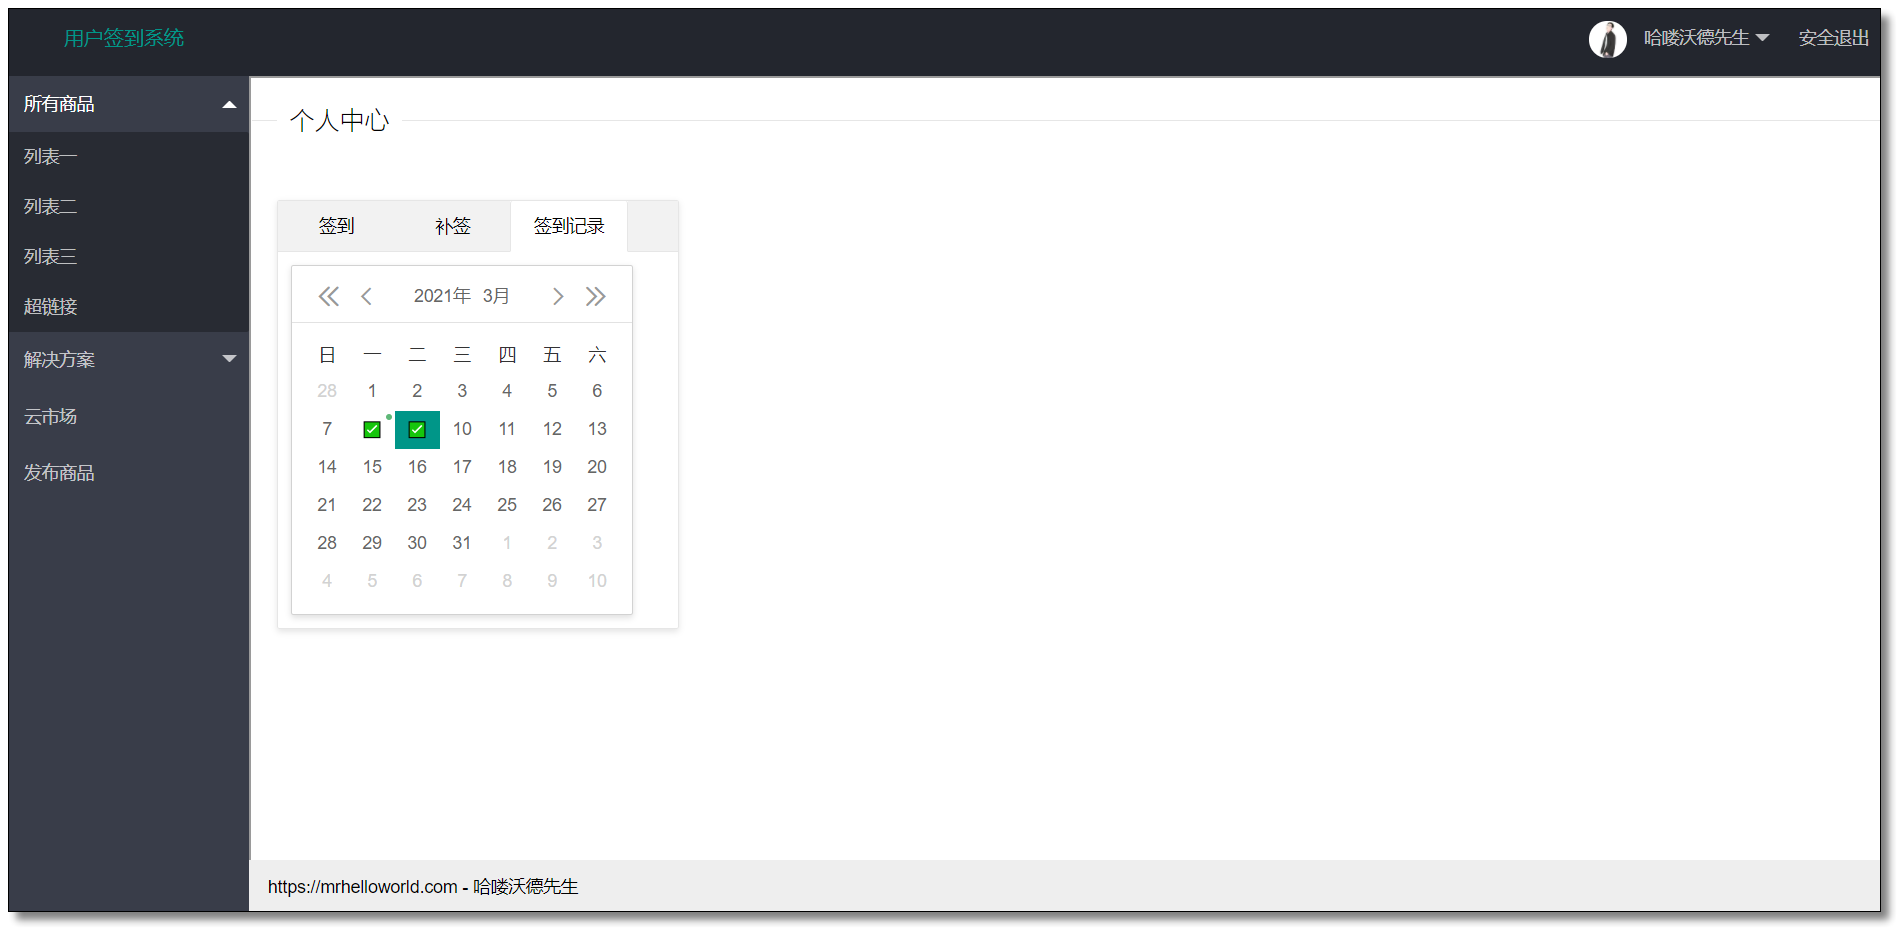
访问:http://localhost:8080/index.html 切换选项卡,选择签到记录,效果如下。
补签以后,切换选项卡时会重新从后台加载签到记录数据。
结语
至此 Redis 的实战小项目《用户签到系统》就完成啦,本文讲解了 Spring Boot 整合 Redis 的使用,顺便结合前端 Layui 实现了简单的页面效果。作为一款非常热门的非关系型数据库,大家非常有必要进行更深入的学习,最后祝大家加薪!加薪!加薪!
温馨提示:本案例图文并茂,代码齐全(包括前端)大家只需要跟着文章一步步学习即可实现。想要一步到位直接获取代码的同学,请关注微信公众号「哈喽沃德先生」回复 sign 即可。
参考
本文采用 知识共享「署名-非商业性使用-禁止演绎 4.0 国际」许可协议。
大家可以通过 分类 查看更多关于 Redis 的文章。
🤗 您的点赞和转发是对我最大的鼓励和支持。
📢 扫码关注 哈喽沃德先生「文档 + 视频」每篇文章都配有专门视频讲解,学习更轻松噢 ~