什么是 Spring Cloud Gateway
Spring Cloud Gateway 作为 Spring Cloud 生态系统中的网关,目标是替代 Netflix Zuul,其不仅提供统一的路由方式,并且还基于 Filter 链的方式提供了网关基本的功能。目前最新版 Spring Cloud 中引用的还是 Zuul 1.x 版本,而这个版本是基于过滤器的,是阻塞 IO,不支持长连接。
Zuul 2.x 版本一直跳票,2019 年 5 月,Netflix 终于开源了支持异步调用模式的 Zuul 2.0 版本,真可谓千呼万唤始出来。但是 Spring Cloud 已经不再集成 Zuul 2.x 了,那么是时候了解一下 Spring Cloud Gateway 了。
Spring Cloud Gateway 是基于 Spring 生态系统之上构建的 API 网关,包括:Spring 5,Spring Boot 2 和 Project Reactor。Spring Cloud Gateway 旨在提供一种简单而有效的方法来路由到 API,并为它们提供跨领域的关注点,例如:安全性,监视/指标,限流等。由于 Spring 5.0 支持 Netty,Http2,而 Spring Boot 2.0 支持 Spring 5.0,因此 Spring Cloud Gateway 支持 Netty 和 Http2 顺理成章。
什么是服务网关
API Gateway(APIGW / API 网关),顾名思义,是出现在系统边界上的一个面向 API 的、串行集中式的强管控服务,这里的边界是企业 IT 系统的边界,可以理解为企业级应用防火墙,主要起到隔离外部访问与内部系统的作用。在微服务概念的流行之前,API 网关就已经诞生了,例如银行、证券等领域常见的前置机系统,它也是解决访问认证、报文转换、访问统计等问题的。
API 网关的流行,源于近几年来移动应用与企业间互联需求的兴起。移动应用、企业互联,使得后台服务支持的对象,从以前单一的Web应用,扩展到多种使用场景,且每种使用场景对后台服务的要求都不尽相同。这不仅增加了后台服务的响应量,还增加了后台服务的复杂性。随着微服务架构概念的提出,API网关成为了微服务架构的一个标配组件。
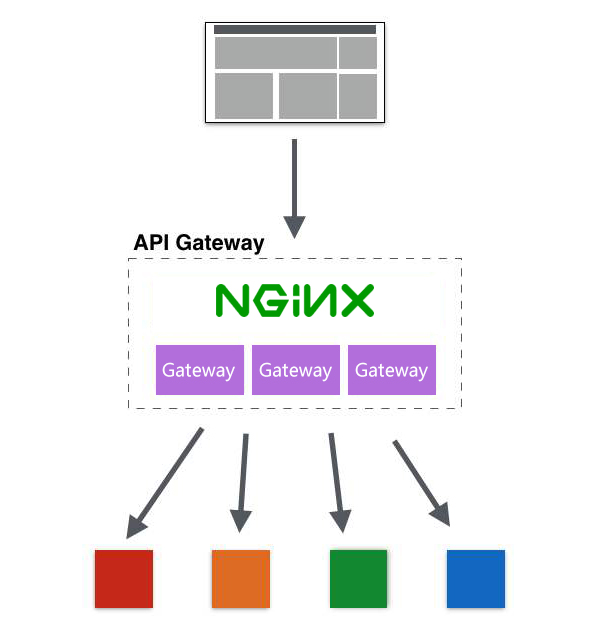
API 网关是一个服务器,是系统对外的唯一入口。API 网关封装了系统内部架构,为每个客户端提供定制的 API。所有的客户端和消费端都通过统一的网关接入微服务,在网关层处理所有非业务功能。API 网关并不是微服务场景中必须的组件,如下图,不管有没有 API 网关,后端微服务都可以通过 API 很好地支持客户端的访问。
但对于服务数量众多、复杂度比较高、规模比较大的业务来说,引入 API 网关也有一系列的好处:
聚合接口使得服务对调用者透明,客户端与后端的耦合度降低
聚合后台服务,节省流量,提高性能,提升用户体验
提供安全、流控、过滤、缓存、计费、监控等 API 管理功能
为什么要使用网关
单体应用:浏览器发起请求到单体应用所在的机器,应用从数据库查询数据原路返回给浏览器,对于单体应用来说是不需要网关的。
微服务:微服务的应用可能部署在不同机房,不同地区,不同域名下。此时客户端(浏览器/手机/软件工具)想要请求对应的服务,都需要知道机器的具体 IP 或者域名 URL,当微服务实例众多时,这是非常难以记忆的,对于客户端来说也太复杂难以维护。此时就有了网关,客户端相关的请求直接发送到网关,由网关根据请求标识解析判断出具体的微服务地址,再把请求转发到微服务实例。这其中的记忆功能就全部交由网关来操作了。
总结
如果让客户端直接与各个微服务交互:
客户端会多次请求不同的微服务,增加了客户端的复杂性
存在跨域请求,在一定场景下处理相对复杂
身份认证问题,每个微服务需要独立身份认证
难以重构,随着项目的迭代,可能需要重新划分微服务
某些微服务可能使用了防火墙/浏览器不友好的协议,直接访问会有一定的困难
因此,我们需要网关介于客户端与服务器之间的中间层,所有外部请求率先经过微服务网关,客户端只需要与网关交互,只需要知道网关地址即可。这样便简化了开发且有以下优点:
易于监控,可在微服务网关收集监控数据并将其推送到外部系统进行分析
易于认证,可在微服务网关上进行认证,然后再将请求转发到后端的微服务,从而无需在每个微服务中进行认证
减少了客户端与各个微服务之间的交互次数
网关解决了什么问题
网关具有身份认证与安全、审查与监控、动态路由、负载均衡、缓存、请求分片与管理、静态响应处理等功能。当然最主要的职责还是与“外界联系”。
总结一下,网关应当具备以下功能:
性能:API 高可用,负载均衡,容错机制。
安全:权限身份认证、脱敏,流量清洗,后端签名(保证全链路可信调用),黑名单(非法调用的限制)。
日志:日志记录,一旦涉及分布式,全链路跟踪必不可少。
缓存:数据缓存。
监控:记录请求响应数据,API 耗时分析,性能监控。
限流:流量控制,错峰流控,可以定义多种限流规则。
灰度:线上灰度部署,可以减小风险。
路由:动态路由规则。
常用网关解决方案
Nginx + Lua
Nginx 是由 Igor Sysoev(伊戈尔 · 赛索耶夫)为俄罗斯访问量第二的 https://www.rambler.ru/ 站点开发的。Nginx 是一个高性能的 HTTP 和反向代理服务器,可以扛得住 5W 左右的并发。Ngnix 一方面可以做反向代理服务器,另外一方面还可以做静态资源服务器。
Kong
Kong 是 Mashape 提供的一款 API 管理软件,它本身是基于 Ngnix + Lua 的,但比 Nginx 提供了更简单的配置方式,数据采用了 ApacheCassandra/PostgreSQL 存储,并且提供了一些优秀的插件,比如验证,日志,调用频次限制等。Kong 非常诱人的地方就是提供了大量的插件来扩展应用,通过设置不同的插件可以为服务提供各种增强的功能。
优点:基于 Nginx 所以在性能和稳定性上都没有问题。Kong 作为一款商业软件,在 Nginx 上做了很扩展工作,而且还有很多付费的商业插件。Kong 本身也有付费的企业版,其中包括技术支持、使用培训服务以及 API 分析插件。
缺点:如果你使用 Spring Cloud,Kong 如何结合目前已有的服务治理体系?
Traefik
Traefik 是一个开源的 GO 语言开发的为了让部署微服务更加便捷而诞生的现代HTTP反向代理、负载均衡工具。 它支持多种后台 (Docker , Swarm , Kubernetes , Marathon , Mesos , Consul , Etcd , Zookeeper , BoltDB , Rest API, file…) 来自动化、动态的应用它的配置文件设置。Traefik 拥有一个基于 AngularJS 编写的简单网站界面,支持 Rest API,配置文件热更新,无需重启进程。高可用集群模式等。
相对 Spring Cloud 和 Kubernetes 而言,目前比较适合 Kubernetes。
Spring Cloud Netflix Zuul
Zuul 是 Netflix 公司开源的一个 API 网关组件,Spring Cloud 对其进行二次基于 Spring Boot 的注解式封装做到开箱即用。目前来说,结合 Sring Cloud 提供的服务治理体系,可以做到请求转发,根据配置或者默认的路由规则进行路由和 Load Balance,无缝集成 Hystrix。
虽然可以通过自定义 Filter 实现我们想要的功能,但是由于 Zuul 本身的设计是基于单线程的接收请求和转发处理,是阻塞 IO,不支持长连接。目前来看 Zuul 就显得很鸡肋,随着 Zuul 2.x 一直跳票(2019 年 5 月发布了 Zuul 2.0 版本),Spring Cloud 推出自己的 Spring Cloud Gateway。
大意就是:Zuul 已死,Spring Cloud Gateway 永生(手动狗头)。
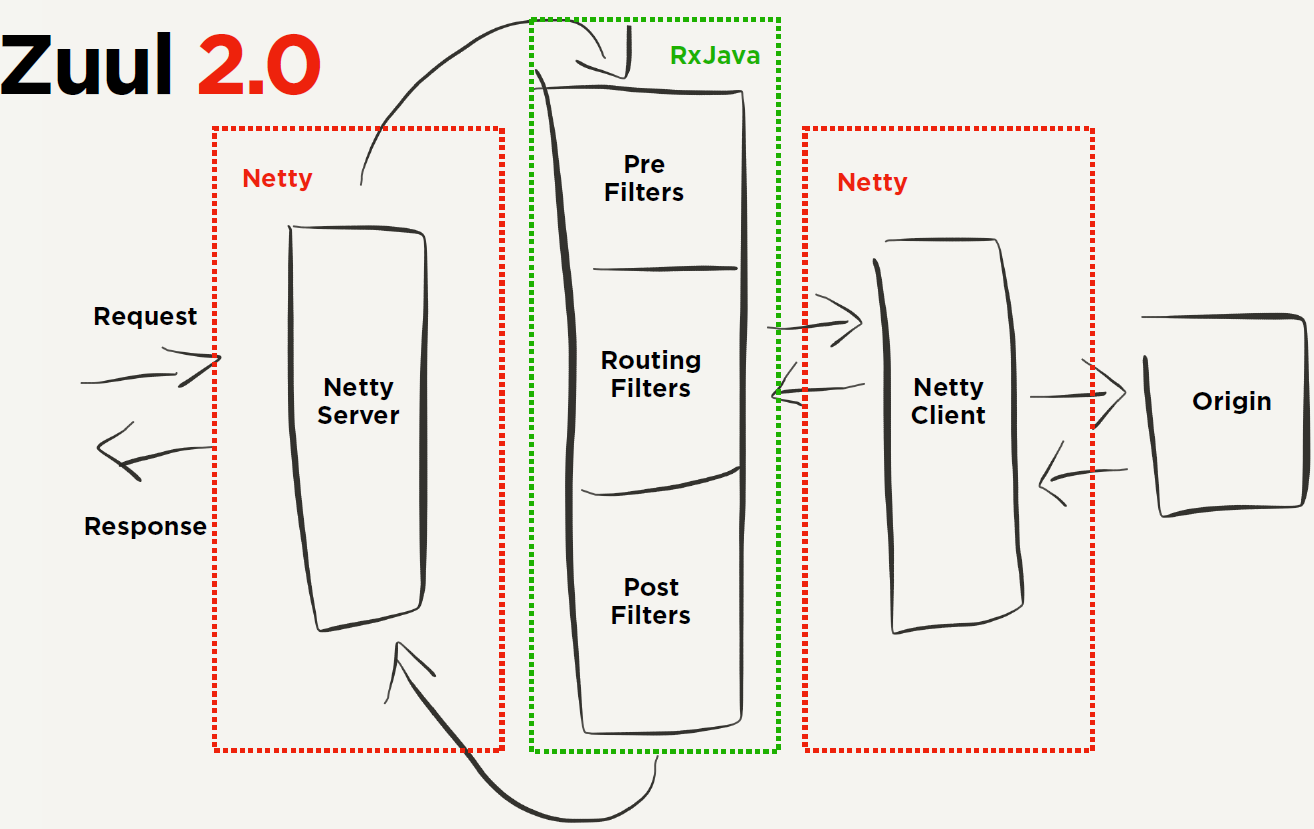
Zuul 1.0
Zuul 2.0
Spring Cloud Gateway
本文主角。
环境准备
gateway-demo 聚合工程。SpringBoot 2.2.4.RELEASE、Spring Cloud Hoxton.SR1。
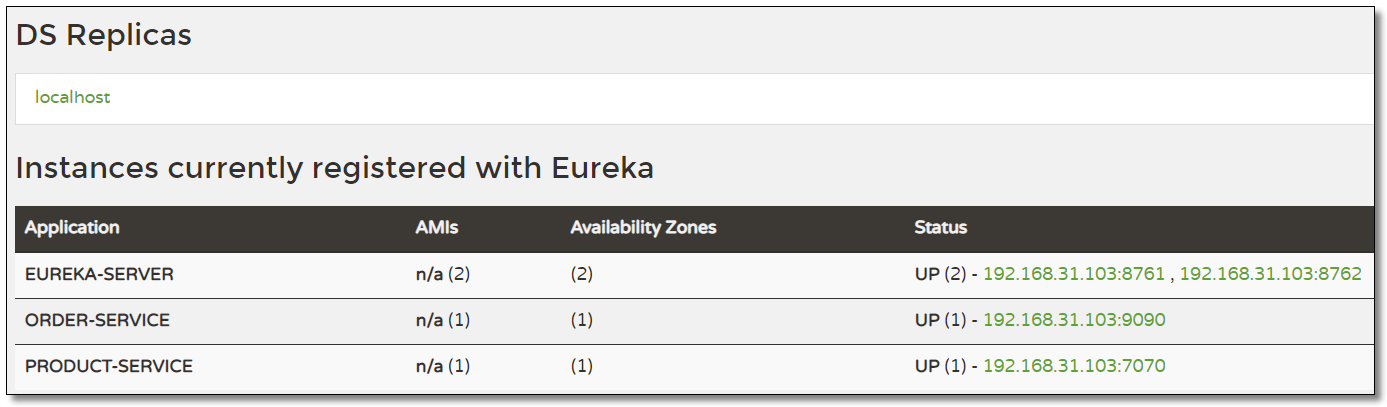
eureka-server:注册中心eureka-server02:注册中心product-service:商品服务,提供了根据主键查询商品接口 http://localhost:7070/product/{id}order-service:订单服务,提供了根据主键查询订单接口 http://localhost:9090/order/{id} 且订单服务调用商品服务。
Nginx 实现 API 网关
之前的课程中我们已经详细的讲解过 Nginx 关于反向代理、负载均衡等功能的使用,这里不再赘述。这里主要通过 Nginx 来实现 API 网关方便大家更好的学习和理解 Spring Cloud Gateway 的使用。
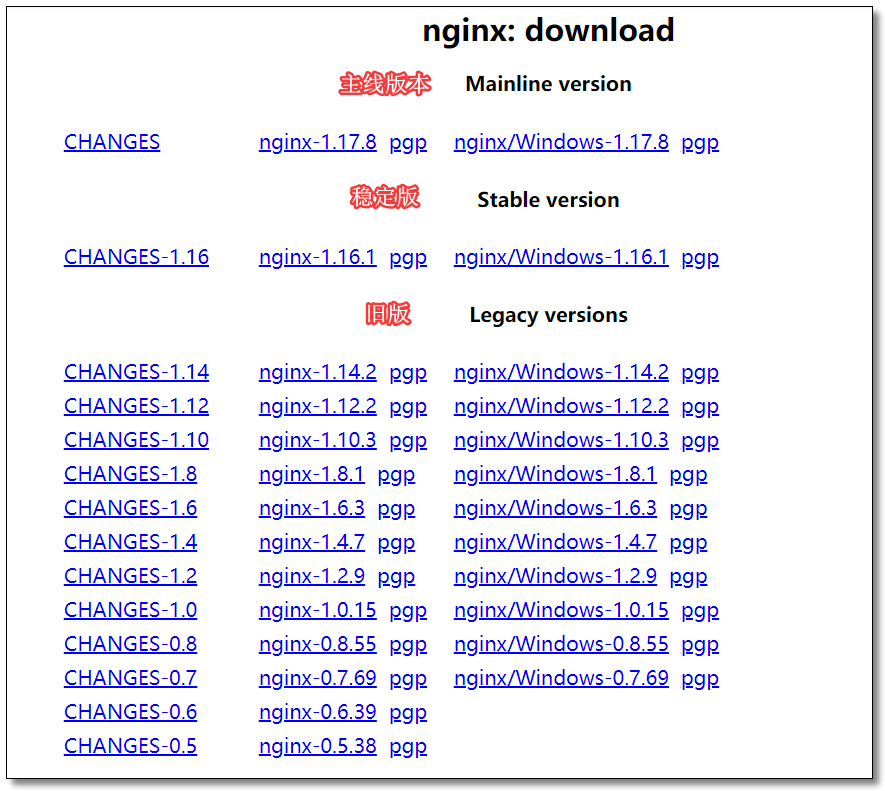
下载
官网:http://nginx.org/en/download.html 下载稳定版。为了方便学习,请下载 Windows 版本。
安装
解压文件后直接运行根路径下的 nginx.exe 文件即可。
Nginx 默认端口为 80,访问:http://localhost:80/ 看到下图说明安装成功。
配置路由规则
进入 Nginx 的 conf 目录,打开 nginx.conf 文件,配置路由规则:
 1
 2
 3
 4
 5
 6
 7
 8
 9
10
11
12
13
14
15
16
17
18
19
20
21
22
23
24
25
26
http {

	...

    server {
        listen       80;
        server_name  localhost;

        ...

        # 路由到商品服务
        location /api-product {
            proxy_pass http://localhost:7070/;
        }

        # 路由到订单服务
        location /api-order {
            proxy_pass http://localhost:9090/;
        }

        ...
    }

    ...

}
访问
之前我们如果要访问服务,必须由客户端指定具体服务地址访问,现在统一访问 Nginx,由 Nginx 实现网关功能将请求路由至具体的服务。
访问:http://localhost/api-product/product/1 结果如下:
访问:http://localhost/api-order/order/1 结果如下:
Gateway 实现 API 网关
官网文档:https://cloud.spring.io/spring-cloud-static/spring-cloud-gateway/2.2.1.RELEASE/reference/html/
核心概念
路由(Route) :路由是网关最基础的部分,路由信息由 ID、目标 URI、一组断言和一组过滤器组成。如果断言路由为真,则说明请求的 URI 和配置匹配。
断言(Predicate) :Java8 中的断言函数。Spring Cloud Gateway 中的断言函数输入类型是 Spring 5.0 框架中的 ServerWebExchange。Spring Cloud Gateway 中的断言函数允许开发者去定义匹配来自于 Http Request 中的任何信息,比如请求头和参数等。
过滤器(Filter) :一个标准的 Spring Web Filter。Spring Cloud Gateway 中的 Filter 分为两种类型,分别是 Gateway Filter 和 Global Filter。过滤器将会对请求和响应进行处理。
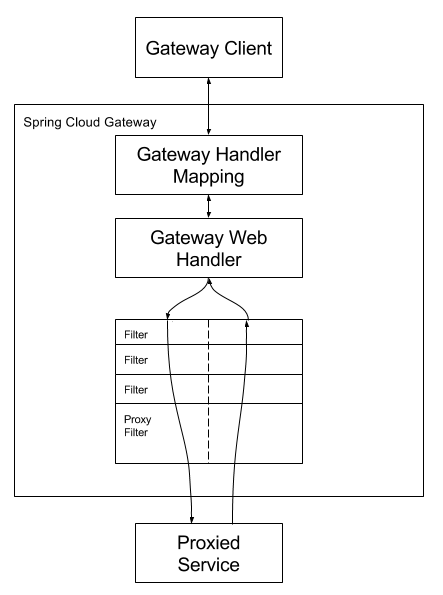
工作原理
如上图所示,客户端向 Spring Cloud Gateway 发出请求。再由网关处理程序 Gateway Handler Mapping 映射确定与请求相匹配的路由,将其发送到网关 Web 处理程序 Gateway Web Handler。该处理程序通过指定的过滤器链将请求发送到我们实际的服务执行业务逻辑,然后返回。过滤器由虚线分隔的原因是,过滤器可以在发送代理请求之前和之后运行逻辑。所有 pre 过滤器逻辑均被执行。然后发出代理请求。发出代理请求后,将运行 post 过滤器逻辑。
搭建网关服务
创建项目
创建 gateway-server 项目。
添加依赖
添加 spring cloud gateway 依赖。
 1
 2
 3
 4
 5
 6
 7
 8
 9
10
11
12
13
14
15
16
17
18
19
20
21
22
23
24
25
26
27
<?xml version="1.0" encoding="UTF-8"?>
<project xmlns= "http://maven.apache.org/POM/4.0.0" xmlns:xsi= "http://www.w3.org/2001/XMLSchema-instance"
xsi:schemaLocation= "http://maven.apache.org/POM/4.0.0 http://maven.apache.org/xsd/maven-4.0.0.xsd" >
<modelVersion> 4.0.0</modelVersion>
<groupId> com.example</groupId>
<artifactId> gateway-server</artifactId>
<version> 1.0-SNAPSHOT</version>
<!-- 继承父依赖 -->
<parent>
<groupId> com.example</groupId>
<artifactId> gateway-demo</artifactId>
<version> 1.0-SNAPSHOT</version>
</parent>
<!-- 项目依赖 -->
<dependencies>
<!-- spring cloud gateway 依赖 -->
<dependency>
<groupId> org.springframework.cloud</groupId>
<artifactId> spring-cloud-starter-gateway</artifactId>
</dependency>
</dependencies>
</project>
配置文件
application.yml
1
2
3
4
5
6
server :
port : 9000 # 端口
spring :
application :
name : gateway-server # 应用名称
启动类
 1
 2
 3
 4
 5
 6
 7
 8
 9
10
11
12
13
package com.example ;
import org.springframework.boot.SpringApplication ;
import org.springframework.boot.autoconfigure.SpringBootApplication ;
@SpringBootApplication
public class GatewayServerApplication {
public static void main ( String [] args ) {
SpringApplication . run ( GatewayServerApplication . class , args );
}
}
配置路由规则
 1
 2
 3
 4
 5
 6
 7
 8
 9
10
11
spring :
application :
name : gateway-server # 应用名称
cloud :
gateway :
# 路由规则
routes :
- id : product-service # 路由 ID,唯一
uri : http://localhost:7070/ # 目标 URI,路由到微服务的地址
predicates : # 断言(判断条件)
- Path=/product/** # 匹配对应 URL 的请求,将匹配到的请求追加在目标 URI 之后
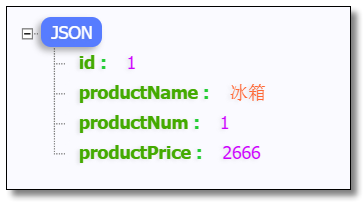
请求 http://localhost:9000/product/1 将会路由至 http://localhost:7070/product/1
访问:http://localhost:9000/product/1 结果如下:
路由规则
Spring Cloud Gateway 创建 Route 对象时, 使用 RoutePredicateFactory 创建 Predicate 对象,Predicate 对象可以赋值给 Route。
Spring Cloud Gateway 包含许多内置的 Route Predicate Factories。
所有这些断言都匹配 HTTP 请求的不同属性。
多个 Route Predicate Factories 可以通过逻辑与(and)结合起来一起使用。
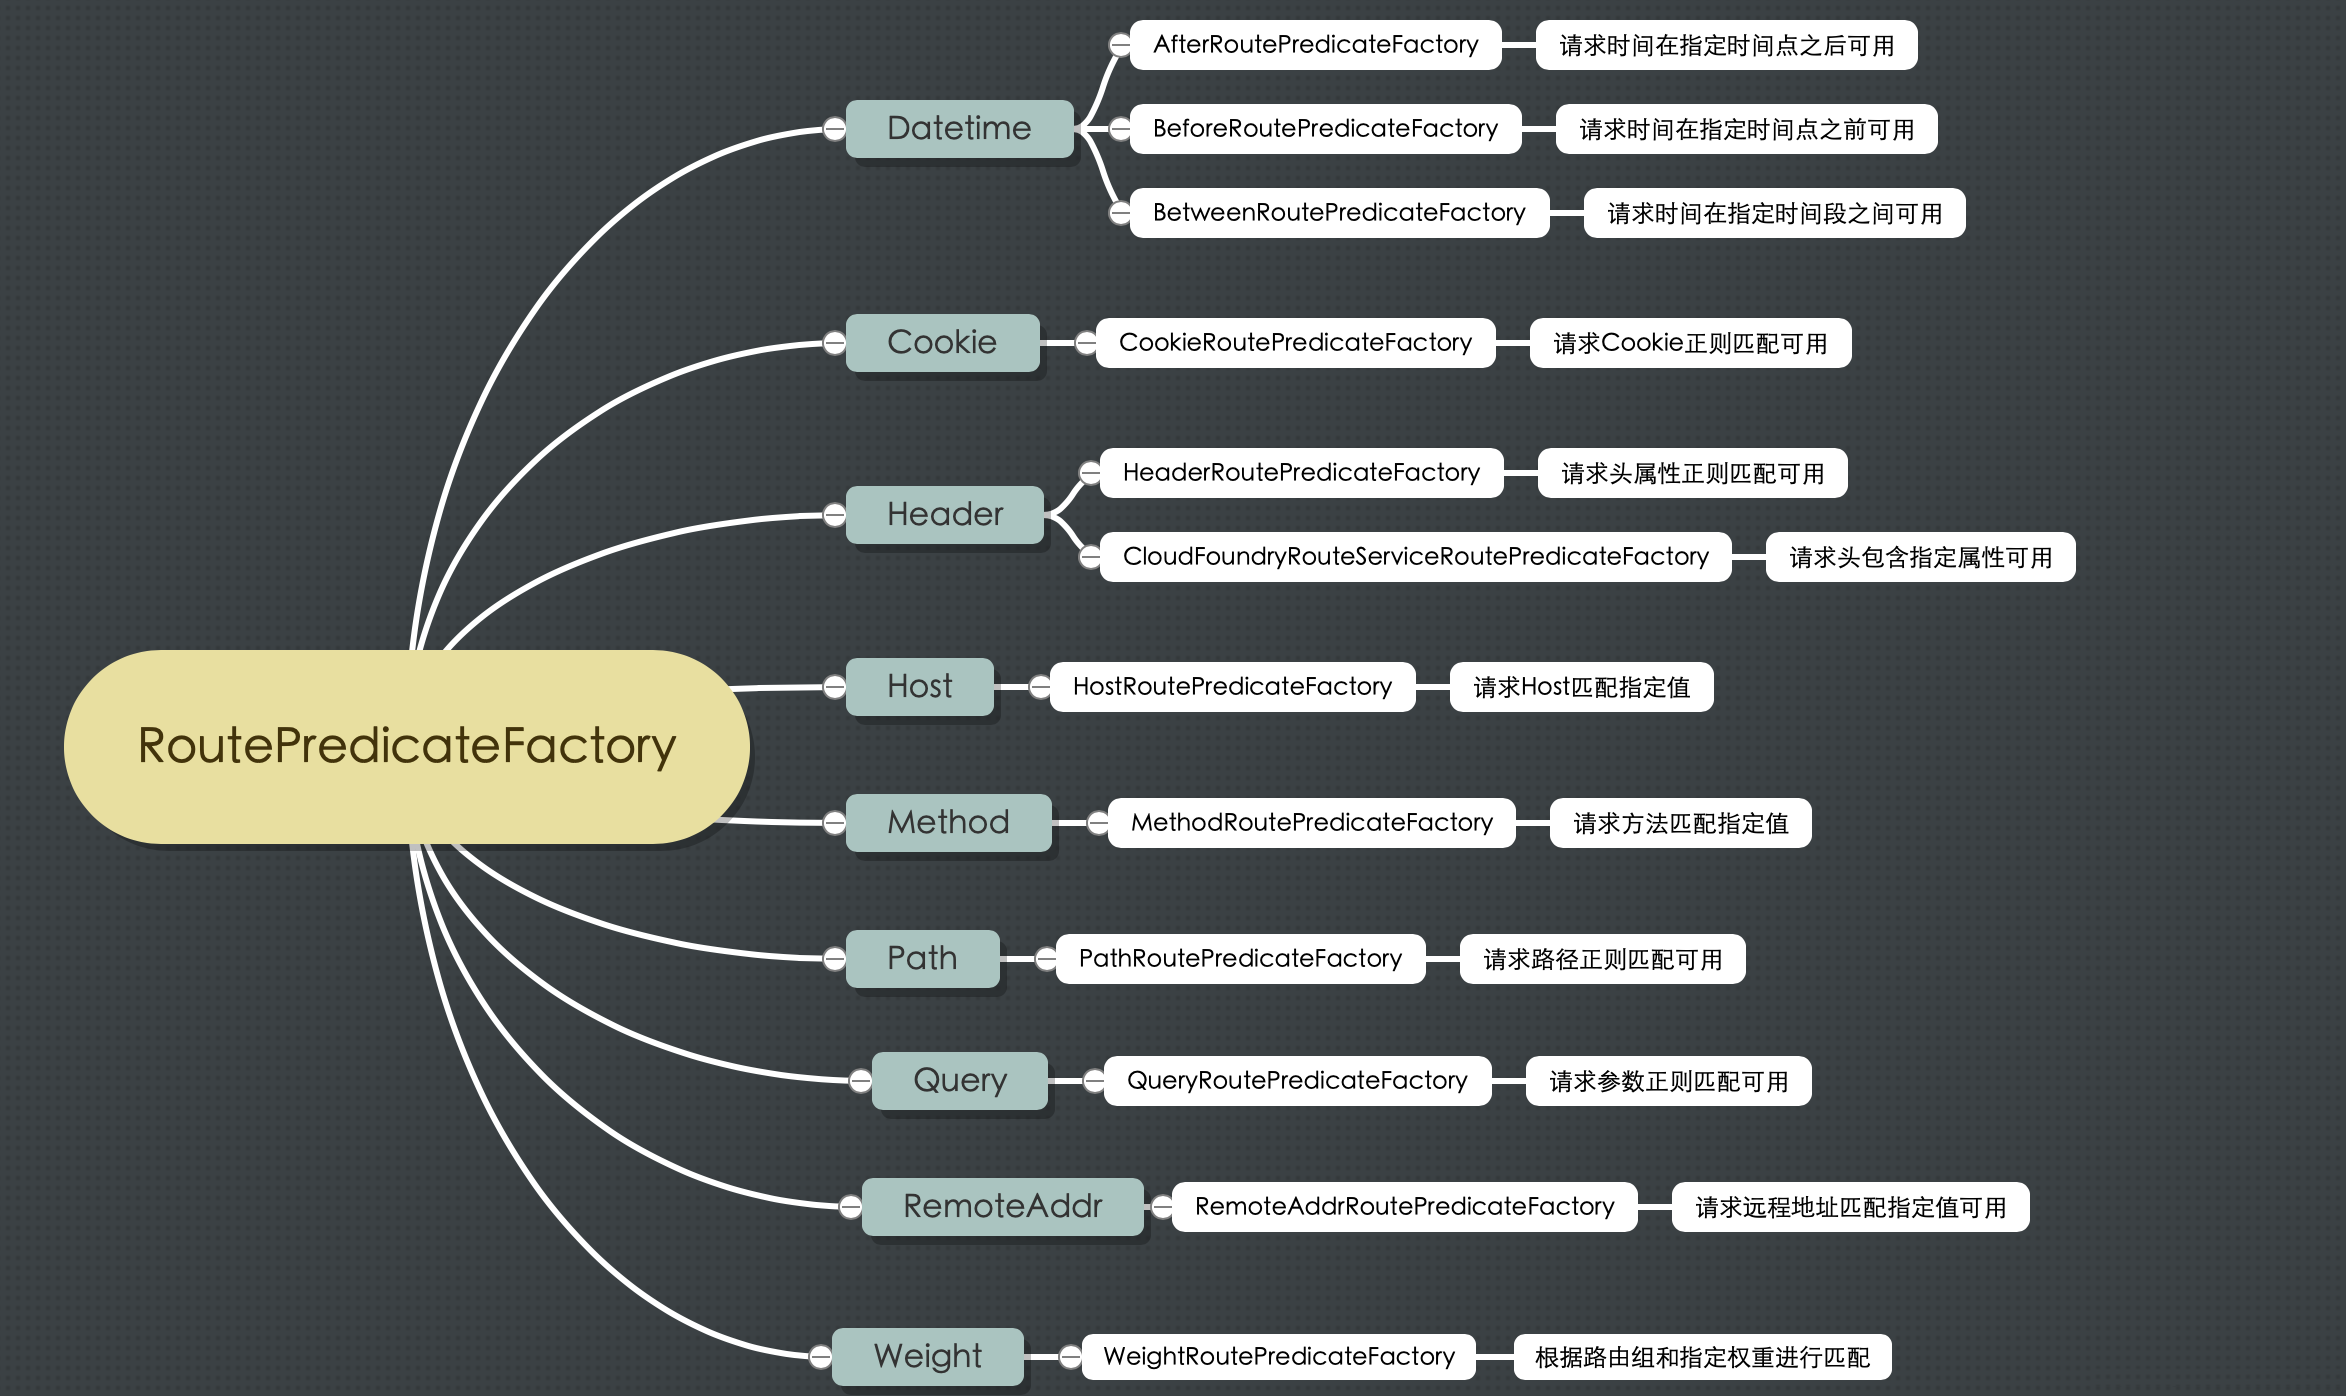
路由断言工厂 RoutePredicateFactory 包含的主要实现类如图所示,包括 Datetime、 请求的远端地址、 路由权重、 请求头、 Host 地址、 请求方法、 请求路径和请求参数等类型的路由断言。
接下来我们举例说明其中一部分如何使用,其余等大家工作中需要应用时再查询资料学习或者咨询我也可以。
Path
 1
 2
 3
 4
 5
 6
 7
 8
 9
10
11
spring :
application :
name : gateway-server # 应用名称
cloud :
gateway :
# 路由规则
routes :
- id : product-service # 路由 ID,唯一
uri : http://localhost:7070/ # 目标 URI,路由到微服务的地址
predicates : # 断言(判断条件)
- Path=/product/** # 匹配对应 URL 的请求,将匹配到的请求追加在目标 URI 之后
请求 http://localhost:9000/product/1 将会路由至 http://localhost:7070/product/1
Query
 1
 2
 3
 4
 5
 6
 7
 8
 9
10
11
12
spring :
application :
name : gateway-server # 应用名称
cloud :
gateway :
# 路由规则
routes :
- id : product-service # 路由 ID,唯一
uri : http://localhost:7070/ # 目标 URI,路由到微服务的地址
predicates : # 断言(判断条件)
#- Query=token # 匹配请求参数中包含 token 的请求
- Query=token, abc. # 匹配请求参数中包含 token 并且其参数值满足正则表达式 abc. 的请求
Query=token:比如,http://localhost:9000/product/1?token=123Query=token, abc.:比如,http://localhost:9000/product/1?token=abc1
Method
 1
 2
 3
 4
 5
 6
 7
 8
 9
10
11
spring :
application :
name : gateway-server # 应用名称
cloud :
gateway :
# 路由规则
routes :
- id : product-service # 路由 ID,唯一
uri : http://localhost:7070/ # 目标 URI,路由到微服务的地址
predicates : # 断言(判断条件)
- Method=GET # 匹配任意 GET 请求
Datetime
 1
 2
 3
 4
 5
 6
 7
 8
 9
10
11
12
spring :
application :
name : gateway-server # 应用名称
cloud :
gateway :
# 路由规则
routes :
- id : product-service # 路由 ID,唯一
uri : http://localhost:7070/ # 目标 URI,路由到微服务的地址
predicates : # 断言(判断条件)
# 匹配中国上海时间 2020-02-02 20:20:20 之后的请求
- After=2020-02-02T20:20:20.000+08:00[Asia/Shanghai]
RemoteAddr
 1
 2
 3
 4
 5
 6
 7
 8
 9
10
11
spring :
application :
name : gateway-server # 应用名称
cloud :
gateway :
# 路由规则
routes :
- id : product-service # 路由 ID,唯一
uri : http://localhost:7070/ # 目标 URI,路由到微服务的地址
predicates : # 断言(判断条件)
- RemoteAddr=192.168.10.1/0 # 匹配远程地址请求是 RemoteAddr 的请求,0表示子网掩码
RemoteAddr=192.168.10.1/0:比如,http://192.168.10.1:9000/product/1
 1
 2
 3
 4
 5
 6
 7
 8
 9
10
11
12
spring :
application :
name : gateway-server # 应用名称
cloud :
gateway :
# 路由规则
routes :
- id : product-service # 路由 ID,唯一
uri : http://localhost:7070/ # 目标 URI,路由到微服务的地址
predicates : # 断言(判断条件)
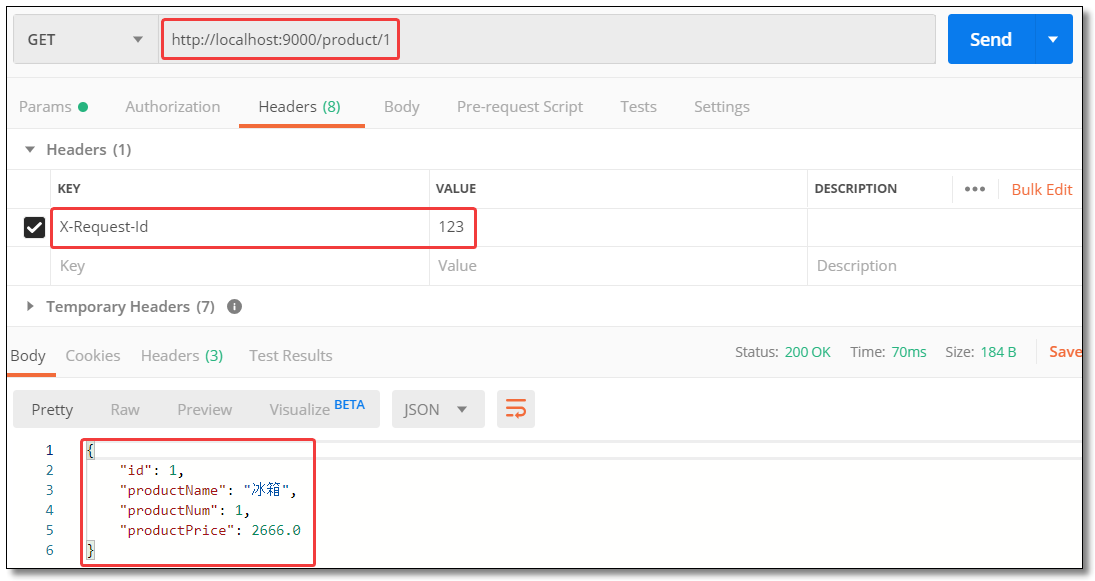
# 匹配请求头包含 X-Request-Id 并且其值匹配正则表达式 \d+ 的请求
- Header=X-Request-Id, \d+
动态路由(服务发现的路由规则)
动态路由其实就是面向服务的路由,Spring Cloud Gateway 支持与 Eureka 整合开发,根据 serviceId 自动从注册中心获取服务地址并转发请求,这样做的好处不仅可以通过单个端点来访问应用的所有服务,而且在添加或移除服务实例时不用修改 Gateway 的路由配置。
添加依赖
1
2
3
4
5
<!-- netflix eureka client 依赖 -->
<dependency>
<groupId> org.springframework.cloud</groupId>
<artifactId> spring-cloud-starter-netflix-eureka-client</artifactId>
</dependency>
动态获取 URI
配置文件
配置注册中心和动态路由规则。
 1
 2
 3
 4
 5
 6
 7
 8
 9
10
11
12
13
14
15
16
17
18
19
20
21
22
23
server :
port : 9000 # 端口
spring :
application :
name : gateway-server # 应用名称
cloud :
gateway :
# 路由规则
routes :
- id : product-service # 路由 ID,唯一
uri : lb://product-service # lb:// 根据服务名称从注册中心获取服务请求地址
predicates : # 断言(判断条件)
- Path=/product/** # 匹配对应 URL 的请求,将匹配到的请求追加在目标 URI 之后
# 配置 Eureka Server 注册中心
eureka :
instance :
prefer-ip-address : true # 是否使用 ip 地址注册
instance-id : ${spring.cloud.client.ip-address}:${server.port} # ip:port
client :
service-url : # 设置服务注册中心地址
defaultZone : http://localhost:8761/eureka/,http://localhost:8762/eureka/
启动类
 1
 2
 3
 4
 5
 6
 7
 8
 9
10
11
12
13
14
15
package com.example ;
import org.springframework.boot.SpringApplication ;
import org.springframework.boot.autoconfigure.SpringBootApplication ;
// 开启 EurekaClient 注解,目前版本如果配置了 Eureka 注册中心,默认会开启该注解
//@EnableEurekaClient
@SpringBootApplication
public class GatewayServerApplication {
public static void main ( String [] args ) {
SpringApplication . run ( GatewayServerApplication . class , args );
}
}
访问
访问:http://localhost:9000/product/1 结果如下:
服务名称转发
即使配置了动态获取 URI 的方式,项目中微服务一旦过多几十上百个时,配置中仍然要写很多配置,这时候就可以使用服务名称转发,与服务发现组件进行结合,通过 serviceId 转发到具体服务实例。默认匹配URL /微服务名称/** 路由到具体微服务。
配置文件
配置注册中心和动态路由规则。
 1
 2
 3
 4
 5
 6
 7
 8
 9
10
11
12
13
14
15
16
17
18
19
20
21
22
server :
port : 9000 # 端口
spring :
application :
name : gateway-server # 应用名称
cloud :
gateway :
discovery :
locator :
# 是否与服务发现组件进行结合,通过 serviceId 转发到具体服务实例。
enabled : true # 是否开启基于服务发现的路由规则
lower-case-service-id : true # 是否将服务名称转小写
# 配置 Eureka Server 注册中心
eureka :
instance :
prefer-ip-address : true # 是否使用 ip 地址注册
instance-id : ${spring.cloud.client.ip-address}:${server.port} # ip:port
client :
service-url : # 设置服务注册中心地址
defaultZone : http://localhost:8761/eureka/,http://localhost:8762/eureka/
启动类
 1
 2
 3
 4
 5
 6
 7
 8
 9
10
11
12
13
14
15
package com.example ;
import org.springframework.boot.SpringApplication ;
import org.springframework.boot.autoconfigure.SpringBootApplication ;
// 开启 EurekaClient 注解,目前版本如果配置了 Eureka 注册中心,默认会开启该注解
//@EnableEurekaClient
@SpringBootApplication
public class GatewayServerApplication {
public static void main ( String [] args ) {
SpringApplication . run ( GatewayServerApplication . class , args );
}
}
访问
配置文件中没有配置任何订单服务的信息,访问:http://localhost:9000/order-service/order/1 结果如下:
过滤器
Spring Cloud Gateway 根据作用范围划分为 GatewayFilter 和 GlobalFilter,二者区别如下:
GatewayFilter:网关过滤器,需要通过 spring.cloud.routes.filters 配置在具体路由下,只作用在当前路由上或通过 spring.cloud.default-filters 配置在全局,作用在所有路由上。GlobalFilter:全局过滤器,不需要在配置文件中配置,作用在所有的路由上,最终通过 GatewayFilterAdapter 包装成 GatewayFilterChain 可识别的过滤器,它为请求业务以及路由的 URI 转换为真实业务服务请求地址的核心过滤器,不需要配置系统初始化时加载,并作用在每个路由上。
网关过滤器 GatewayFilter
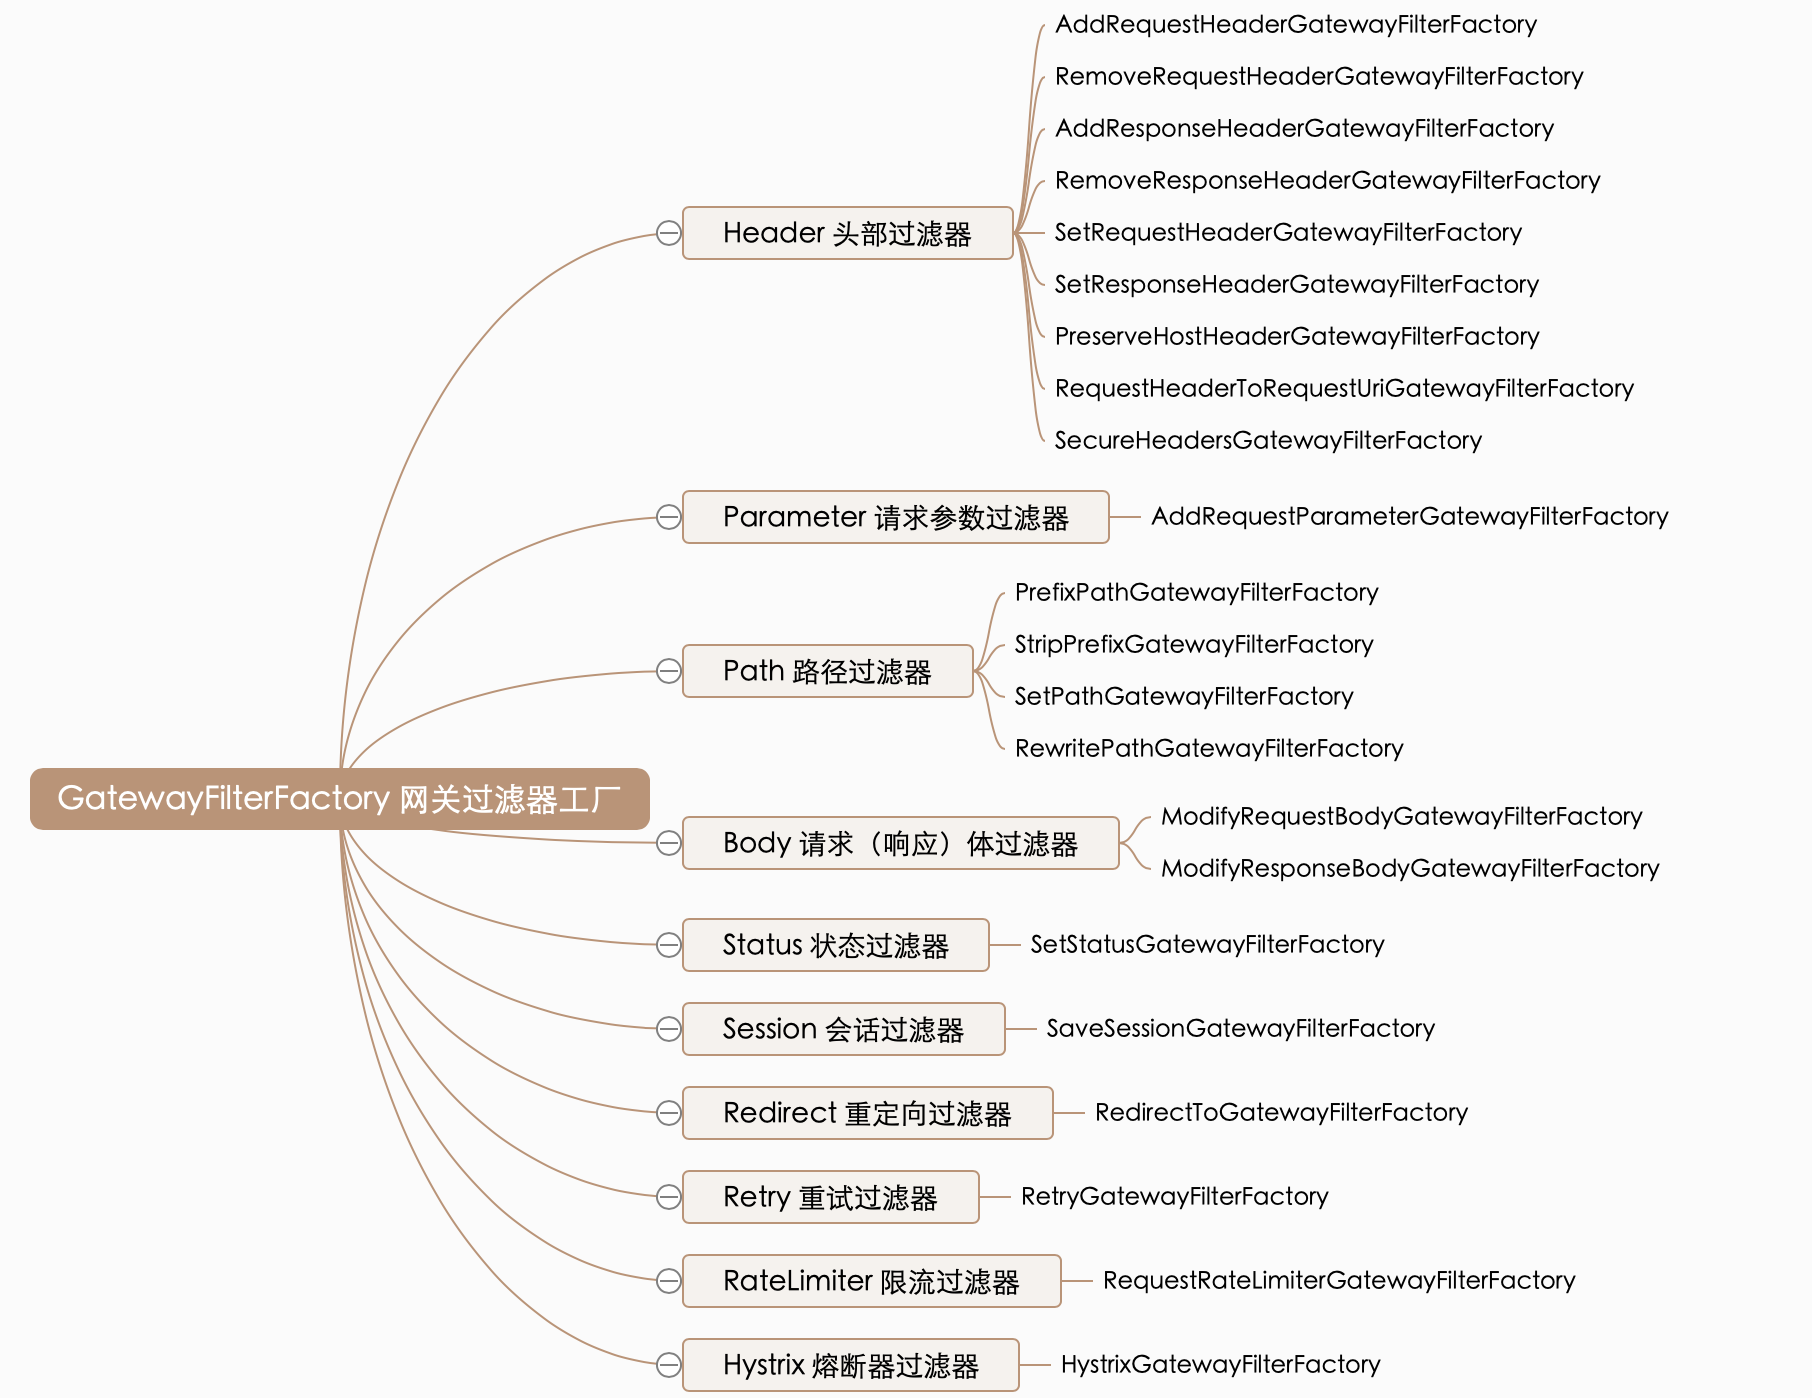
网关过滤器用于拦截并链式处理 Web 请求,可以实现横切与应用无关的需求,比如:安全、访问超时的设置等。修改传入的 HTTP 请求或传出 HTTP 响应。Spring Cloud Gateway 包含许多内置的网关过滤器工厂一共有 22 个,包括头部过滤器、 路径类过滤器、Hystrix 过滤器和重写请求 URL 的过滤器, 还有参数和状态码等其他类型的过滤器。根据过滤器工厂的用途来划分,可以分为以下几种:Header、Parameter、Path、Body、Status、Session、Redirect、Retry、RateLimiter 和 Hystrix。
接下来我们举例说明其中一部分如何使用,其余等大家工作中需要应用时再查询资料学习或者咨询我也可以。
Path 路径过滤器
Path 路径过滤器可以实现 URL 重写,通过重写 URL 可以实现隐藏实际路径提高安全性,易于用户记忆和键入,易于被搜索引擎收录等优点。实现方式如下:
RewritePathGatewayFilterFactory
RewritePath 网关过滤器工厂采用路径正则表达式参数和替换参数,使用 Java 正则表达式来灵活地重写请求路径。
 1
 2
 3
 4
 5
 6
 7
 8
 9
10
11
12
13
14
15
spring :
application :
name : gateway-server # 应用名称
cloud :
gateway :
# 路由规则
routes :
- id : product-service # 路由 ID,唯一
uri : lb://product-service # lb:// 根据服务名称从注册中心获取服务请求地址,并遵循负载均衡策略
predicates : # 断言(判断条件)
# 匹配对应 URI 的请求,将匹配到的请求追加在目标 URI 之后
- Path=/product/**, /api-gateway/**
filters : # 网关过滤器
# 将 /api-gateway/product/1 重写为 /product/1
- RewritePath=/api-gateway(?<segment>/?.*), $\{segment}
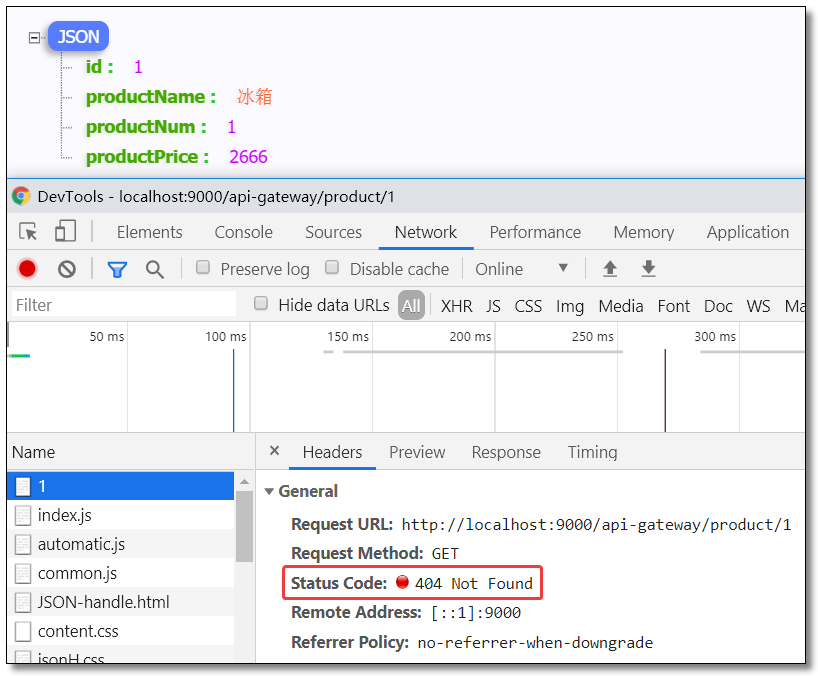
访问:http://localhost:9000/api-gateway/product/1 结果如下:
PrefixPathGatewayFilterFactory
PrefixPath 网关过滤器工厂为匹配的 URI 添加指定前缀。
 1
 2
 3
 4
 5
 6
 7
 8
 9
10
11
12
13
14
15
spring :
application :
name : gateway-server # 应用名称
cloud :
gateway :
# 路由规则
routes :
- id : product-service # 路由 ID,唯一
uri : lb://product-service # lb:// 根据服务名称从注册中心获取服务请求地址,并遵循负载均衡策略
predicates : # 断言(判断条件)
# 匹配对应 URI 的请求,将匹配到的请求追加在目标 URI 之后
- Path=/**
filters : # 网关过滤器
# 将 /1 重写为 /product/1
- PrefixPath=/product
访问:http://localhost:9000/1 结果如下:
StripPrefixGatewayFilterFactory
StripPrefix 网关过滤器工厂采用一个参数 StripPrefix,该参数表示在将请求发送到下游之前从请求中剥离的路径个数。
 1
 2
 3
 4
 5
 6
 7
 8
 9
10
11
12
13
14
15
spring :
application :
name : gateway-server # 应用名称
cloud :
gateway :
# 路由规则
routes :
- id : product-service # 路由 ID,唯一
uri : lb://product-service # lb:// 根据服务名称从注册中心获取服务请求地址,并遵循负载均衡策略
predicates : # 断言(判断条件)
# 匹配对应 URI 的请求,将匹配到的请求追加在目标 URI 之后
- Path=/**
filters : # 网关过滤器
# 将 /api/123/product/1 重写为 /product/1
- StripPrefix=2
访问:http://localhost:9000/api/123/product/1 结果如下:
SetPathGatewayFilterFactory
SetPath 网关过滤器工厂采用路径模板参数。 它提供了一种通过允许模板化路径段来操作请求路径的简单方法,使用了 Spring Framework 中的 uri 模板,允许多个匹配段。
 1
 2
 3
 4
 5
 6
 7
 8
 9
10
11
12
13
14
15
spring :
application :
name : gateway-server # 应用名称
cloud :
gateway :
# 路由规则
routes :
- id : product-service # 路由 ID,唯一
uri : lb://product-service # lb:// 根据服务名称从注册中心获取服务请求地址,并遵循负载均衡策略
predicates : # 断言(判断条件)
# 匹配对应 URI 的请求,将匹配到的请求追加在目标 URI 之后
- Path=/api/product/{segment}
filters : # 网关过滤器
# 将 /api/product/1 重写为 /product/1
- SetPath=/product/{segment}
访问:http://localhost:9000/api/product/1 结果如下:
Parameter 参数过滤器
AddRequestParameter 网关过滤器工厂会将指定参数添加至匹配到的下游请求中。
 1
 2
 3
 4
 5
 6
 7
 8
 9
10
11
12
13
14
15
16
17
spring :
application :
name : gateway-server # 应用名称
cloud :
gateway :
# 路由规则
routes :
- id : product-service # 路由 ID,唯一
uri : lb://product-service # lb:// 根据服务名称从注册中心获取服务请求地址,并遵循负载均衡策略
predicates : # 断言(判断条件)
# 匹配对应 URI 的请求,将匹配到的请求追加在目标 URI 之后
- Path=/api-gateway/**
filters : # 网关过滤器
# 将 /api-gateway/product/1 重写为 /product/1
- RewritePath=/api-gateway(?<segment>/?.*), $\{segment}
# 在下游请求中添加 flag=1
- AddRequestParameter=flag, 1
修改商品服务的控制层代码。
 1
 2
 3
 4
 5
 6
 7
 8
 9
10
11
12
13
14
15
16
17
18
19
20
21
22
23
24
25
26
27
28
29
30
package com.example.controller ;
import com.example.pojo.Product ;
import com.example.service.ProductService ;
import org.springframework.beans.factory.annotation.Autowired ;
import org.springframework.web.bind.annotation.GetMapping ;
import org.springframework.web.bind.annotation.PathVariable ;
import org.springframework.web.bind.annotation.RequestMapping ;
import org.springframework.web.bind.annotation.RestController ;
@RestController
@RequestMapping ( "/product" )
public class ProductController {
@Autowired
private ProductService productService ;
/**
* 根据主键查询商品
*
* @param id
* @return
*/
@GetMapping ( "/{id}" )
public Product selectProductById ( @PathVariable ( "id" ) Integer id , String flag ) {
System . out . println ( "flag = " + flag );
return productService . selectProductById ( id );
}
}
访问:http://localhost:9000/api-gateway/product/1 控制台结果如下:
Status 状态过滤器
SetStatus 网关过滤器工厂采用单个状态参数,它必须是有效的 Spring HttpStatus。它可以是整数 404 或枚举 NOT_FOUND 的字符串表示。
 1
 2
 3
 4
 5
 6
 7
 8
 9
10
11
12
13
14
15
16
17
spring :
application :
name : gateway-server # 应用名称
cloud :
gateway :
# 路由规则
routes :
- id : product-service # 路由 ID,唯一
uri : lb://product-service # lb:// 根据服务名称从注册中心获取服务请求地址,并遵循负载均衡策略
predicates : # 断言(判断条件)
# 匹配对应 URI 的请求,将匹配到的请求追加在目标 URI 之后
- Path=/api-gateway/**
filters : # 网关过滤器
# 将 /api-gateway/product/1 重写为 /product/1
- RewritePath=/api-gateway(?<segment>/?.*), $\{segment}
# 任何情况下,响应的 HTTP 状态都将设置为 404
- SetStatus=404 # 404 或者对应的枚举 NOT_FOUND
访问:http://localhost:9000/api-gateway/product/1 结果如下:
全局过滤器 GlobalFilter
全局过滤器不需要在配置文件中配置,作用在所有的路由上,最终通过 GatewayFilterAdapter 包装成 GatewayFilterChain 可识别的过滤器,它是请求业务以及路由的 URI 转换为真实业务服务请求地址的核心过滤器,不需要配置系统初始化时加载,并作用在每个路由上。
自定义过滤器
即使 Spring Cloud Gateway 自带许多实用的 GatewayFilter Factory、Gateway Filter、Global Filter,但是在很多情景下我们仍然希望可以自定义自己的过滤器,实现一些骚操作。
自定义网关过滤器
自定义网关过滤器需要实现以下两个接口 :GatewayFilter,Ordered。
创建过滤器
CustomGatewayFilter.java
 1
 2
 3
 4
 5
 6
 7
 8
 9
10
11
12
13
14
15
16
17
18
19
20
21
22
23
24
25
26
27
28
29
30
31
32
33
34
35
36
37
package com.example.filter ;
import org.springframework.cloud.gateway.filter.GatewayFilter ;
import org.springframework.cloud.gateway.filter.GatewayFilterChain ;
import org.springframework.core.Ordered ;
import org.springframework.web.server.ServerWebExchange ;
import reactor.core.publisher.Mono ;
/**
* 自定义网关过滤器
*/
public class CustomGatewayFilter implements GatewayFilter , Ordered {
/**
* 过滤器业务逻辑
*
* @param exchange
* @param chain
* @return
*/
@Override
public Mono < Void > filter ( ServerWebExchange exchange , GatewayFilterChain chain ) {
System . out . println ( "自定义网关过滤器被执行" );
return chain . filter ( exchange ); // 继续向下执行
}
/**
* 过滤器执行顺序,数值越小,优先级越高
*
* @return
*/
@Override
public int getOrder () {
return 0 ;
}
}
注册过滤器
 1
 2
 3
 4
 5
 6
 7
 8
 9
10
11
12
13
14
15
16
17
18
19
20
21
22
23
24
25
26
27
28
29
package com.example.config ;
import com.example.filter.CustomGatewayFilter ;
import org.springframework.cloud.gateway.route.RouteLocator ;
import org.springframework.cloud.gateway.route.builder.RouteLocatorBuilder ;
import org.springframework.context.annotation.Bean ;
import org.springframework.context.annotation.Configuration ;
/**
* 网关路由配置类
*/
@Configuration
public class GatewayRoutesConfiguration {
@Bean
public RouteLocator routeLocator ( RouteLocatorBuilder builder ) {
return builder . routes (). route ( r -> r
// 断言(判断条件)
. path ( "/product/**" )
// 目标 URI,路由到微服务的地址
. uri ( "lb://product-service" )
// 注册自定义网关过滤器
. filters ( new CustomGatewayFilter ())
// 路由 ID,唯一
. id ( "product-service" ))
. build ();
}
}
访问
注释配置文件中所有网关配置,重启并访问:http://localhost:9000/product/1 控制台结果如下:
自定义全局过滤器
自定义全局过滤器需要实现以下两个接口 :GlobalFilter,Ordered。通过全局过滤器可以实现权限校验,安全性验证等功能。
创建过滤器
实现指定接口,添加 @Component 注解即可。
CustomGlobalFilter.java
 1
 2
 3
 4
 5
 6
 7
 8
 9
10
11
12
13
14
15
16
17
18
19
20
21
22
23
24
25
26
27
28
29
30
31
32
33
34
35
36
37
38
39
package com.example.filter ;
import org.springframework.cloud.gateway.filter.GatewayFilterChain ;
import org.springframework.cloud.gateway.filter.GlobalFilter ;
import org.springframework.core.Ordered ;
import org.springframework.stereotype.Component ;
import org.springframework.web.server.ServerWebExchange ;
import reactor.core.publisher.Mono ;
/**
* 自定义全局过滤器
*/
@Component
public class CustomGlobalFilter implements GlobalFilter , Ordered {
/**
* 过滤器业务逻辑
*
* @param exchange
* @param chain
* @return
*/
@Override
public Mono < Void > filter ( ServerWebExchange exchange , GatewayFilterChain chain ) {
System . out . println ( "自定义全局过滤器被执行" );
return chain . filter ( exchange ); // 继续向下执行
}
/**
* 过滤器执行顺序,数值越小,优先级越高
*
* @return
*/
@Override
public int getOrder () {
return 0 ;
}
}
访问
访问:http://localhost:9000/product/1 控制台结果如下:
统一鉴权
接下来我们在网关过滤器中通过 token 判断用户是否登录,完成一个统一鉴权案例。
创建过滤器
AccessFilter.java
 1
 2
 3
 4
 5
 6
 7
 8
 9
10
11
12
13
14
15
16
17
18
19
20
21
22
23
24
25
26
27
28
29
30
31
32
33
34
35
36
37
38
39
40
41
42
43
44
45
46
47
48
49
50
51
52
53
54
55
56
57
58
59
60
61
62
63
package com.example.filter ;
import org.slf4j.Logger ;
import org.slf4j.LoggerFactory ;
import org.springframework.cloud.gateway.filter.GatewayFilterChain ;
import org.springframework.cloud.gateway.filter.GlobalFilter ;
import org.springframework.core.Ordered ;
import org.springframework.core.io.buffer.DataBuffer ;
import org.springframework.http.HttpStatus ;
import org.springframework.http.server.reactive.ServerHttpResponse ;
import org.springframework.stereotype.Component ;
import org.springframework.web.server.ServerWebExchange ;
import reactor.core.publisher.Mono ;
/**
* 权限验证过滤器
*/
@Component
public class AccessFilter implements GlobalFilter , Ordered {
private Logger logger = LoggerFactory . getLogger ( AccessFilter . class );
/**
* 过滤器业务逻辑
*
* @param exchange
* @param chain
* @return
*/
@Override
public Mono < Void > filter ( ServerWebExchange exchange , GatewayFilterChain chain ) {
// 获取请求参数
String token = exchange . getRequest (). getQueryParams (). getFirst ( "token" );
// 业务逻辑处理
if ( null == token ) {
logger . warn ( "token is null..." );
ServerHttpResponse response = exchange . getResponse ();
// 响应类型
response . getHeaders (). add ( "Content-Type" , "application/json; charset=utf-8" );
// 响应状态码,HTTP 401 错误代表用户没有访问权限
response . setStatusCode ( HttpStatus . UNAUTHORIZED );
// 响应内容
String message = "{\"message\":\"" + HttpStatus . UNAUTHORIZED . getReasonPhrase () + "\"}" ;
DataBuffer buffer = response . bufferFactory (). wrap ( message . getBytes ());
// 请求结束,不在继续向下请求
return response . writeWith ( Mono . just ( buffer ));
}
// 使用 token 进行身份验证
logger . info ( "token is OK!" );
return chain . filter ( exchange );
}
/**
* 过滤器执行顺序,数值越小,优先级越高
*
* @return
*/
@Override
public int getOrder () {
return 1 ;
}
}
访问
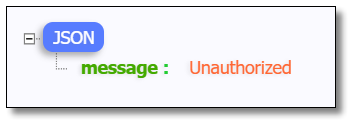
访问:http://localhost:9000/product/1 结果如下:
访问:http://localhost:9000/product/1?token=abc123 结果如下:
网关限流
顾名思义,限流就是限制流量,就像你宽带包有 1 个 G 的流量,用完了就没了。通过限流,我们可以很好地控制系统的 QPS,从而达到保护系统的目的。
为什么需要限流
比如 Web 服务、对外 API,这种类型的服务有以下几种可能导致机器被拖垮:
用户增长过快(好事)
因为某个热点事件(微博热搜)
竞争对象爬虫
恶意的请求
这些情况都是无法预知的,不知道什么时候会有 10 倍甚至 20 倍的流量打进来,如果真碰上这种情况,扩容是根本来不及的。
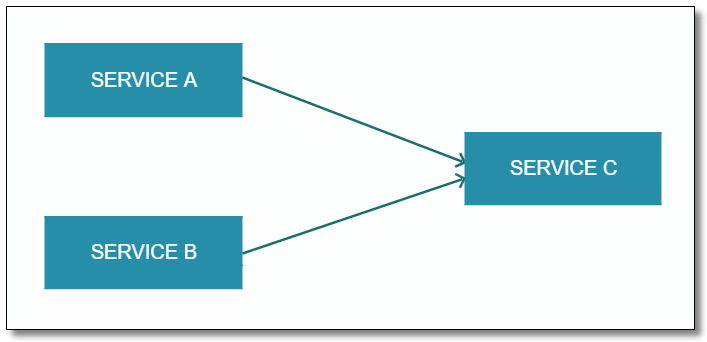
从上图可以看出,对内而言:上游的 A、B 服务直接依赖了下游的基础服务 C,对于 A,B 服务都依赖的基础服务 C 这种场景,服务 A 和 B 其实处于某种竞争关系,如果服务 A 的并发阈值设置过大,当流量高峰期来临,有可能直接拖垮基础服务 C 并影响服务 B,即雪崩效应。
限流算法
常见的限流算法有:
计数器算法
漏桶(Leaky Bucket)算法
令牌桶(Token Bucket)算法
计数器算法
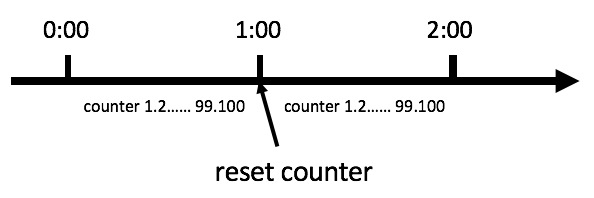
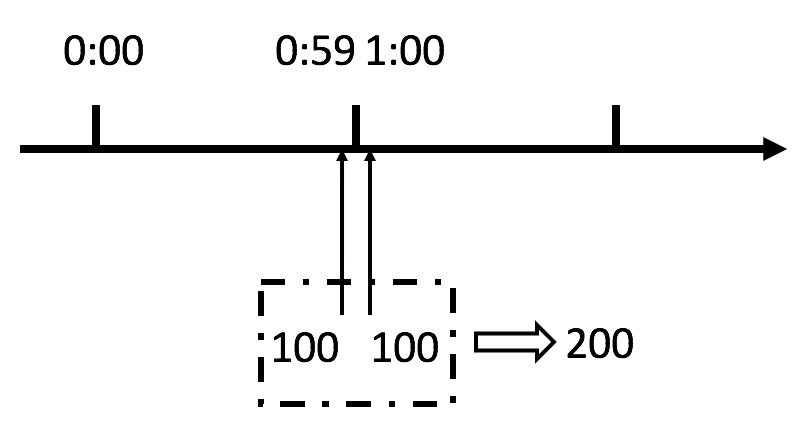
计数器算法是限流算法里最简单也是最容易实现的一种算法。比如我们规定,对于 A 接口来说,我们 1 分钟的访问次数不能超过 100 个。那么我们可以这么做:在一开始的时候,我们可以设置一个计数器 counter,每当一个请求过来的时候,counter 就加 1,如果 counter 的值大于 100 并且该请求与第一个请求的间隔时间还在 1 分钟之内,触发限流;如果该请求与第一个请求的间隔时间大于 1 分钟,重置 counter 重新计数,具体算法的示意图如下:
这个算法虽然简单,但是有一个十分致命的问题,那就是临界问题,我们看下图:
从上图中我们可以看到,假设有一个恶意用户,他在 0:59 时,瞬间发送了 100 个请求,并且 1:00 又瞬间发送了 100 个请求,那么其实这个用户在 1 秒里面,瞬间发送了 200 个请求。我们刚才规定的是 1 分钟最多 100 个请求,也就是每秒钟最多 1.7 个请求,用户通过在时间窗口的重置节点处突发请求, 可以瞬间超过我们的速率限制。用户有可能通过算法的这个漏洞,瞬间压垮我们的应用。
还有资料浪费的问题存在,我们的预期想法是希望 100 个请求可以均匀分散在这一分钟内,假设 30s 以内我们就请求上限了,那么剩余的半分钟服务器就会处于闲置状态,比如下图:
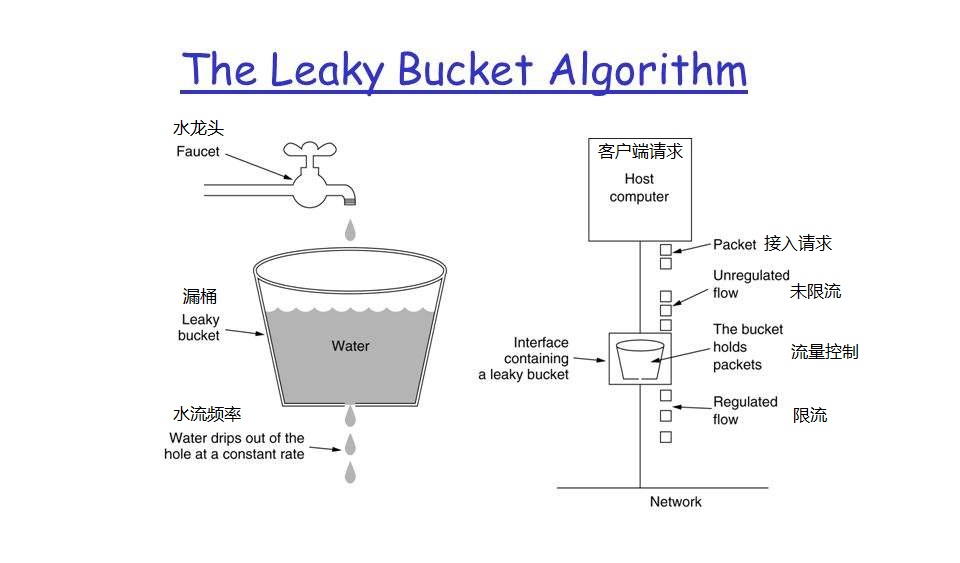
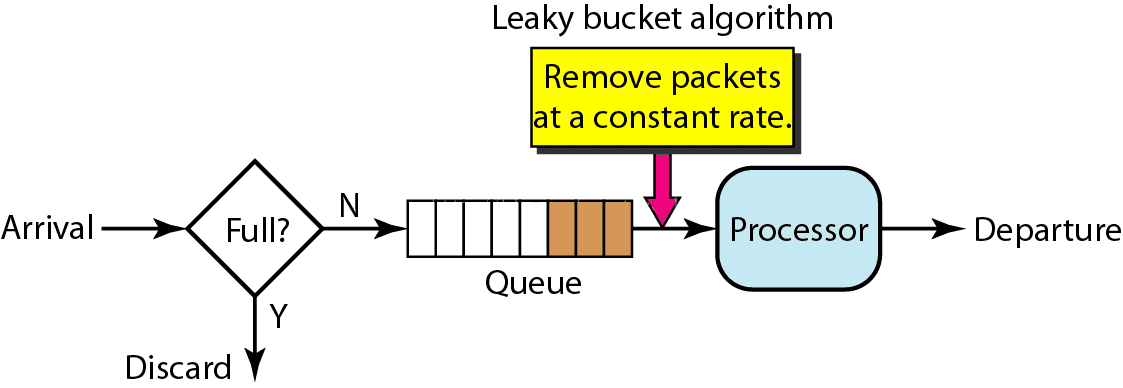
漏桶算法
漏桶算法其实也很简单,可以粗略的认为就是注水漏水的过程,往桶中以任意速率流入水,以一定速率流出水,当水超过桶流量则丢弃,因为桶容量是不变的,保证了整体的速率。
漏桶算法是使用队列机制实现的。
漏桶算法主要用途在于保护它人(服务),假设入水量很大,而出水量较慢,则会造成网关的资源堆积可能导致网关瘫痪。而目标服务可能是可以处理大量请求的,但是漏桶算法出水量缓慢反而造成服务那边的资源浪费。
漏桶算法无法应对突发调用。不管上面流量多大,下面流出的速度始终保持不变。因为处理的速度是固定的,请求进来的速度是未知的,可能突然进来很多请求,没来得及处理的请求就先放在桶里,既然是个桶,肯定是有容量上限,如果桶满了,那么新进来的请求就会丢弃。
令牌桶算法
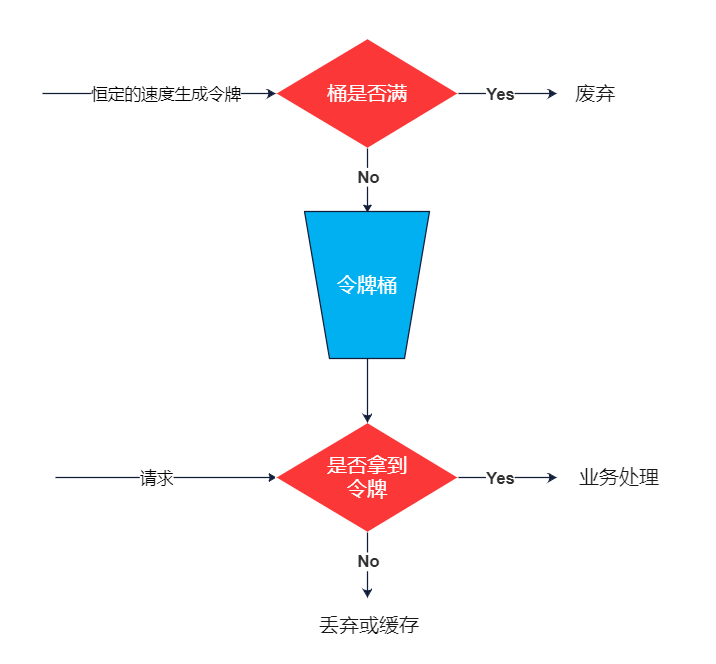
令牌桶算法是对漏桶算法的一种改进,漏桶算法能够限制请求调用的速率,而令牌桶算法能够在限制调用的平均速率的同时还允许一定程度的突发调用。在令牌桶算法中,存在一个桶,用来存放固定数量的令牌。算法中存在一种机制,以一定的速率往桶中放令牌。每次请求调用需要先获取令牌 ,只有拿到令牌 ,才有机会继续执行 ,否则选择选择等待可用的令牌、或者直接拒绝。放令牌这个动作是持续不断的进行,如果桶中令牌数达到上限,就丢弃令牌。
场景大概是这样的:桶中一直有大量的可用令牌,这时进来的请求可以直接拿到令牌执行,比如设置 QPS 为 100/s,那么限流器初始化完成一秒后,桶中就已经有 100 个令牌了,等服务启动完成对外提供服务时,该限流器可以抵挡瞬时的 100 个请求。当桶中没有令牌时,请求会进行等待,最后相当于以一定的速率执行。
Spring Cloud Gateway 内部使用的就是该算法,大概描述如下:
所有的请求在处理之前都需要拿到一个可用的令牌才会被处理;
根据限流大小,设置按照一定的速率往桶里添加令牌;
桶设置最大的放置令牌限制,当桶满时、新添加的令牌就被丢弃或者拒绝;
请求到达后首先要获取令牌桶中的令牌,拿着令牌才可以进行其他的业务逻辑,处理完业务逻辑之后,将令牌直接删除;
令牌桶有最低限额,当桶中的令牌达到最低限额的时候,请求处理完之后将不会删除令牌,以此保证足够的限流。
漏桶算法主要用途在于保护它人,而令牌桶算法主要目的在于保护自己,将请求压力交由目标服务处理。假设突然进来很多请求,只要拿到令牌这些请求会瞬时被处理调用目标服务。
Gateway 限流
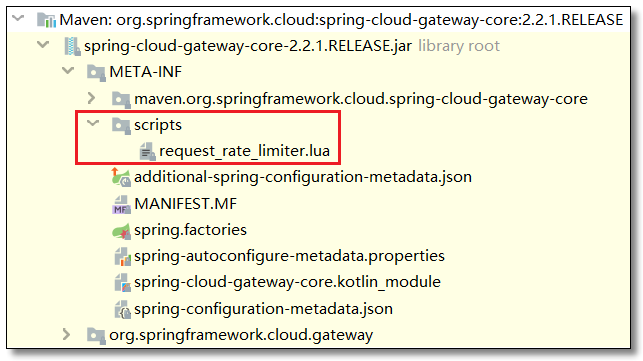
Spring Cloud Gateway 官方提供了 RequestRateLimiterGatewayFilterFactory 过滤器工厂,使用 Redis 和 Lua 脚本实现了令牌桶的方式。
官网文档:https://cloud.spring.io/spring-cloud-static/spring-cloud-gateway/2.2.1.RELEASE/reference/html/#the-redis-ratelimiter 具体实现逻辑在 RequestRateLimiterGatewayFilterFactory 类中,Lua 脚本在如下图所示的源码文件夹中:
添加依赖
 1
 2
 3
 4
 5
 6
 7
 8
 9
10
<!-- spring data redis reactive 依赖 -->
<dependency>
<groupId> org.springframework.boot</groupId>
<artifactId> spring-boot-starter-data-redis-reactive</artifactId>
</dependency>
<!-- commons-pool2 对象池依赖 -->
<dependency>
<groupId> org.apache.commons</groupId>
<artifactId> commons-pool2</artifactId>
</dependency>
限流规则
URI 限流
配置限流过滤器和限流过滤器引用的 bean 对象。
 1
 2
 3
 4
 5
 6
 7
 8
 9
10
11
12
13
14
15
16
17
18
19
20
21
22
23
24
25
26
27
28
29
30
31
32
spring :
application :
name : gateway-server # 应用名称
cloud :
gateway :
# 路由规则
routes :
- id : product-service # 路由 ID,唯一
uri : lb://product-service # lb:// 根据服务名称从注册中心获取服务请求地址,并遵循负载均衡策略
predicates : # 断言(判断条件)
# 匹配对应 URI 的请求,将匹配到的请求追加在目标 URI 之后
- Path=/product/**
filters : # 网关过滤器
# 限流过滤器
- name : RequestRateLimiter
args :
redis-rate-limiter.replenishRate : 1 # 令牌桶每秒填充速率
redis-rate-limiter.burstCapacity : 2 # 令牌桶总容量
key-resolver : "#{@pathKeyResolver}" # 使用 SpEL 表达式按名称引用 bean
# redis 缓存
redis :
timeout : 10000 # 连接超时时间
host : 192.168.10.101 # Redis服务器地址
port : 6379 # Redis服务器端口
password : root # Redis服务器密码
database : 0 # 选择哪个库,默认0库
lettuce :
pool :
max-active : 1024 # 最大连接数,默认 8
max-wait : 10000 # 最大连接阻塞等待时间,单位毫秒,默认 -1
max-idle : 200 # 最大空闲连接,默认 8
min-idle : 5 # 最小空闲连接,默认 0
编写限流规则配置类。
 1
 2
 3
 4
 5
 6
 7
 8
 9
10
11
12
13
14
15
16
17
18
19
20
21
22
23
24
25
26
27
28
29
30
31
32
33
package com.example.config ;
import org.springframework.cloud.gateway.filter.ratelimit.KeyResolver ;
import org.springframework.context.annotation.Bean ;
import org.springframework.context.annotation.Configuration ;
import reactor.core.publisher.Mono ;
/**
* 限流规则配置类
*/
@Configuration
public class KeyResolverConfiguration {
/**
* 限流规则
*
* @return
*/
@Bean
public KeyResolver pathKeyResolver () {
/*
return new KeyResolver() {
@Override
public Mono<String> resolve(ServerWebExchange exchange) {
return Mono.just(exchange.getRequest().getPath().toString());
}
};
*/
// JDK 1.8
return exchange -> Mono . just ( exchange . getRequest (). getURI (). getPath ());
}
}
多次访问:http://localhost:9000/product/1 结果如下:
Redis 结果如下:
参数限流
配置限流过滤器和限流过滤器引用的 bean 对象。
 1
 2
 3
 4
 5
 6
 7
 8
 9
10
11
12
13
14
15
16
17
18
19
20
21
22
23
24
25
26
27
28
29
30
31
32
spring :
application :
name : gateway-server # 应用名称
cloud :
gateway :
# 路由规则
routes :
- id : product-service # 路由 ID,唯一
uri : lb://product-service # lb:// 根据服务名称从注册中心获取服务请求地址,并遵循负载均衡策略
predicates : # 断言(判断条件)
# 匹配对应 URI 的请求,将匹配到的请求追加在目标 URI 之后
- Path=/product/**
filters : # 网关过滤器
# 限流过滤器
- name : RequestRateLimiter
args :
redis-rate-limiter.replenishRate : 1 # 令牌桶每秒填充速率
redis-rate-limiter.burstCapacity : 2 # 令牌桶总容量
key-resolver : "#{@parameterKeyResolver}" # 使用 SpEL 表达式按名称引用 bean
# redis 缓存
redis :
timeout : 10000 # 连接超时时间
host : 192.168.10.101 # Redis服务器地址
port : 6379 # Redis服务器端口
password : root # Redis服务器密码
database : 0 # 选择哪个库,默认0库
lettuce :
pool :
max-active : 1024 # 最大连接数,默认 8
max-wait : 10000 # 最大连接阻塞等待时间,单位毫秒,默认 -1
max-idle : 200 # 最大空闲连接,默认 8
min-idle : 5 # 最小空闲连接,默认 0
编写限流规则配置类。
 1
 2
 3
 4
 5
 6
 7
 8
 9
10
11
12
13
14
15
16
17
18
19
20
21
22
23
24
package com.example.config ;
import org.springframework.cloud.gateway.filter.ratelimit.KeyResolver ;
import org.springframework.context.annotation.Bean ;
import org.springframework.context.annotation.Configuration ;
import reactor.core.publisher.Mono ;
/**
* 限流规则配置类
*/
@Configuration
public class KeyResolverConfiguration {
/**
* 根据参数限流
*
* @return
*/
@Bean
public KeyResolver parameterKeyResolver () {
return exchange -> Mono . just ( exchange . getRequest (). getQueryParams (). getFirst ( "userId" ));
}
}
多次访问:http://localhost:9000/product/1?userId=123 结果如下:
Redis 结果如下:
IP 限流
配置限流过滤器和限流过滤器引用的 bean 对象。
 1
 2
 3
 4
 5
 6
 7
 8
 9
10
11
12
13
14
15
16
17
18
19
20
21
22
23
24
25
26
27
28
29
30
31
32
spring :
application :
name : gateway-server # 应用名称
cloud :
gateway :
# 路由规则
routes :
- id : product-service # 路由 ID,唯一
uri : lb://product-service # lb:// 根据服务名称从注册中心获取服务请求地址,并遵循负载均衡策略
predicates : # 断言(判断条件)
# 匹配对应 URI 的请求,将匹配到的请求追加在目标 URI 之后
- Path=/product/**
filters : # 网关过滤器
# 限流过滤器
- name : RequestRateLimiter
args :
redis-rate-limiter.replenishRate : 1 # 令牌桶每秒填充速率
redis-rate-limiter.burstCapacity : 2 # 令牌桶总容量
key-resolver : "#{@ipKeyResolver}" # 使用 SpEL 表达式按名称引用 bean
# redis 缓存
redis :
timeout : 10000 # 连接超时时间
host : 192.168.10.101 # Redis服务器地址
port : 6379 # Redis服务器端口
password : root # Redis服务器密码
database : 0 # 选择哪个库,默认0库
lettuce :
pool :
max-active : 1024 # 最大连接数,默认 8
max-wait : 10000 # 最大连接阻塞等待时间,单位毫秒,默认 -1
max-idle : 200 # 最大空闲连接,默认 8
min-idle : 5 # 最小空闲连接,默认 0
编写限流规则配置类。
 1
 2
 3
 4
 5
 6
 7
 8
 9
10
11
12
13
14
15
16
17
18
19
20
21
22
23
24
package com.example.config ;
import org.springframework.cloud.gateway.filter.ratelimit.KeyResolver ;
import org.springframework.context.annotation.Bean ;
import org.springframework.context.annotation.Configuration ;
import reactor.core.publisher.Mono ;
/**
* 限流规则配置类
*/
@Configuration
public class KeyResolverConfiguration {
/**
* 根据 IP 限流
*
* @return
*/
@Bean
public KeyResolver ipKeyResolver () {
return exchange -> Mono . just ( exchange . getRequest (). getRemoteAddress (). getHostName ());
}
}
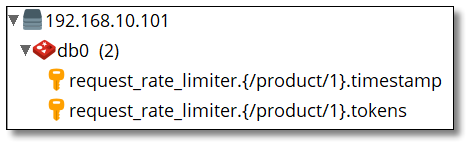
多次访问:http://localhost:9000/product/1 结果如下:
Redis 结果如下:
Sentinel 限流
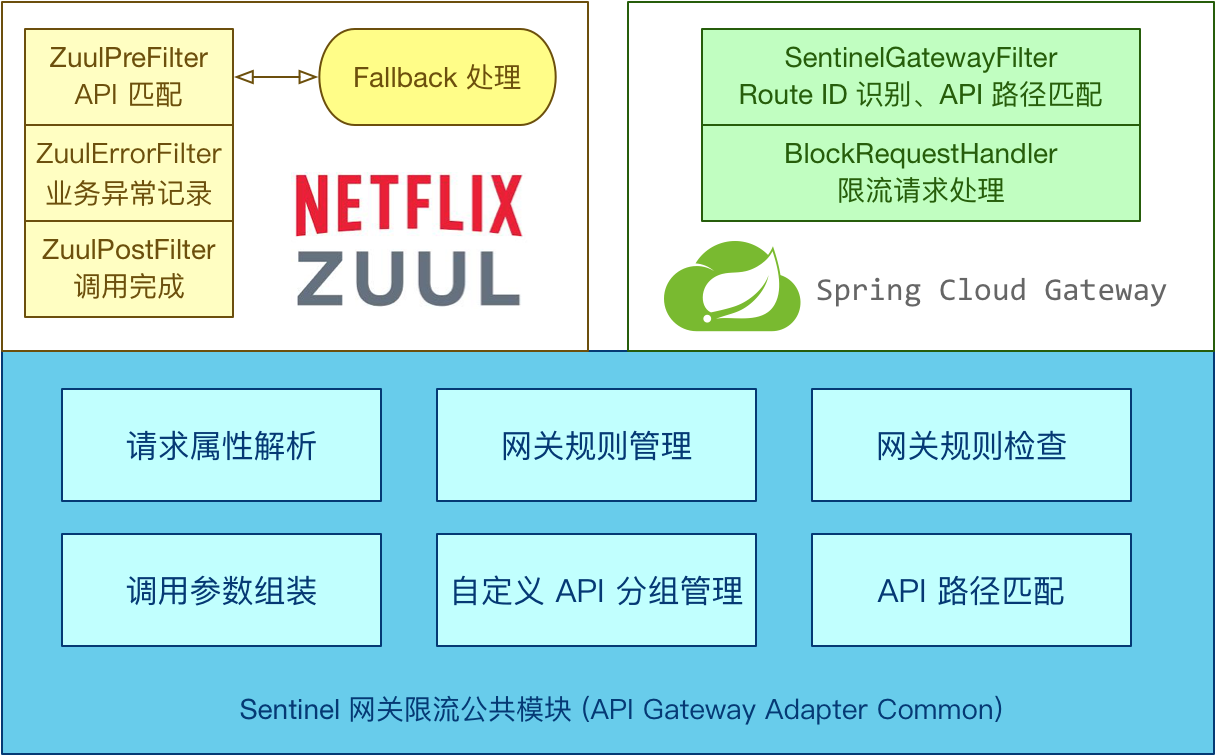
Sentinel 支持对 Spring Cloud Gateway、Netflix Zuul 等主流的 API Gateway 进行限流。
官网文档:
创建项目
创建 gateway-server-sentinel 项目。
添加依赖
单独使用添加 sentinel-spring-cloud-gateway-adapter 依赖即可。
若想跟 Sentinel Starter 配合使用,需要加上 spring-cloud-alibaba-sentinel-gateway 依赖来让 spring-cloud-alibaba-sentinel-gateway 模块里的 Spring Cloud Gateway 自动化配置类生效。
同时请将 spring.cloud.sentinel.filter.enabled 配置项置为 false(若在网关流控控制台上看到了 URL 资源,就是此配置项没有置为 false)。
 1
 2
 3
 4
 5
 6
 7
 8
 9
10
11
12
13
14
15
16
17
18
19
20
21
22
23
24
25
26
27
28
29
30
31
32
33
34
35
36
37
38
39
40
41
42
43
44
45
46
47
48
49
<?xml version="1.0" encoding="UTF-8"?>
<project xmlns= "http://maven.apache.org/POM/4.0.0" xmlns:xsi= "http://www.w3.org/2001/XMLSchema-instance"
xsi:schemaLocation= "http://maven.apache.org/POM/4.0.0 http://maven.apache.org/xsd/maven-4.0.0.xsd" >
<modelVersion> 4.0.0</modelVersion>
<groupId> com.example</groupId>
<artifactId> gateway-server-sentinel</artifactId>
<version> 1.0-SNAPSHOT</version>
<!-- 继承父依赖 -->
<parent>
<groupId> com.example</groupId>
<artifactId> gateway-demo</artifactId>
<version> 1.0-SNAPSHOT</version>
</parent>
<!-- 项目依赖 -->
<dependencies>
<!-- spring cloud gateway 依赖 -->
<dependency>
<groupId> org.springframework.cloud</groupId>
<artifactId> spring-cloud-starter-gateway</artifactId>
</dependency>
<!-- netflix eureka client 依赖 -->
<dependency>
<groupId> org.springframework.cloud</groupId>
<artifactId> spring-cloud-starter-netflix-eureka-client</artifactId>
</dependency>
<!-- 单独使用 -->
<!-- sentinel gateway adapter 依赖 -->
<dependency>
<groupId> com.alibaba.csp</groupId>
<artifactId> sentinel-spring-cloud-gateway-adapter</artifactId>
</dependency>
<!-- 和 Sentinel Starter 配合使用 -->
<!--
<dependency>
<groupId>com.alibaba.cloud</groupId>
<artifactId>spring-cloud-starter-alibaba-sentinel</artifactId>
</dependency>
<dependency>
<groupId>com.alibaba.cloud</groupId>
<artifactId>spring-cloud-alibaba-sentinel-gateway</artifactId>
</dependency>
-->
</dependencies>
</project>
配置文件
 1
 2
 3
 4
 5
 6
 7
 8
 9
10
11
12
13
14
15
16
17
18
19
20
21
22
23
24
25
26
27
28
29
30
31
32
server :
port : 9001 # 端口
spring :
application :
name : gateway-server-sentinel # 应用名称
cloud :
sentinel :
filter :
enabled : false
gateway :
discovery :
locator :
# 是否与服务发现组件进行结合,通过 serviceId 转发到具体服务实例。
enabled : true # 是否开启基于服务发现的路由规则
lower-case-service-id : true # 是否将服务名称转小写
# 路由规则
routes :
- id : order-service # 路由 ID,唯一
uri : lb://order-service # 目标 URI,lb:// 根据服务名称从注册中心获取服务请求地址,并遵循负载均衡策略
predicates : # 断言(判断条件)
# 匹配对应 URI 的请求,将匹配到的请求追加在目标 URI 之后
- Path=/order/**
# 配置 Eureka Server 注册中心
eureka :
instance :
prefer-ip-address : true # 是否使用 ip 地址注册
instance-id : ${spring.cloud.client.ip-address}:${server.port} # ip:port
client :
service-url : # 设置服务注册中心地址
defaultZone : http://localhost:8761/eureka/,http://localhost:8762/eureka/
限流规则配置类
使用时只需注入对应的 SentinelGatewayFilter 实例以及 SentinelGatewayBlockExceptionHandler 实例即可。
GatewayConfiguration.java
 1
 2
 3
 4
 5
 6
 7
 8
 9
10
11
12
13
14
15
16
17
18
19
20
21
22
23
24
25
26
27
28
29
30
31
32
33
34
35
36
37
38
39
40
41
42
43
44
45
46
47
48
49
50
51
52
53
54
55
56
57
58
59
60
61
62
63
64
65
66
67
68
69
70
71
72
73
74
75
76
77
78
79
80
81
82
83
84
85
86
87
88
89
90
91
92
package com.example.config ;
import com.alibaba.csp.sentinel.adapter.gateway.common.rule.GatewayFlowRule ;
import com.alibaba.csp.sentinel.adapter.gateway.common.rule.GatewayRuleManager ;
import com.alibaba.csp.sentinel.adapter.gateway.sc.SentinelGatewayFilter ;
import com.alibaba.csp.sentinel.adapter.gateway.sc.exception.SentinelGatewayBlockExceptionHandler ;
import org.springframework.beans.factory.ObjectProvider ;
import org.springframework.cloud.gateway.filter.GlobalFilter ;
import org.springframework.context.annotation.Bean ;
import org.springframework.context.annotation.Configuration ;
import org.springframework.core.Ordered ;
import org.springframework.core.annotation.Order ;
import org.springframework.http.codec.ServerCodecConfigurer ;
import org.springframework.web.reactive.result.view.ViewResolver ;
import javax.annotation.PostConstruct ;
import java.util.Collections ;
import java.util.HashSet ;
import java.util.List ;
import java.util.Set ;
/**
* 限流规则配置类
*/
@Configuration
public class GatewayConfiguration {
private final List < ViewResolver > viewResolvers ;
private final ServerCodecConfigurer serverCodecConfigurer ;
/**
* 构造器
*
* @param viewResolversProvider
* @param serverCodecConfigurer
*/
public GatewayConfiguration ( ObjectProvider < List < ViewResolver >> viewResolversProvider ,
ServerCodecConfigurer serverCodecConfigurer ) {
this . viewResolvers = viewResolversProvider . getIfAvailable ( Collections :: emptyList );
this . serverCodecConfigurer = serverCodecConfigurer ;
}
/**
* 限流异常处理器
*
* @return
*/
@Bean
@Order ( Ordered . HIGHEST_PRECEDENCE )
public SentinelGatewayBlockExceptionHandler sentinelGatewayBlockExceptionHandler () {
// Register the block exception handler for Spring Cloud Gateway.
return new SentinelGatewayBlockExceptionHandler ( viewResolvers , serverCodecConfigurer );
}
/**
* 限流过滤器
*
* @return
*/
@Bean
@Order ( Ordered . HIGHEST_PRECEDENCE )
public GlobalFilter sentinelGatewayFilter () {
return new SentinelGatewayFilter ();
}
/**
* Spring 容器初始化的时候执行该方法
*/
@PostConstruct
public void doInit () {
// 加载网关限流规则
initGatewayRules ();
}
/**
* 网关限流规则
*/
private void initGatewayRules () {
Set < GatewayFlowRule > rules = new HashSet <> ();
/*
resource:资源名称,可以是网关中的 route 名称或者用户自定义的 API 分组名称
count:限流阈值
intervalSec:统计时间窗口,单位是秒,默认是 1 秒
*/
rules . add ( new GatewayFlowRule ( "order-service" )
. setCount ( 3 ) // 限流阈值
. setIntervalSec ( 60 )); // 统计时间窗口,单位是秒,默认是 1 秒
// 加载网关限流规则
GatewayRuleManager . loadRules ( rules );
}
}
启动类
GatewayServerSentinelApplication.java
 1
 2
 3
 4
 5
 6
 7
 8
 9
10
11
12
13
14
15
package com.example ;
import org.springframework.boot.SpringApplication ;
import org.springframework.boot.autoconfigure.SpringBootApplication ;
// 开启 EurekaClient 注解,目前版本如果配置了 Eureka 注册中心,默认会开启该注解
//@EnableEurekaClient
@SpringBootApplication
public class GatewayServerSentinelApplication {
public static void main ( String [] args ) {
SpringApplication . run ( GatewayServerSentinelApplication . class , args );
}
}
访问
多次访问:http://localhost:9001/order/1 结果如下:
接口 BlockRequestHandler 的默认实现为 DefaultBlockRequestHandler,当触发限流时会返回默认的错误信息:Blocked by Sentinel: FlowException。我们可以通过 GatewayCallbackManager 定制异常提示信息。
自定义异常提示
GatewayCallbackManager 的 setBlockHandler 注册函数用于实现自定义的逻辑,处理被限流的请求。
  1
  2
  3
  4
  5
  6
  7
  8
  9
 10
 11
 12
 13
 14
 15
 16
 17
 18
 19
 20
 21
 22
 23
 24
 25
 26
 27
 28
 29
 30
 31
 32
 33
 34
 35
 36
 37
 38
 39
 40
 41
 42
 43
 44
 45
 46
 47
 48
 49
 50
 51
 52
 53
 54
 55
 56
 57
 58
 59
 60
 61
 62
 63
 64
 65
 66
 67
 68
 69
 70
 71
 72
 73
 74
 75
 76
 77
 78
 79
 80
 81
 82
 83
 84
 85
 86
 87
 88
 89
 90
 91
 92
 93
 94
 95
 96
 97
 98
 99
100
101
102
103
104
105
106
107
108
109
110
111
112
113
114
115
116
117
118
119
120
package com.example.config ;
import com.alibaba.csp.sentinel.adapter.gateway.common.rule.GatewayFlowRule ;
import com.alibaba.csp.sentinel.adapter.gateway.common.rule.GatewayRuleManager ;
import com.alibaba.csp.sentinel.adapter.gateway.sc.SentinelGatewayFilter ;
import com.alibaba.csp.sentinel.adapter.gateway.sc.callback.BlockRequestHandler ;
import com.alibaba.csp.sentinel.adapter.gateway.sc.callback.GatewayCallbackManager ;
import com.alibaba.csp.sentinel.adapter.gateway.sc.exception.SentinelGatewayBlockExceptionHandler ;
import org.springframework.beans.factory.ObjectProvider ;
import org.springframework.cloud.gateway.filter.GlobalFilter ;
import org.springframework.context.annotation.Bean ;
import org.springframework.context.annotation.Configuration ;
import org.springframework.core.Ordered ;
import org.springframework.core.annotation.Order ;
import org.springframework.http.HttpStatus ;
import org.springframework.http.MediaType ;
import org.springframework.http.codec.ServerCodecConfigurer ;
import org.springframework.web.reactive.function.BodyInserters ;
import org.springframework.web.reactive.function.server.ServerResponse ;
import org.springframework.web.reactive.result.view.ViewResolver ;
import org.springframework.web.server.ServerWebExchange ;
import reactor.core.publisher.Mono ;
import javax.annotation.PostConstruct ;
import java.util.* ;
/**
* 限流规则配置类
*/
@Configuration
public class GatewayConfiguration {
private final List < ViewResolver > viewResolvers ;
private final ServerCodecConfigurer serverCodecConfigurer ;
/**
* 构造器
*
* @param viewResolversProvider
* @param serverCodecConfigurer
*/
public GatewayConfiguration ( ObjectProvider < List < ViewResolver >> viewResolversProvider ,
ServerCodecConfigurer serverCodecConfigurer ) {
this . viewResolvers = viewResolversProvider . getIfAvailable ( Collections :: emptyList );
this . serverCodecConfigurer = serverCodecConfigurer ;
}
/**
* 限流异常处理器
*
* @return
*/
@Bean
@Order ( Ordered . HIGHEST_PRECEDENCE )
public SentinelGatewayBlockExceptionHandler sentinelGatewayBlockExceptionHandler () {
// Register the block exception handler for Spring Cloud Gateway.
return new SentinelGatewayBlockExceptionHandler ( viewResolvers , serverCodecConfigurer );
}
/**
* 限流过滤器
*
* @return
*/
@Bean
@Order ( Ordered . HIGHEST_PRECEDENCE )
public GlobalFilter sentinelGatewayFilter () {
return new SentinelGatewayFilter ();
}
/**
* Spring 容器初始化的时候执行该方法
*/
@PostConstruct
public void doInit () {
// 加载网关限流规则
initGatewayRules ();
// 加载自定义限流异常处理器
initBlockHandler ();
}
/**
* 网关限流规则
*/
private void initGatewayRules () {
Set < GatewayFlowRule > rules = new HashSet <> ();
/*
resource:资源名称,可以是网关中的 route 名称或者用户自定义的 API 分组名称
count:限流阈值
intervalSec:统计时间窗口,单位是秒,默认是 1 秒
*/
rules . add ( new GatewayFlowRule ( "order-service" )
. setCount ( 3 ) // 限流阈值
. setIntervalSec ( 60 )); // 统计时间窗口,单位是秒,默认是 1 秒
// 加载网关限流规则
GatewayRuleManager . loadRules ( rules );
}
/**
* 自定义限流异常处理器
*/
private void initBlockHandler () {
BlockRequestHandler blockRequestHandler = new BlockRequestHandler () {
@Override
public Mono < ServerResponse > handleRequest ( ServerWebExchange serverWebExchange , Throwable throwable ) {
Map < String , String > result = new HashMap <> ();
result . put ( "code" , String . valueOf ( HttpStatus . TOO_MANY_REQUESTS . value ()));
result . put ( "message" , HttpStatus . TOO_MANY_REQUESTS . getReasonPhrase ());
result . put ( "route" , "order-service" );
return ServerResponse . status ( HttpStatus . TOO_MANY_REQUESTS )
. contentType ( MediaType . APPLICATION_JSON )
. body ( BodyInserters . fromValue ( result ));
}
};
// 加载自定义限流异常处理器
GatewayCallbackManager . setBlockHandler ( blockRequestHandler );
}
}
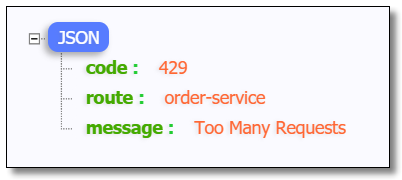
访问
多次访问:http://localhost:9001/order/1 结果如下:
分组限流
  1
  2
  3
  4
  5
  6
  7
  8
  9
 10
 11
 12
 13
 14
 15
 16
 17
 18
 19
 20
 21
 22
 23
 24
 25
 26
 27
 28
 29
 30
 31
 32
 33
 34
 35
 36
 37
 38
 39
 40
 41
 42
 43
 44
 45
 46
 47
 48
 49
 50
 51
 52
 53
 54
 55
 56
 57
 58
 59
 60
 61
 62
 63
 64
 65
 66
 67
 68
 69
 70
 71
 72
 73
 74
 75
 76
 77
 78
 79
 80
 81
 82
 83
 84
 85
 86
 87
 88
 89
 90
 91
 92
 93
 94
 95
 96
 97
 98
 99
100
101
102
103
104
105
106
107
108
109
110
111
112
113
114
115
116
117
118
119
120
121
122
123
124
125
126
127
128
129
130
131
132
133
134
135
136
137
138
139
140
141
142
143
144
145
146
147
148
149
150
151
152
153
154
155
156
157
158
159
160
package com.example.config ;
import com.alibaba.csp.sentinel.adapter.gateway.common.SentinelGatewayConstants ;
import com.alibaba.csp.sentinel.adapter.gateway.common.api.ApiDefinition ;
import com.alibaba.csp.sentinel.adapter.gateway.common.api.ApiPathPredicateItem ;
import com.alibaba.csp.sentinel.adapter.gateway.common.api.ApiPredicateItem ;
import com.alibaba.csp.sentinel.adapter.gateway.common.api.GatewayApiDefinitionManager ;
import com.alibaba.csp.sentinel.adapter.gateway.common.rule.GatewayFlowRule ;
import com.alibaba.csp.sentinel.adapter.gateway.common.rule.GatewayRuleManager ;
import com.alibaba.csp.sentinel.adapter.gateway.sc.SentinelGatewayFilter ;
import com.alibaba.csp.sentinel.adapter.gateway.sc.callback.BlockRequestHandler ;
import com.alibaba.csp.sentinel.adapter.gateway.sc.callback.GatewayCallbackManager ;
import com.alibaba.csp.sentinel.adapter.gateway.sc.exception.SentinelGatewayBlockExceptionHandler ;
import org.springframework.beans.factory.ObjectProvider ;
import org.springframework.cloud.gateway.filter.GlobalFilter ;
import org.springframework.context.annotation.Bean ;
import org.springframework.context.annotation.Configuration ;
import org.springframework.core.Ordered ;
import org.springframework.core.annotation.Order ;
import org.springframework.http.HttpStatus ;
import org.springframework.http.MediaType ;
import org.springframework.http.codec.ServerCodecConfigurer ;
import org.springframework.web.reactive.function.BodyInserters ;
import org.springframework.web.reactive.function.server.ServerResponse ;
import org.springframework.web.reactive.result.view.ViewResolver ;
import org.springframework.web.server.ServerWebExchange ;
import reactor.core.publisher.Mono ;
import javax.annotation.PostConstruct ;
import java.util.* ;
/**
* 限流规则配置类
*/
@Configuration
public class GatewayConfiguration {
private final List < ViewResolver > viewResolvers ;
private final ServerCodecConfigurer serverCodecConfigurer ;
/**
* 构造器
*
* @param viewResolversProvider
* @param serverCodecConfigurer
*/
public GatewayConfiguration ( ObjectProvider < List < ViewResolver >> viewResolversProvider ,
ServerCodecConfigurer serverCodecConfigurer ) {
this . viewResolvers = viewResolversProvider . getIfAvailable ( Collections :: emptyList );
this . serverCodecConfigurer = serverCodecConfigurer ;
}
/**
* 限流异常处理器
*
* @return
*/
@Bean
@Order ( Ordered . HIGHEST_PRECEDENCE )
public SentinelGatewayBlockExceptionHandler sentinelGatewayBlockExceptionHandler () {
// Register the block exception handler for Spring Cloud Gateway.
return new SentinelGatewayBlockExceptionHandler ( viewResolvers , serverCodecConfigurer );
}
/**
* 限流过滤器
*
* @return
*/
@Bean
@Order ( Ordered . HIGHEST_PRECEDENCE )
public GlobalFilter sentinelGatewayFilter () {
return new SentinelGatewayFilter ();
}
/**
* Spring 容器初始化的时候执行该方法
*/
@PostConstruct
public void doInit () {
// 加载网关限流规则
initGatewayRules ();
// 加载自定义限流异常处理器
initBlockHandler ();
}
/**
* 网关限流规则
*/
private void initGatewayRules () {
Set < GatewayFlowRule > rules = new HashSet <> ();
/*
resource:资源名称,可以是网关中的 route 名称或者用户自定义的 API 分组名称
count:限流阈值
intervalSec:统计时间窗口,单位是秒,默认是 1 秒
*/
// rules.add(new GatewayFlowRule("order-service")
// .setCount(3) // 限流阈值
// .setIntervalSec(60)); // 统计时间窗口,单位是秒,默认是 1 秒
// --------------------限流分组----------start----------
rules . add ( new GatewayFlowRule ( "product-api" )
. setCount ( 3 ) // 限流阈值
. setIntervalSec ( 60 )); // 统计时间窗口,单位是秒,默认是 1 秒
rules . add ( new GatewayFlowRule ( "order-api" )
. setCount ( 5 ) // 限流阈值
. setIntervalSec ( 60 )); // 统计时间窗口,单位是秒,默认是 1 秒
// --------------------限流分组-----------end-----------
// 加载网关限流规则
GatewayRuleManager . loadRules ( rules );
// 加载限流分组
initCustomizedApis ();
}
/**
* 自定义限流异常处理器
*/
private void initBlockHandler () {
BlockRequestHandler blockRequestHandler = new BlockRequestHandler () {
@Override
public Mono < ServerResponse > handleRequest ( ServerWebExchange serverWebExchange , Throwable throwable ) {
Map < String , String > result = new HashMap <> ();
result . put ( "code" , String . valueOf ( HttpStatus . TOO_MANY_REQUESTS . value ()));
result . put ( "message" , HttpStatus . TOO_MANY_REQUESTS . getReasonPhrase ());
result . put ( "route" , "order-service" );
return ServerResponse . status ( HttpStatus . TOO_MANY_REQUESTS )
. contentType ( MediaType . APPLICATION_JSON )
. body ( BodyInserters . fromValue ( result ));
}
};
// 加载自定义限流异常处理器
GatewayCallbackManager . setBlockHandler ( blockRequestHandler );
}
/**
* 限流分组
*/
private void initCustomizedApis () {
Set < ApiDefinition > definitions = new HashSet <> ();
// product-api 组
ApiDefinition api1 = new ApiDefinition ( "product-api" )
. setPredicateItems ( new HashSet < ApiPredicateItem > () {{
// 匹配 /product-service/product 以及其子路径的所有请求
add ( new ApiPathPredicateItem (). setPattern ( "/product-service/product/**" )
. setMatchStrategy ( SentinelGatewayConstants . URL_MATCH_STRATEGY_PREFIX ));
}});
// order-api 组
ApiDefinition api2 = new ApiDefinition ( "order-api" )
. setPredicateItems ( new HashSet < ApiPredicateItem > () {{
// 只匹配 /order-service/order/index
add ( new ApiPathPredicateItem (). setPattern ( "/order-service/order/index" ));
}});
definitions . add ( api1 );
definitions . add ( api2 );
// 加载限流分组
GatewayApiDefinitionManager . loadApiDefinitions ( definitions );
}
}
访问
访问:http://localhost:9001/product-service/product/1 触发限流
访问:http://localhost:9001/order-service/order/index 触发限流
访问:http://localhost:9001/order-service/order/1 不会触发限流
高可用网关
业内通常用多少 9 来衡量网站的可用性,例如 QQ 的可用性是 4 个 9,就是说 QQ 能够保证在一年里,服务在 99.99% 的时间是可用的,只有 0.01% 的时间不可用,大约最多 53 分钟。
对于大多数网站,2 个 9 是基本可用;3 个 9 是叫高可用;4 个 9 是拥有自动恢复能力的高可用。
实现高可用的主要手段是数据的冗余备份 和服务的失效转移 ,这两种手段具体可以怎么做呢,在网关里如何体现?主要有以下几个方向:
集群部署
负载均衡
健康检查
节点自动重启
熔断
服务降级
接口重试
Nginx + 网关集群实现高可用网关
下载
官网:http://nginx.org/en/download.html 下载稳定版。为了方便学习,请下载 Windows 版本。
安装
解压文件后直接运行根路径下的 nginx.exe 文件即可。
Nginx 默认端口为 80,访问:http://localhost:80/ 看到下图说明安装成功。
配置网关集群
进入 Nginx 的 conf 目录,打开 nginx.conf 文件,配置网关集群:
 1
 2
 3
 4
 5
 6
 7
 8
 9
10
11
12
13
14
15
16
17
18
19
20
21
22
23
24
25
26
27
http {

	...

    # 网关集群
	upstream gateway {
		server 127.0.0.1:9000;
		server 127.0.0.1:9001;
	}

    server {
        listen       80;
        server_name  localhost;

        ...

        # 代理网关集群,负载均衡调用
		location / {
            proxy_pass http://gateway;
        }

        ...
    }

    ...

}
访问
启动两台网关服务器 http://localhost:9000/,http://localhost:9001/ 和相关服务。
访问:http://localhost/product-service/product/1 实现高可用网关。
总结
一个请求过来,首先经过 Nginx 的一层负载,到达网关,然后由网关负载到真实后端,若后端有问题,网关会进行重试访问,多次访问后仍返回失败,可以通过熔断或服务降级立即返回结果。而且,由于是负载均衡,网关重试时不一定会访问到出错的后端。
至此 Gateway 服务网关所有的知识点就讲解结束了。
本文采用 知识共享「署名-非商业性使用-禁止演绎 4.0 国际」许可协议
大家可以通过 分类Spring Cloud
🤗 您的点赞和转发是对我最大的鼓励和支持。
📢 扫码关注 哈喽沃德先生「文档 + 视频」每篇文章都配有专门视频讲解,学习更轻松噢 ~