什么是 Zuul
Zuul 是从设备和网站到应用程序后端的所有请求的前门。作为边缘服务应用程序,Zuul 旨在实现动态路由,监视,弹性和安全性。Zuul 包含了对请求的路由 和过滤 两个最主要的功能。
Zuul 是 Netflix 开源的微服务网关,它可以和 Eureka、Ribbon、Hystrix 等组件配合使用。Zuul 的核心是一系列的过滤器,这些过滤器可以完成以下功能:
身份认证与安全:识别每个资源的验证要求,并拒绝那些与要求不符的请求
审查与监控:在边缘位置追踪有意义的数据和统计结果,从而带来精确的生产试图
动态路由:动态地将请求路由到不同的后端集群
压力测试:逐渐增加只想集群的流量,以了解性能
负载分配:为每一种负载类型分配对应容量,并弃用超出限定值的请求
静态响应处理:在边缘位置直接建立部份响应,从而避免其转发到内部集群\
多区域弹性:跨越AWS Region进行请求路由,旨在实现ELB(Elastic Load Balancing)使用的多样化,以及让系统的边缘更贴近系统的使用者
什么是服务网关
API Gateway(APIGW / API 网关),顾名思义,是出现在系统边界上的一个面向 API 的、串行集中式的强管控服务,这里的边界是企业 IT 系统的边界,可以理解为企业级应用防火墙,主要起到隔离外部访问与内部系统的作用。在微服务概念的流行之前,API 网关就已经诞生了,例如银行、证券等领域常见的前置机系统,它也是解决访问认证、报文转换、访问统计等问题的。
API 网关的流行,源于近几年来移动应用与企业间互联需求的兴起。移动应用、企业互联,使得后台服务支持的对象,从以前单一的 Web 应用,扩展到多种使用场景,且每种使用场景对后台服务的要求都不尽相同。这不仅增加了后台服务的响应量,还增加了后台服务的复杂性。随着微服务架构概念的提出,API 网关成为了微服务架构的一个标配组件。
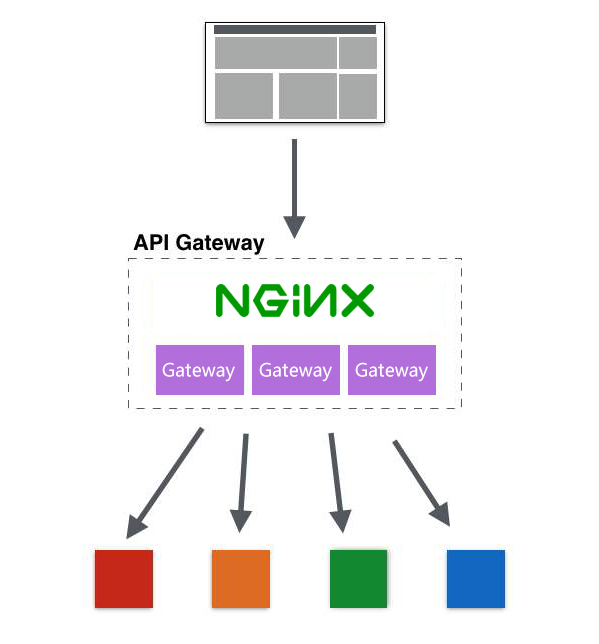
API 网关是一个服务器,是系统对外的唯一入口。API 网关封装了系统内部架构,为每个客户端提供定制的 API。所有的客户端和消费端都通过统一的网关接入微服务,在网关层处理所有非业务功能。API 网关并不是微服务场景中必须的组件,如下图,不管有没有 API 网关,后端微服务都可以通过 API 很好地支持客户端的访问。
但对于服务数量众多、复杂度比较高、规模比较大的业务来说,引入 API 网关也有一系列的好处:
聚合接口使得服务对调用者透明,客户端与后端的耦合度降低
聚合后台服务,节省流量,提高性能,提升用户体验
提供安全、流控、过滤、缓存、计费、监控等 API 管理功能
为什么要使用网关
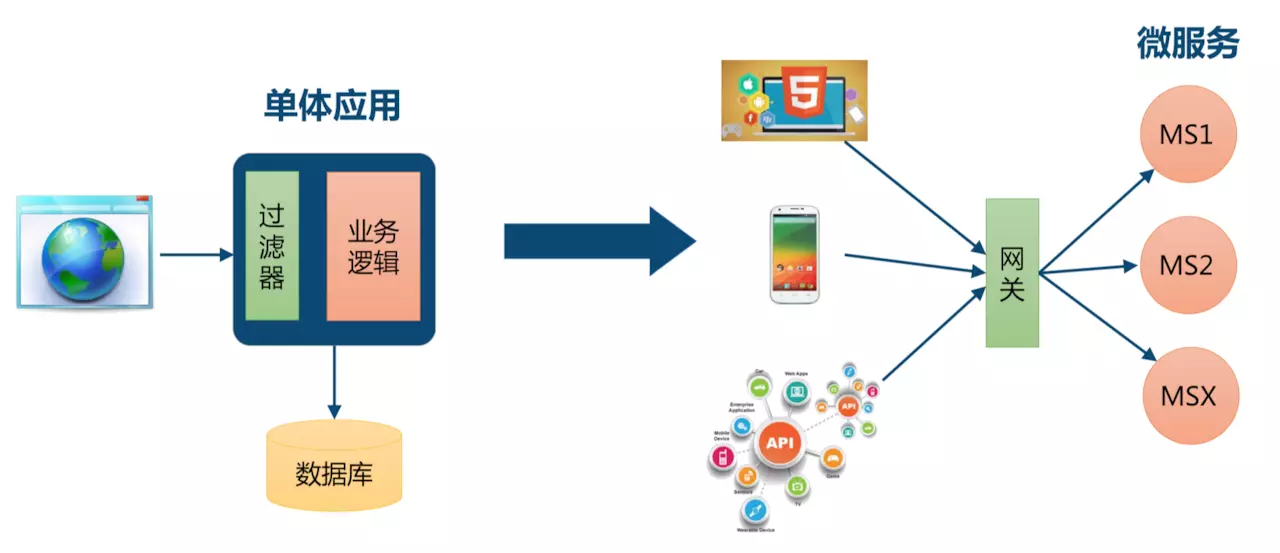
单体应用:浏览器发起请求到单体应用所在的机器,应用从数据库查询数据原路返回给浏览器,对于单体应用来说是不需要网关的。
微服务:微服务的应用可能部署在不同机房,不同地区,不同域名下。此时客户端(浏览器/手机/软件工具)想要请求对应的服务,都需要知道机器的具体 IP 或者域名 URL,当微服务实例众多时,这是非常难以记忆的,对于客户端来说也太复杂难以维护。此时就有了网关,客户端相关的请求直接发送到网关,由网关根据请求标识解析判断出具体的微服务地址,再把请求转发到微服务实例。这其中的记忆功能就全部交由网关来操作了。
总结
如果让客户端直接与各个微服务交互:
客户端会多次请求不同的微服务,增加了客户端的复杂性
存在跨域请求,在一定场景下处理相对复杂
身份认证问题,每个微服务需要独立身份认证
难以重构,随着项目的迭代,可能需要重新划分微服务
某些微服务可能使用了防火墙/浏览器不友好的协议,直接访问会有一定的困难
因此,我们需要网关介于客户端与服务器之间的中间层,所有外部请求率先经过微服务网关,客户端只需要与网关交互,只需要知道网关地址即可。这样便简化了开发且有以下优点:
易于监控,可在微服务网关收集监控数据并将其推送到外部系统进行分析
易于认证,可在微服务网关上进行认证,然后再将请求转发到后端的微服务,从而无需在每个微服务中进行认证
减少了客户端与各个微服务之间的交互次数
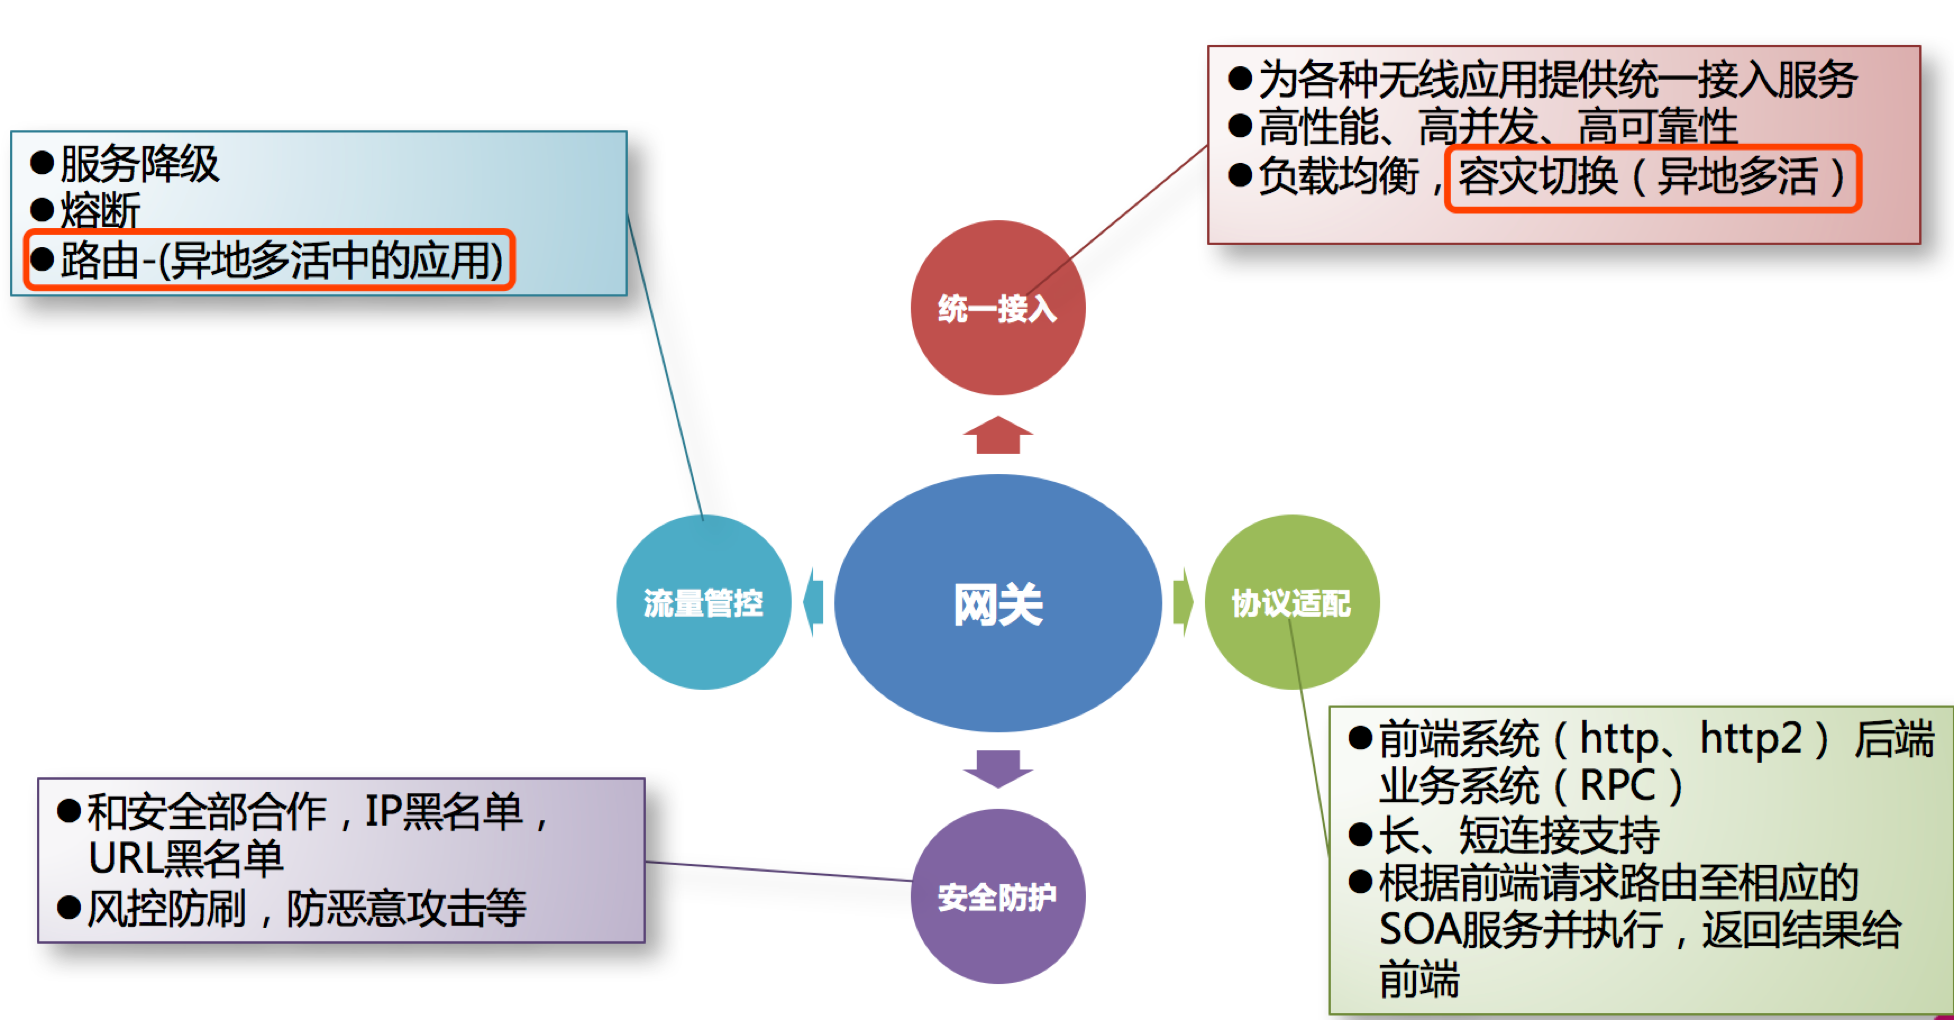
网关解决了什么问题
网关具有身份认证与安全、审查与监控、动态路由、负载均衡、缓存、请求分片与管理、静态响应处理等功能。当然最主要的职责还是与“外界联系”。
总结一下,网关应当具备以下功能:
性能:API 高可用,负载均衡,容错机制。
安全:权限身份认证、脱敏,流量清洗,后端签名(保证全链路可信调用),黑名单(非法调用的限制)。
日志:日志记录,一旦涉及分布式,全链路跟踪必不可少。
缓存:数据缓存。
监控:记录请求响应数据,API 耗时分析,性能监控。
限流:流量控制,错峰流控,可以定义多种限流规则。
灰度:线上灰度部署,可以减小风险。
路由:动态路由规则。
常用网关解决方案
Nginx + Lua
Nginx 是由 Igor Sysoev(伊戈尔 · 赛索耶夫)为俄罗斯访问量第二的 https://www.rambler.ru/ 站点开发的。Nginx 是一个高性能的 HTTP 和反向代理服务器,可以扛得住 5W 左右的并发。Ngnix 一方面可以做反向代理服务器,另外一方面还可以做静态资源服务器。
Nginx 是 C 语言开发,而 Zuul 是 Java 语言开发
Nginx 负载均衡实现,采用服务器实现负载均衡,而 Zuul 负载均衡的实现是采用 Ribbon + Eureka 来实现本地负载均衡
Nginx 适合于服务器端负载均衡,Zuul 适合微服务中实现网关
Nginx 相比 Zuul 功能会更加强大,因为 Nginx 可以整合一些脚本语言(Nginx + Lua)
Nginx 是一个高性能的 HTTP 和反向代理服务器,也是一个 IMAP / POP3 /SMIP 服务器。Zuul 是 Spring Cloud Netflix 中的开源的一个 API Gateway 服务器,本质上是一个 Servlet 应用,提供动态路由,监控,弹性,安全等边缘服务的框架。 Zuul 相当于是从设备和网站到应用程序后端的所有请求的前门。
Nginx 适合做门户网关,是作为整个全局的网关,对外的处于最外层的那种;而 Zuul 属于业务网关,主要用来对应不同的客户端提供服务,用于聚合业务。各个微服务独立部署,职责单一,对外提供服务的时候需要有一个东西把业务聚合起来。
Zuul 可以实现熔断、重试等功能,这是 Nginx 不具备的。
Kong
Kong 是 Mashape 提供的一款 API 管理软件,它本身是基于 Ngnix + Lua 的,但比 Nginx 提供了更简单的配置方式,数据采用了 ApacheCassandra/PostgreSQL 存储,并且提供了一些优秀的插件,比如验证,日志,调用频次限制等。Kong 非常诱人的地方就是提供了大量的插件来扩展应用,通过设置不同的插件可以为服务提供各种增强的功能。
优点:基于 Nginx 所以在性能和稳定性上都没有问题。Kong 作为一款商业软件,在 Nginx 上做了很扩展工作,而且还有很多付费的商业插件。Kong 本身也有付费的企业版,其中包括技术支持、使用培训服务以及 API 分析插件。
缺点:如果你使用 Spring Cloud,Kong 如何结合目前已有的服务治理体系?
Traefik
Traefik 是一个开源的 GO 语言开发的为了让部署微服务更加便捷而诞生的现代HTTP反向代理、负载均衡工具。 它支持多种后台 (Docker , Swarm , Kubernetes , Marathon , Mesos , Consul , Etcd , Zookeeper , BoltDB , Rest API, file…) 来自动化、动态的应用它的配置文件设置。Traefik 拥有一个基于 AngularJS 编写的简单网站界面,支持 Rest API,配置文件热更新,无需重启进程。高可用集群模式等。
相对 Spring Cloud 和 Kubernetes 而言,目前比较适合 Kubernetes。
Spring Cloud Netflix Zuul
Zuul 是 Netflix 公司开源的一个 API 网关组件,Spring Cloud 对其进行二次基于 Spring Boot 的注解式封装做到开箱即用。目前来说,结合 Sring Cloud 提供的服务治理体系,可以做到请求转发,根据配置或者默认的路由规则进行路由和 Load Balance,无缝集成 Hystrix。
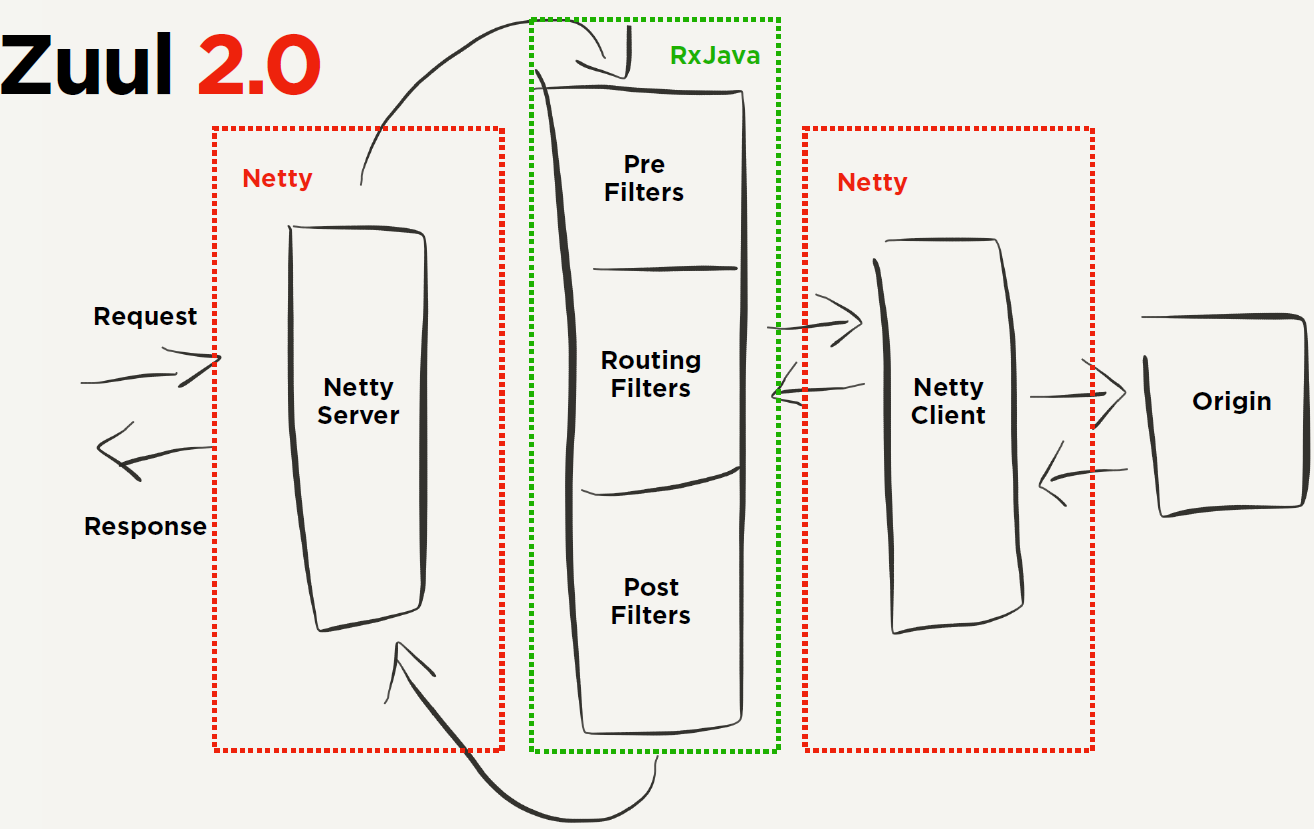
虽然可以通过自定义 Filter 实现我们想要的功能,但是由于 Zuul 本身的设计是基于单线程的接收请求和转发处理,是阻塞 IO,不支持长连接。目前来看 Zuul 就显得很鸡肋,随着 Zuul 2.x 一直跳票(2019 年 5 月发布了 Zuul 2.0 版本),Spring Cloud 推出自己的 Spring Cloud Gateway。
大意就是:Zuul 已死,Spring Cloud Gateway 永生(手动狗头)。
Zuul 1.0
Zuul 2.0
Spring Cloud Gateway
Spring Cloud Gateway 作为 Spring Cloud 生态系统中的网关,目标是替代 Netflix Zuul,其不仅提供统一的路由方式,并且还基于 Filter 链的方式提供了网关基本的功能。目前最新版 Spring Cloud 中引用的还是 Zuul 1.x 版本,而这个版本是基于过滤器的,是阻塞 IO,不支持长连接。
Zuul 2.x 版本一直跳票,2019 年 5 月,Netflix 终于开源了支持异步调用模式的 Zuul 2.0 版本,真可谓千呼万唤始出来。但是 Spring Cloud 已经不再集成 Zuul 2.x 了。
Spring Cloud Gateway 是基于 Spring 生态系统之上构建的 API 网关,包括:Spring 5,Spring Boot 2 和 Project Reactor。Spring Cloud Gateway 旨在提供一种简单而有效的方法来路由到 API,并为它们提供跨领域的关注点,例如:安全性,监视/指标,限流等。由于 Spring 5.0 支持 Netty,Http2,而 Spring Boot 2.0 支持 Spring 5.0,因此 Spring Cloud Gateway 支持 Netty 和 Http2 顺理成章。
总结
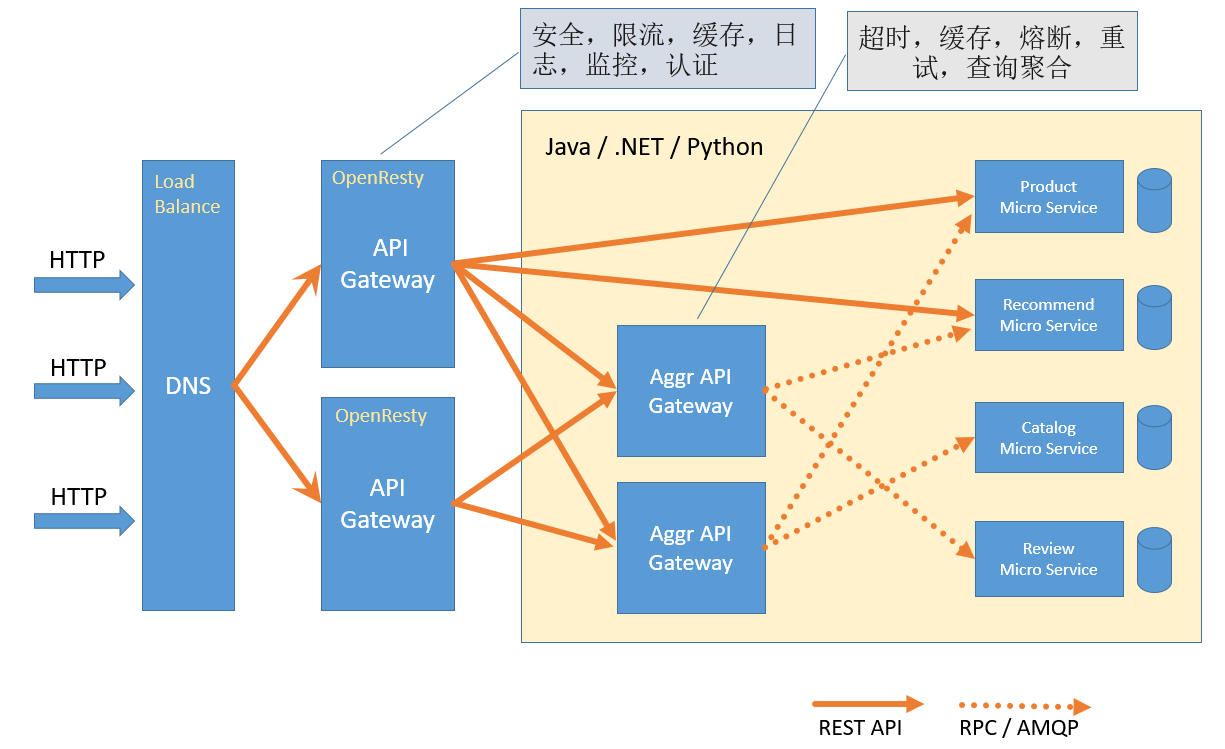
API 网关在微服务架构中的作用大概是这样的:
我们目前所学习的网关关注的就是 Aggr API Gateway 这部分,在这里做聚合服务 的操作。
环境准备
zuul-demo 聚合工程。SpringBoot 2.2.4.RELEASE、Spring Cloud Hoxton.SR1。
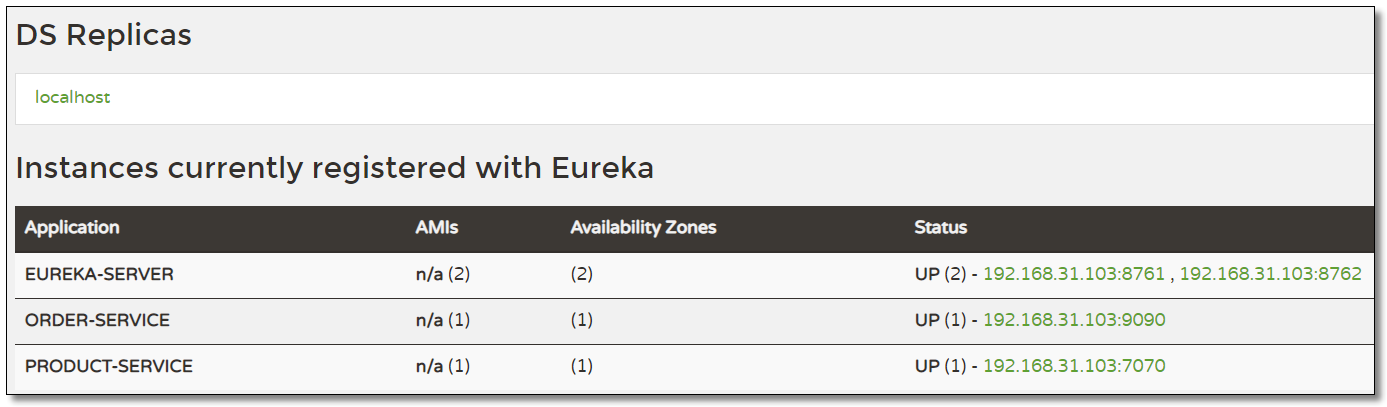
eureka-server:注册中心eureka-server02:注册中心product-service:商品服务,提供了根据主键查询商品接口 http://localhost:7070/product/{id}order-service:订单服务,提供了根据主键查询订单接口 http://localhost:9090/order/{id} 且订单服务调用商品服务。
Nginx 实现 API 网关
之前的课程中我们已经详细的讲解过 Nginx 关于反向代理、负载均衡等功能的使用,这里不再赘述。这里主要通过 Nginx 来实现 API 网关方便大家更好的学习和理解 Zuul 的使用。
下载
官网:http://nginx.org/en/download.html 下载稳定版。为了方便学习,请下载 Windows 版本。
安装
解压文件后直接运行根路径下的 nginx.exe 文件即可。
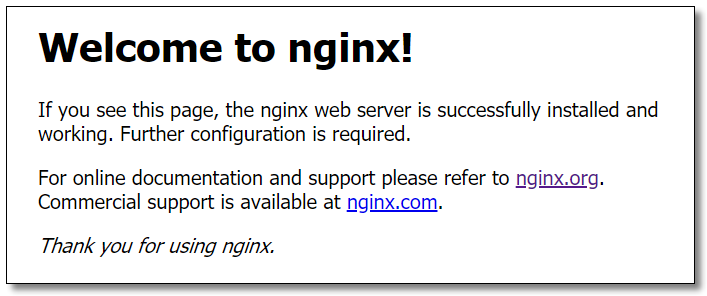
Nginx 默认端口为 80,访问:http://localhost:80/ 看到下图说明安装成功。
配置路由规则
进入 Nginx 的 conf 目录,打开 nginx.conf 文件,配置路由规则:
 1
 2
 3
 4
 5
 6
 7
 8
 9
10
11
12
13
14
15
16
17
18
19
20
21
22
23
24
25
26
http {

	...

    server {
        listen       80;
        server_name  localhost;

        ...

        # 路由到商品服务
        location /api-product {
            proxy_pass http://localhost:7070/;
        }

        # 路由到订单服务
        location /api-order {
            proxy_pass http://localhost:9090/;
        }

        ...
    }

    ...

}
访问
之前我们如果要访问服务,必须由客户端指定具体服务地址访问,现在统一访问 Nginx,由 Nginx 实现网关功能将请求路由至具体的服务。
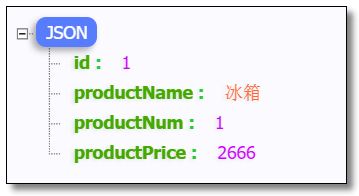
访问:http://localhost/api-product/product/1 结果如下:
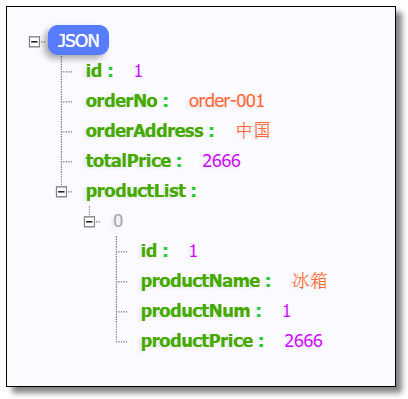
访问:http://localhost/api-order/order/1 结果如下:
Zuul 实现 API 网关
官网文档: https://cloud.spring.io/spring-cloud-static/spring-cloud-netflix/2.2.1.RELEASE/reference/html/#router-and-filter-zuul
搭建网关服务
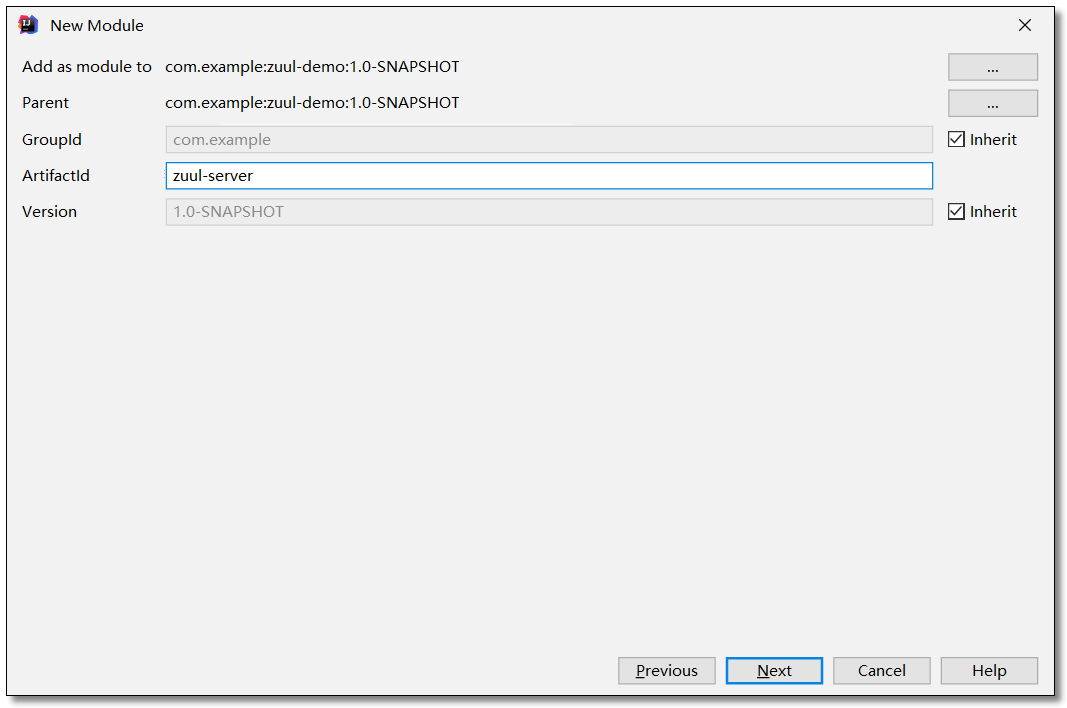
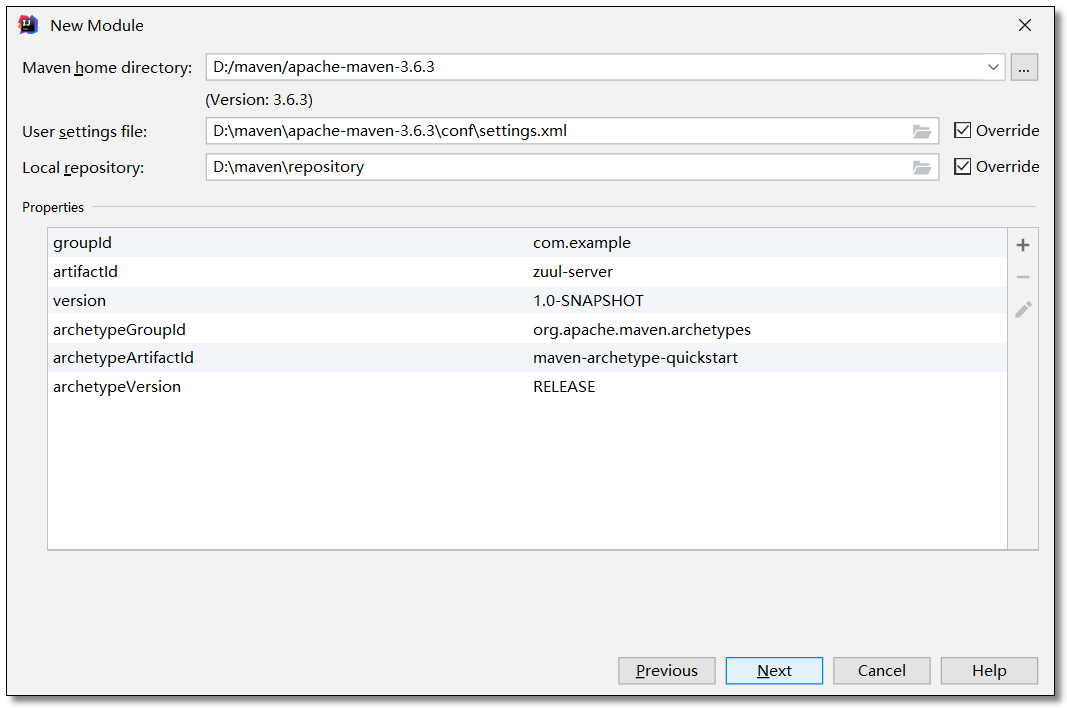
创建项目
创建 zuul-server 项目。
添加依赖
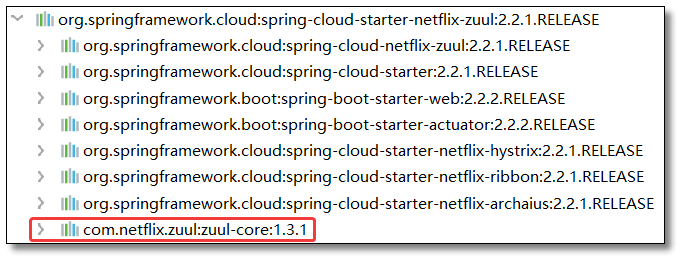
添加 spring cloud netflix zuul 依赖。
 1
 2
 3
 4
 5
 6
 7
 8
 9
10
11
12
13
14
15
16
17
18
19
20
21
22
23
24
25
26
27
<?xml version="1.0" encoding="UTF-8"?>
<project xmlns= "http://maven.apache.org/POM/4.0.0" xmlns:xsi= "http://www.w3.org/2001/XMLSchema-instance"
xsi:schemaLocation= "http://maven.apache.org/POM/4.0.0 http://maven.apache.org/xsd/maven-4.0.0.xsd" >
<modelVersion> 4.0.0</modelVersion>
<groupId> com.example</groupId>
<artifactId> zuul-server</artifactId>
<version> 1.0-SNAPSHOT</version>
<!-- 继承父依赖 -->
<parent>
<groupId> com.example</groupId>
<artifactId> zuul-demo</artifactId>
<version> 1.0-SNAPSHOT</version>
</parent>
<!-- 项目依赖 -->
<dependencies>
<!-- spring cloud netflix zuul 依赖 -->
<dependency>
<groupId> org.springframework.cloud</groupId>
<artifactId> spring-cloud-starter-netflix-zuul</artifactId>
</dependency>
</dependencies>
</project>
配置文件
application.yml
1
2
3
4
5
6
server :
port : 9000 # 端口
spring :
application :
name : zuul-server # 应用名称
启动类
启动类需要开启 @EnableZuulProxy 注解。
 1
 2
 3
 4
 5
 6
 7
 8
 9
10
11
12
13
14
15
16
package com.example ;
import org.springframework.boot.SpringApplication ;
import org.springframework.boot.autoconfigure.SpringBootApplication ;
import org.springframework.cloud.netflix.zuul.EnableZuulProxy ;
@SpringBootApplication
// 开启 Zuul 注解
@EnableZuulProxy
public class ZuulServerApplication {
public static void main ( String [] args ) {
SpringApplication . run ( ZuulServerApplication . class , args );
}
}
配置路由规则
URL 地址路由
1
2
3
4
5
6
# 路由规则
zuul :
routes :
product-service : # 路由 id 自定义
path : /product-service/** # 配置请求 url 的映射路径
url : http://localhost:7070/ # 映射路径对应的微服务地址
通配符含义:
通配符
含义
举例
解释
?
匹配任意单个字符
/product-service/?
/product-service/a,/product-service/b,…
*
匹配任意数量字符不包括子路径
/product-service/*
/product-service/aa,/product-service/bbb,…
**
匹配任意数量字符包括所有下级路径
/product-service/**
/product-service/aa,/product-service/aaa/b/ccc
访问:http://localhost:9000/product-service/product/1 结果如下:
服务名称路由
微服务一般是由几十、上百个服务组成,对于 URL 地址路由的方式,如果对每个服务实例手动指定一个唯一访问地址,这样做显然是不合理的。
Zuul 支持与 Eureka 整合开发,根据 serviceId 自动从注册中心获取服务地址并转发请求,这样做的好处不仅可以通过单个端点来访问应用的所有服务,而且在添加或移除服务实例时不用修改 Zuul 的路由配置。
添加 Eureka Client 依赖
1
2
3
4
5
<!-- netflix eureka client 依赖 -->
<dependency>
<groupId> org.springframework.cloud</groupId>
<artifactId> spring-cloud-starter-netflix-eureka-client</artifactId>
</dependency>
配置注册中心和路由规则
 1
 2
 3
 4
 5
 6
 7
 8
 9
10
11
12
13
14
15
# 路由规则
zuul :
routes :
product-service : # 路由 id 自定义
path : /product-service/** # 配置请求 url 的映射路径
serviceId : product-service # 根据 serviceId 自动从注册中心获取服务地址并转发请求
# 配置 Eureka Server 注册中心
eureka :
instance :
prefer-ip-address : true # 是否使用 ip 地址注册
instance-id : ${spring.cloud.client.ip-address}:${server.port} # ip:port
client :
service-url : # 设置服务注册中心地址
defaultZone : http://localhost:8761/eureka/,http://localhost:8762/eureka/
启动类
 1
 2
 3
 4
 5
 6
 7
 8
 9
10
11
12
13
14
15
16
17
18
package com.example ;
import org.springframework.boot.SpringApplication ;
import org.springframework.boot.autoconfigure.SpringBootApplication ;
import org.springframework.cloud.netflix.zuul.EnableZuulProxy ;
@SpringBootApplication
// 开启 Zuul 注解
@EnableZuulProxy
// 开启 EurekaClient 注解,目前版本如果配置了 Eureka 注册中心,默认会开启该注解
//@EnableEurekaClient
public class ZuulServerApplication {
public static void main ( String [] args ) {
SpringApplication . run ( ZuulServerApplication . class , args );
}
}
访问
访问:http://localhost:9000/product-service/product/1 结果如下:
简化路由配置
Zuul 为了方便大家使用,提供了默认路由配置:路由 id 和 微服务名称 一致,path 默认对应 /微服务名称/**,所以以下配置就没必要再写了。
1
2
3
4
5
6
# 路由规则
zuul :
routes :
product-service : # 路由 id 自定义
path : /product-service/** # 配置请求 url 的映射路径
serviceId : product-service # 根据 serviceId 自动从注册中心获取服务地址并转发请求
访问
此时我们并没有配置任何订单服务的路由规则,访问:http://localhost:9000/order-service/order/1 结果如下:
路由排除
我们可以通过路由排除设置不允许被访问的资源。允许被访问的资源可以通过路由规则进行设置。
URL 地址排除
1
2
3
4
5
6
7
8
# 路由规则
zuul :
ignored-patterns : /**/order/** # URL 地址排除,排除所有包含 /order/ 的路径
# 不受路由排除影响
routes :
product-service : # 路由 id 自定义
path : /product-service/** # 配置请求 url 的映射路径
serviceId : product-service # 根据 serviceId 自动从注册中心获取服务地址并转发请求
服务名称排除
1
2
3
4
5
6
7
8
# 路由规则
zuul :
ignored-services : order-service # 服务名称排除,多个服务逗号分隔,'*' 排除所有
# 不受路由排除影响
routes :
product-service : # 路由 id 自定义
path : /product-service/** # 配置请求 url 的映射路径
serviceId : product-service # 根据 serviceId 自动从注册中心获取服务地址并转发请求
路由前缀
访问
访问:http://localhost:9000/api/product-service/product/1 结果如下:
网关过滤器
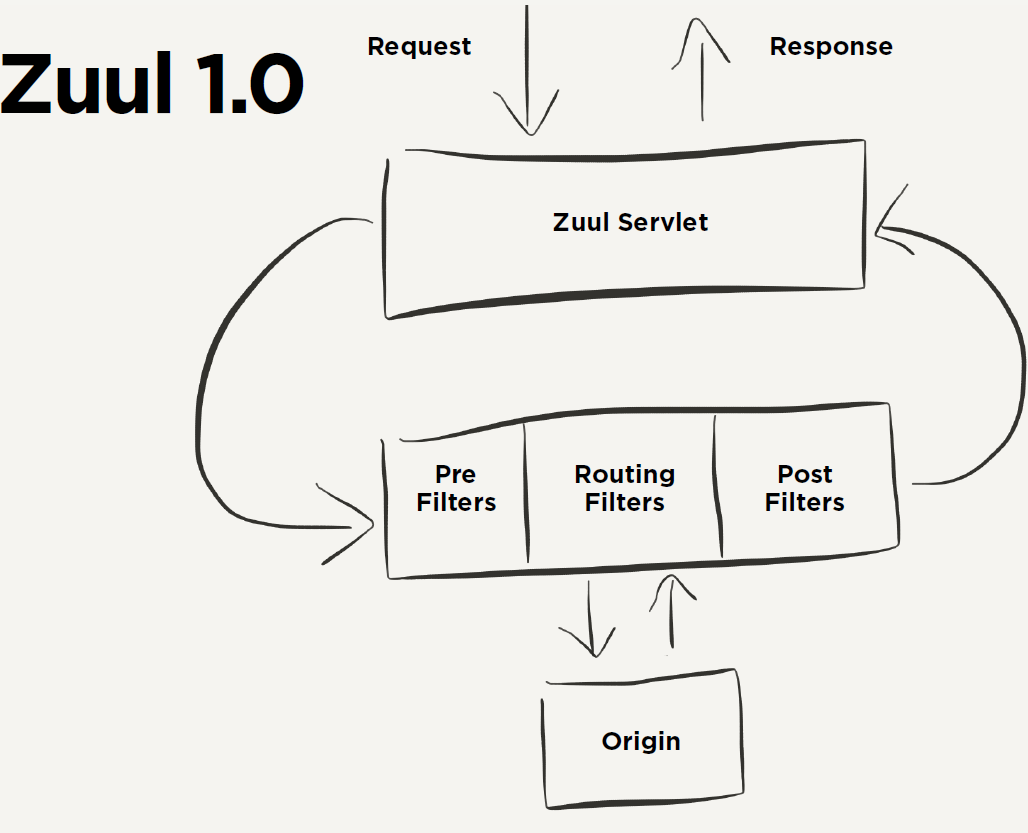
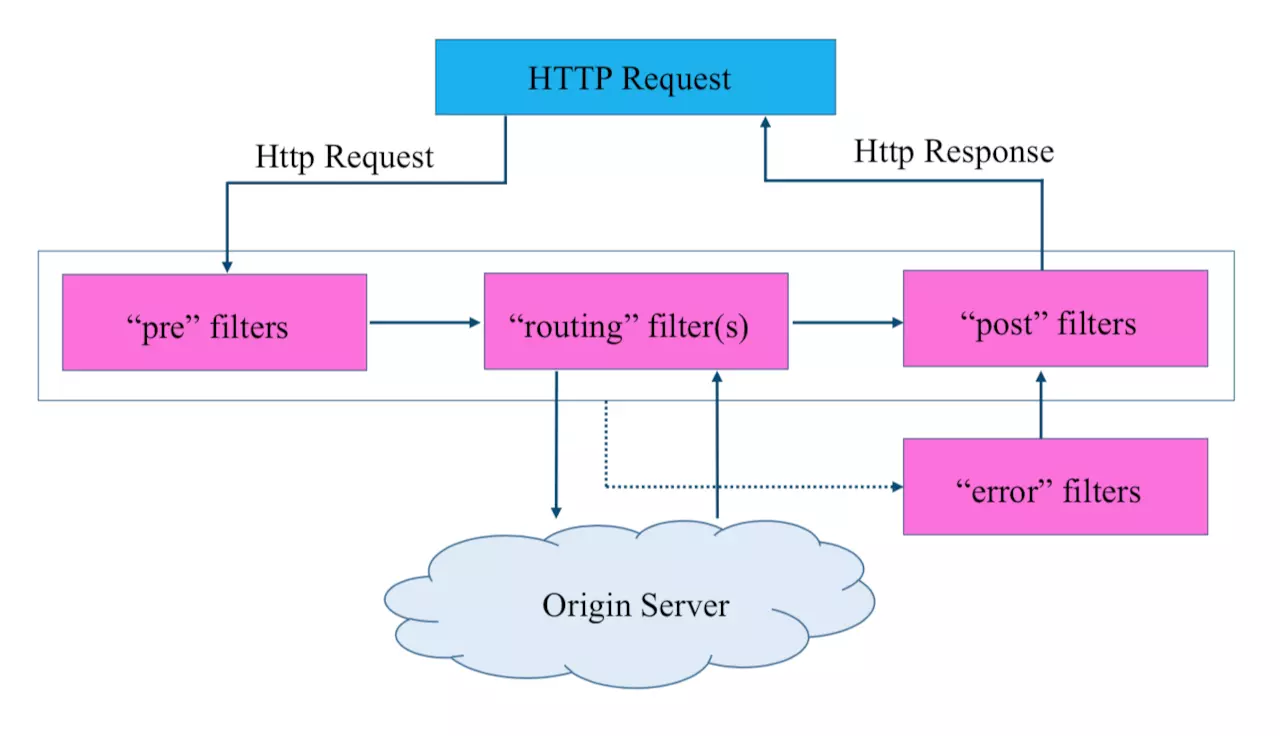
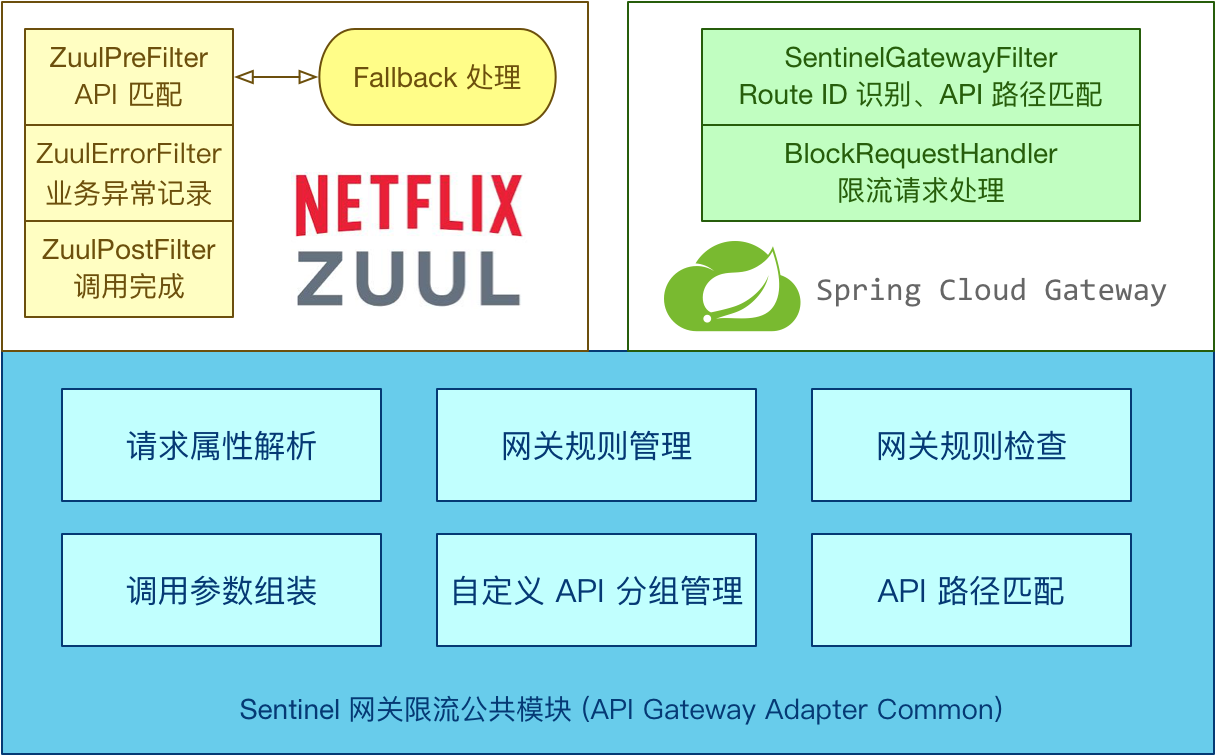
Zuul 包含了对请求的路由和过滤两个核心功能,其中路由功能负责将外部请求转发到具体的微服务实例上,是实现外部访问统一入口的基础;而过滤器功能则负责对请求的处理过程进行干预,是实现请求校验,服务聚合等功能的基础。然而实际上,路由功能在真正运行时,它的路由映射和请求转发都是由几个不同的过滤器完成的。
路由映射主要通过 pre 类型的过滤器完成,它将请求路径与配置的路由规则进行匹配,以找到需要转发的目标地址;而请求转发的部分则是由 routing 类型的过滤器来完成,对 pre 类型过滤器获得的路由地址进行转发。所以说,过滤器可以说是 Zuul 实现 API 网关功能最核心的部件,每一个进入 Zuul 的 http 请求都会经过一系列的过滤器处理链得到请求响应并返回给客户端。
关键名词
类型 :定义路由流程中应用过滤器的阶段。共 pre、routing、post、error 4 个类型。执行顺序 :在同类型 中,定义过滤器执行的顺序。比如多个 pre 类型的执行顺序。条件 :执行过滤器所需的条件。true 开启,false 关闭。动作 :如果符合条件,将执行的动作。具体操作。
过滤器类型
pre:请求被路由到源服务器之前执行的过滤器
routing:处理将请求发送到源服务器的过滤器
post:响应从源服务器返回时执行的过滤器
对响应增加 HTTP 头
收集统计和度量指标
将响应以流的方式发送回客户端
error:上述阶段中出现错误时执行的过滤器
入门案例
创建过滤器
Spring Cloud Netflix Zuul 中实现过滤器必须包含 4 个基本特征:过滤器类型,执行顺序,执行条件,动作(具体操作)。这些步骤都是 ZuulFilter 接口中定义的 4 个抽象方法:
1
2
3
4
5
6
7
8
9
10
11
12
13
14
15
16
17
18
19
20
21
22
23
24
25
26
27
28
29
30
31
32
33
34
35
36
37
38
39
40
41
42
43
44
45
46
47
48
49
50
51
52
53
54
55
56
57
58
59
60
61
62
63
64
65
66
67
68
69
70
71
72
73
74
75
package com.example.filter ;
import com.netflix.zuul.ZuulFilter ;
import com.netflix.zuul.context.RequestContext ;
import com.netflix.zuul.exception.ZuulException ;
import org.slf4j.Logger ;
import org.slf4j.LoggerFactory ;
import org.springframework.stereotype.Component ;
import javax.servlet.http.HttpServletRequest ;
/**
* 网关过滤器
*/
@Component
public class CustomFilter extends ZuulFilter {
private static final Logger logger = LoggerFactory . getLogger ( CustomFilter . class );
/**
* 过滤器类型
* pre
* routing
* post
* error
*
* @return
*/
@Override
public String filterType () {
return "pre" ;
}
/**
* 执行顺序
* 数值越小,优先级越高
*
* @return
*/
@Override
public int filterOrder () {
return 0 ;
}
/**
* 执行条件
* true 开启
* false 关闭
*
* @return
*/
@Override
public boolean shouldFilter () {
return true ;
}
/**
* 动作(具体操作)
* 具体逻辑
*
* @return
* @throws ZuulException
*/
@Override
public Object run () throws ZuulException {
// 获取请求上下文
RequestContext rc = RequestContext . getCurrentContext ();
HttpServletRequest request = rc . getRequest ();
logger . info ( "CustomFilter...method={}, url={}" ,
request . getMethod (),
request . getRequestURL (). toString ());
return null ;
}
}
filterType:该函数需要返回一个字符串代表过滤器的类型,而这个类型就是在 http 请求过程中定义的各个阶段。在 Zuul 中默认定义了 4 个不同的生命周期过程类型,具体如下:
pre:请求被路由之前调用
routing: 路由请求时被调用
post:routing 和 error 过滤器之后被调用
error:处理请求时发生错误时被调用
filterOrder:通过 int 值来定义过滤器的执行顺序,数值越小优先级越高。shouldFilter:返回一个 boolean 值来判断该过滤器是否要执行。run:过滤器的具体逻辑。在该函数中,我们可以实现自定义的过滤逻辑,来确定是否要拦截当前的请求,不对其进行后续路由,或是在请求路由返回结果之后,对处理结果做一些加工等。
访问
访问:http://localhost:9000/product-service/product/1 控制台输出如下:
1
CustomFilter...method= GET, url = http://localhost:9000/product-service/product/1
统一鉴权
接下来我们在网关过滤器中通过 token 判断用户是否登录,完成一个统一鉴权案例。
创建过滤器
1
2
3
4
5
6
7
8
9
10
11
12
13
14
15
16
17
18
19
20
21
22
23
24
25
26
27
28
29
30
31
32
33
34
35
36
37
38
39
40
41
42
43
44
45
46
47
48
49
50
51
52
53
54
55
56
57
58
59
60
61
62
63
64
65
66
67
68
69
70
71
72
package com.example.filter ;
import com.netflix.zuul.ZuulFilter ;
import com.netflix.zuul.context.RequestContext ;
import com.netflix.zuul.exception.ZuulException ;
import org.slf4j.Logger ;
import org.slf4j.LoggerFactory ;
import org.springframework.http.HttpStatus ;
import org.springframework.stereotype.Component ;
import javax.servlet.http.HttpServletRequest ;
import java.io.IOException ;
import java.io.PrintWriter ;
/**
* 权限验证过滤器
*/
@Component
public class AccessFilter extends ZuulFilter {
private static final Logger logger = LoggerFactory . getLogger ( AccessFilter . class );
@Override
public String filterType () {
return "pre" ;
}
@Override
public int filterOrder () {
return 1 ;
}
@Override
public boolean shouldFilter () {
return true ;
}
@Override
public Object run () throws ZuulException {
// 获取请求上下文
RequestContext rc = RequestContext . getCurrentContext ();
HttpServletRequest request = rc . getRequest ();
// 获取表单中的 token
String token = request . getParameter ( "token" );
// 业务逻辑处理
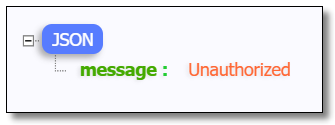
if ( null == token ) {
logger . warn ( "token is null..." );
// 请求结束,不在继续向下请求。
rc . setSendZuulResponse ( false );
// 响应状态码,HTTP 401 错误代表用户没有访问权限
rc . setResponseStatusCode ( HttpStatus . UNAUTHORIZED . value ());
// 响应类型
rc . getResponse (). setContentType ( "application/json; charset=utf-8" );
PrintWriter writer = null ;
try {
writer = rc . getResponse (). getWriter ();
// 响应内容
writer . print ( "{\"message\":\"" + HttpStatus . UNAUTHORIZED . getReasonPhrase () + "\"}" );
} catch ( IOException e ) {
e . printStackTrace ();
} finally {
if ( null != writer )
writer . close ();
}
} else {
// 使用 token 进行身份验证
logger . info ( "token is OK!" );
}
return null ;
}
}
访问
访问:http://localhost:9000/product-service/product/1 结果如下:
访问:http://localhost:9000/product-service/product/1?token=abc123 结果如下:
Zuul 请求的生命周期
HTTP 发送请求到 Zuul 网关
Zuul 网关首先经过 pre filter
验证通过后进入 routing filter,接着将请求转发给远程服务,远程服务执行完返回结果,如果出错,则执行 error filter
继续往下执行 post filter
最后返回响应给 HTTP 客户端
网关过滤器异常统一处理
创建过滤器
1
2
3
4
5
6
7
8
9
10
11
12
13
14
15
16
17
18
19
20
21
22
23
24
25
26
27
28
29
30
31
32
33
34
35
36
37
38
39
40
41
42
43
44
45
46
47
48
49
50
51
52
53
54
55
56
57
58
59
60
package com.example.filter ;
import com.netflix.zuul.ZuulFilter ;
import com.netflix.zuul.context.RequestContext ;
import com.netflix.zuul.exception.ZuulException ;
import org.slf4j.Logger ;
import org.slf4j.LoggerFactory ;
import org.springframework.http.HttpStatus ;
import org.springframework.stereotype.Component ;
import java.io.IOException ;
import java.io.PrintWriter ;
/**
* 异常过滤器
*/
@Component
public class ErrorFilter extends ZuulFilter {
private static final Logger logger = LoggerFactory . getLogger ( ErrorFilter . class );
@Override
public String filterType () {
return "error" ;
}
@Override
public int filterOrder () {
return 0 ;
}
@Override
public boolean shouldFilter () {
return true ;
}
@Override
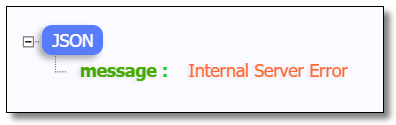
public Object run () throws ZuulException {
RequestContext rc = RequestContext . getCurrentContext ();
Throwable throwable = rc . getThrowable ();
logger . error ( "ErrorFilter..." + throwable . getCause (). getMessage (), throwable );
// 响应状态码,HTTP 500 服务器错误
rc . setResponseStatusCode ( HttpStatus . INTERNAL_SERVER_ERROR . value ());
// 响应类型
rc . getResponse (). setContentType ( "application/json; charset=utf-8" );
PrintWriter writer = null ;
try {
writer = rc . getResponse (). getWriter ();
// 响应内容
writer . print ( "{\"message\":\"" + HttpStatus . INTERNAL_SERVER_ERROR . getReasonPhrase () + "\"}" );
} catch ( IOException e ) {
e . printStackTrace ();
} finally {
if ( null != writer )
writer . close ();
}
return null ;
}
}
模拟异常
在 pre 过滤器中添加模拟异常代码。
1
2
// 模拟异常
Integer . parseInt ( "zuul" );
配置文件
禁用 Zuul 默认的异常处理 filter:SendErrorFilter
1
2
3
4
5
zuul :
# 禁用 Zuul 默认的异常处理 filter
SendErrorFilter :
error :
disable : true
访问
访问:http://localhost:9000/product-service/product/1 结果如下:
Zuul 和 Hystrix 无缝结合
在 Spring Cloud 中,Zuul 启动器中包含了 Hystrix 相关依赖,在 Zuul 网关工程中,默认是提供了 Hystrix Dashboard 服务监控数据的(hystrix.stream),但是不会提供监控面板的界面展示。在 Spring Cloud 中,Zuul 和 Hystrix 是无缝结合的,我们可以非常方便的实现网关容错处理。
网关监控
Zuul 的依赖中包含了 Hystrix 的相关 jar 包,所以我们不需要在项目中额外添加 Hystrix 的依赖。
但是需要开启数据监控的项目中要添加 dashboard 依赖。
1
2
3
4
5
<!-- spring cloud netflix hystrix dashboard 依赖 -->
<dependency>
<groupId> org.springframework.cloud</groupId>
<artifactId> spring-cloud-starter-netflix-hystrix-dashboard</artifactId>
</dependency>
配置文件
在配置文件中开启 hystrix.stream 端点。
1
2
3
4
5
6
# 度量指标监控与健康检查
management :
endpoints :
web :
exposure :
include : hystrix.stream
启动类
在需要开启数据监控的项目启动类中添加 @EnableHystrixDashboard 注解。
1
2
3
4
5
6
7
8
9
10
11
12
13
14
15
16
17
18
19
package com.example ;
import org.springframework.boot.SpringApplication ;
import org.springframework.boot.autoconfigure.SpringBootApplication ;
import org.springframework.cloud.netflix.hystrix.dashboard.EnableHystrixDashboard ;
import org.springframework.cloud.netflix.zuul.EnableZuulProxy ;
@SpringBootApplication
// 开启 Zuul 注解
@EnableZuulProxy
// 开启数据监控注解
@EnableHystrixDashboard
public class ZuulServerApplication {
public static void main ( String [] args ) {
SpringApplication . run ( ZuulServerApplication . class , args );
}
}
访问并查看数据
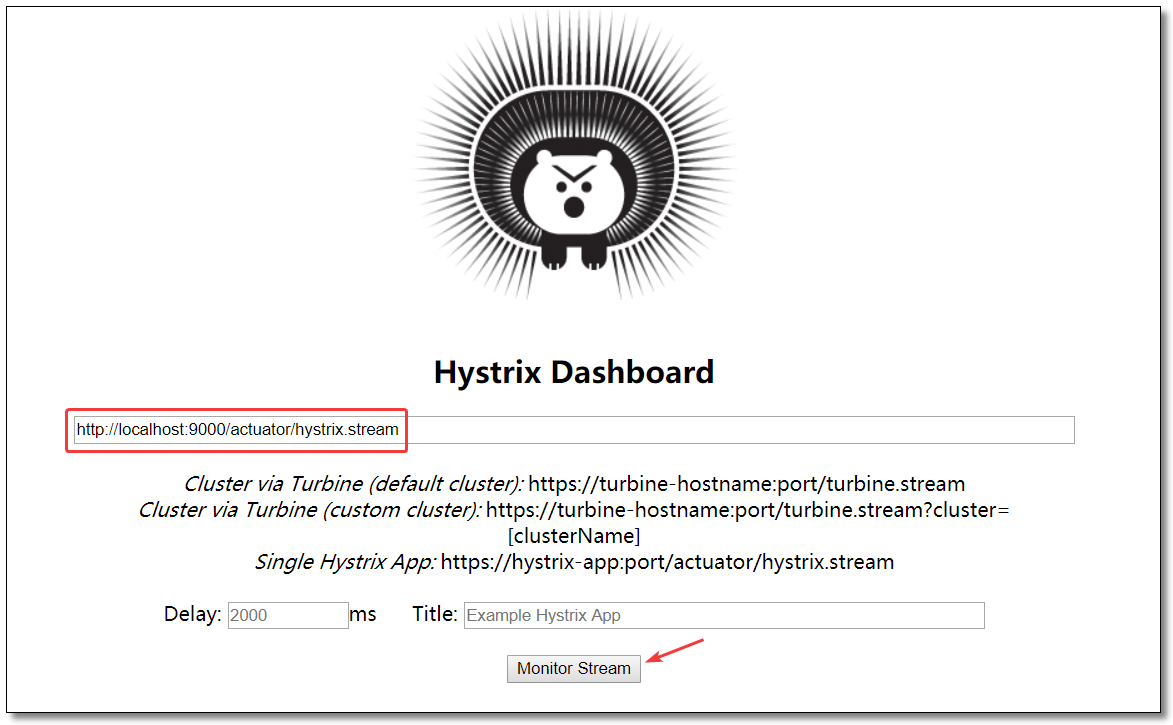
访问:http://localhost:9000/hystrix 监控中心界面如下:
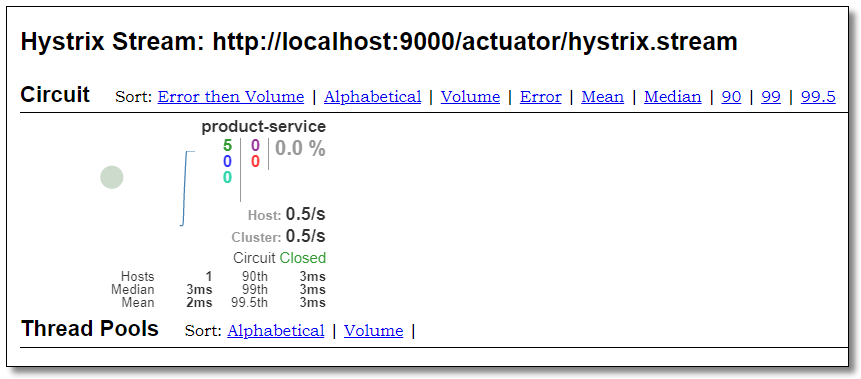
请求多次:http://localhost:9000/product-service/product/1?token=abc123 结果如下:
网关熔断
在 Edgware 版本之前,Zuul 提供了接口 ZuulFallbackProvider 用于实现 fallback 处理。从 Edgware 版本开始,Zuul 提供了接口 FallbackProvider 来提供 fallback 处理。
Zuul 的 fallback 容错处理逻辑,只针对 timeout 异常处理,当请求被 Zuul 路由后,只要服务有返回(包括异常),都不会触发 Zuul 的 fallback 容错逻辑。
因为对于Zuul网关来说,做请求路由分发的时候,结果由远程服务运算。远程服务反馈了异常信息,Zuul 网关不会处理异常,因为无法确定这个错误是否是应用程序真实想要反馈给客户端的。
代码示例
ProductProviderFallback.java
 1
 2
 3
 4
 5
 6
 7
 8
 9
10
11
12
13
14
15
16
17
18
19
20
21
22
23
24
25
26
27
28
29
30
31
32
33
34
35
36
37
38
39
40
41
42
43
44
45
46
47
48
49
50
51
52
53
54
55
56
57
58
59
60
61
62
63
64
65
66
67
68
69
70
71
72
73
74
75
76
77
78
79
80
81
82
83
84
85
86
87
88
89
90
91
92
93
94
95
96
97
98
99
100
package com.example.fallback ;
import org.springframework.cloud.netflix.zuul.filters.route.FallbackProvider ;
import org.springframework.http.HttpHeaders ;
import org.springframework.http.HttpStatus ;
import org.springframework.http.MediaType ;
import org.springframework.http.client.ClientHttpResponse ;
import org.springframework.stereotype.Component ;
import java.io.ByteArrayInputStream ;
import java.io.IOException ;
import java.io.InputStream ;
import java.nio.charset.Charset ;
/**
* 对商品服务做服务容错处理
*/
@Component
public class ProductProviderFallback implements FallbackProvider {
/**
* return - 返回 fallback 处理哪一个服务。返回的是服务的名称。
* 推荐 - 为指定的服务定义特性化的 fallback 逻辑。
* 推荐 - 提供一个处理所有服务的 fallback 逻辑。
* 好处 - 某个服务发生超时,那么指定的 fallback 逻辑执行。如果有新服务上线,未提供 fallback 逻辑,有一个通用的。
*/
@Override
public String getRoute () {
return "product-service" ;
}
/**
* 对商品服务做服务容错处理
*
* @param route 容错服务名称
* @param cause 服务异常信息
* @return
*/
@Override
public ClientHttpResponse fallbackResponse ( String route , Throwable cause ) {
return new ClientHttpResponse () {
/**
* 设置响应的头信息
* @return
*/
@Override
public HttpHeaders getHeaders () {
HttpHeaders header = new HttpHeaders ();
header . setContentType ( new MediaType ( "application" , "json" , Charset . forName ( "utf-8" )));
return header ;
}
/**
* 设置响应体
* Zuul 会将本方法返回的输入流数据读取,并通过 HttpServletResponse 的输出流输出到客户端。
* @return
*/
@Override
public InputStream getBody () throws IOException {
return new ByteArrayInputStream ( "{\"message\":\"商品服务不可用,请稍后再试。\"}" . getBytes ());
}
/**
* ClientHttpResponse 的 fallback 的状态码 返回 HttpStatus
* @return
*/
@Override
public HttpStatus getStatusCode () throws IOException {
return HttpStatus . INTERNAL_SERVER_ERROR ;
}
/**
* ClientHttpResponse 的 fallback 的状态码 返回 int
* @return
*/
@Override
public int getRawStatusCode () throws IOException {
return this . getStatusCode (). value ();
}
/**
* ClientHttpResponse 的 fallback 的状态码 返回 String
* @return
*/
@Override
public String getStatusText () throws IOException {
return this . getStatusCode (). getReasonPhrase ();
}
/**
* 回收资源方法
* 用于回收当前 fallback 逻辑开启的资源对象。
*/
@Override
public void close () {
}
};
}
}
访问
关闭商品服务,访问:http://localhost:9000/product-service/product/1?token=abc123 结果如下:
网关限流
顾名思义,限流就是限制流量,就像你宽带包有 1 个 G 的流量,用完了就没了。通过限流,我们可以很好地控制系统的 QPS,从而达到保护系统的目的。Zuul 网关组件也提供了限流保护。当请求并发达到阀值,自动触发限流保护,返回错误结果。只要提供 error 错误处理机制即可。
为什么需要限流
比如 Web 服务、对外 API,这种类型的服务有以下几种可能导致机器被拖垮:
用户增长过快(好事)
因为某个热点事件(微博热搜)
竞争对象爬虫
恶意的请求
这些情况都是无法预知的,不知道什么时候会有 10 倍甚至 20 倍的流量打进来,如果真碰上这种情况,扩容是根本来不及的。
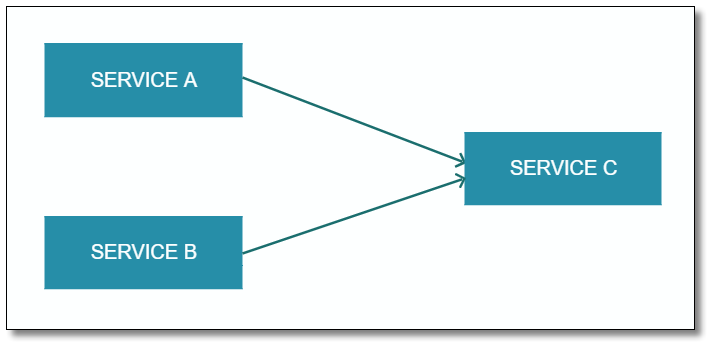
从上图可以看出,对内而言:上游的 A、B 服务直接依赖了下游的基础服务 C,对于 A,B 服务都依赖的基础服务 C 这种场景,服务 A 和 B 其实处于某种竞争关系,如果服务 A 的并发阈值设置过大,当流量高峰期来临,有可能直接拖垮基础服务 C 并影响服务 B,即雪崩效应。
限流算法
常见的限流算法有:
计数器算法
漏桶(Leaky Bucket)算法
令牌桶(Token Bucket)算法
计数器算法
计数器算法是限流算法里最简单也是最容易实现的一种算法。比如我们规定,对于 A 接口来说,我们 1 分钟的访问次数不能超过 100 个。那么我们可以这么做:在一开始的时候,我们可以设置一个计数器 counter,每当一个请求过来的时候,counter 就加 1,如果 counter 的值大于 100 并且该请求与第一个请求的间隔时间还在 1 分钟之内,触发限流;如果该请求与第一个请求的间隔时间大于 1 分钟,重置 counter 重新计数,具体算法的示意图如下:
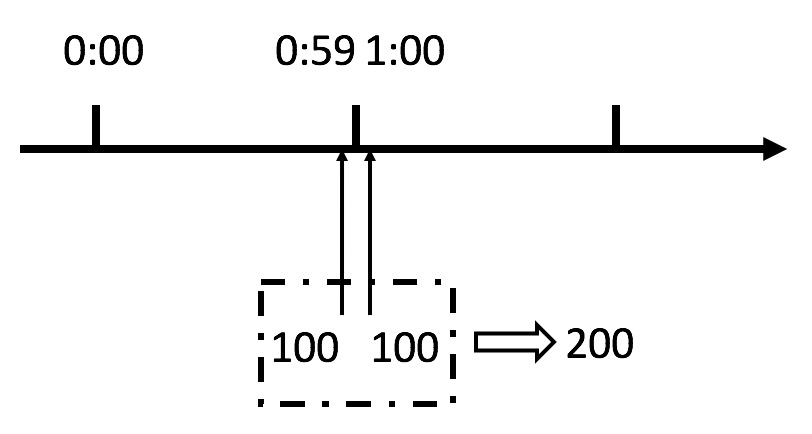
这个算法虽然简单,但是有一个十分致命的问题,那就是临界问题,我们看下图:
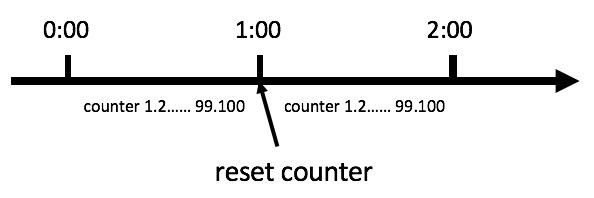
从上图中我们可以看到,假设有一个恶意用户,他在 0:59 时,瞬间发送了 100 个请求,并且 1:00 又瞬间发送了 100 个请求,那么其实这个用户在 1 秒里面,瞬间发送了 200 个请求。我们刚才规定的是 1 分钟最多 100 个请求,也就是每秒钟最多 1.7 个请求,用户通过在时间窗口的重置节点处突发请求, 可以瞬间超过我们的速率限制。用户有可能通过算法的这个漏洞,瞬间压垮我们的应用。
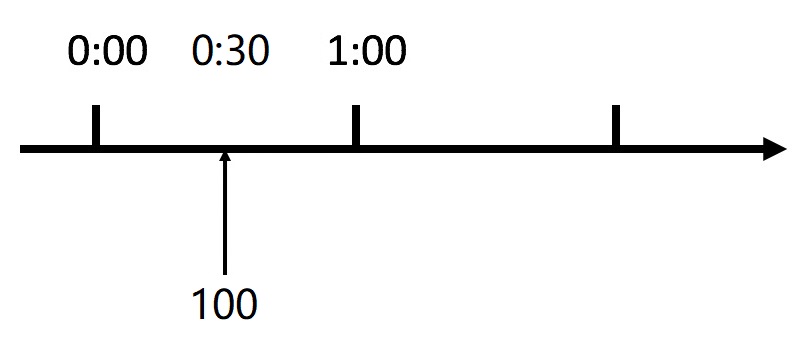
还有资料浪费的问题存在,我们的预期想法是希望 100 个请求可以均匀分散在这一分钟内,假设 30s 以内我们就请求上限了,那么剩余的半分钟服务器就会处于闲置状态,比如下图:
漏桶算法
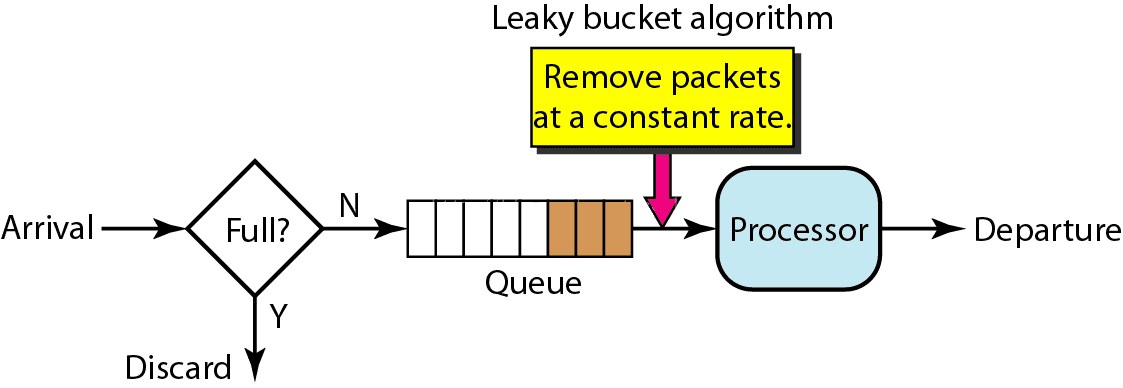
漏桶算法其实也很简单,可以粗略的认为就是注水漏水的过程,往桶中以任意速率流入水,以一定速率流出水,当水超过桶流量则丢弃,因为桶容量是不变的,保证了整体的速率。
漏桶算法是使用队列机制实现的。
漏桶算法主要用途在于保护它人(服务),假设入水量很大,而出水量较慢,则会造成网关的资源堆积可能导致网关瘫痪。而目标服务可能是可以处理大量请求的,但是漏桶算法出水量缓慢反而造成服务那边的资源浪费。
漏桶算法无法应对突发调用。不管上面流量多大,下面流出的速度始终保持不变。因为处理的速度是固定的,请求进来的速度是未知的,可能突然进来很多请求,没来得及处理的请求就先放在桶里,既然是个桶,肯定是有容量上限,如果桶满了,那么新进来的请求就会丢弃。
令牌桶算法
令牌桶算法是对漏桶算法的一种改进,漏桶算法能够限制请求调用的速率,而令牌桶算法能够在限制调用的平均速率的同时还允许一定程度的突发调用。在令牌桶算法中,存在一个桶,用来存放固定数量的令牌。算法中存在一种机制,以一定的速率往桶中放令牌。每次请求调用需要先获取令牌 ,只有拿到令牌 ,才有机会继续执行 ,否则选择选择等待可用的令牌、或者直接拒绝。放令牌这个动作是持续不断的进行,如果桶中令牌数达到上限,就丢弃令牌。
场景大概是这样的:桶中一直有大量的可用令牌,这时进来的请求可以直接拿到令牌执行,比如设置 QPS 为 100/s,那么限流器初始化完成一秒后,桶中就已经有 100 个令牌了,等服务启动完成对外提供服务时,该限流器可以抵挡瞬时的 100 个请求。当桶中没有令牌时,请求会进行等待,最后相当于以一定的速率执行。
Zuul 内部使用 Ratelimit 组件实现限流,使用的就是该算法,大概描述如下:
所有的请求在处理之前都需要拿到一个可用的令牌才会被处理;
根据限流大小,设置按照一定的速率往桶里添加令牌;
桶设置最大的放置令牌限制,当桶满时、新添加的令牌就被丢弃或者拒绝;
请求到达后首先要获取令牌桶中的令牌,拿着令牌才可以进行其他的业务逻辑,处理完业务逻辑之后,将令牌直接删除;
令牌桶有最低限额,当桶中的令牌达到最低限额的时候,请求处理完之后将不会删除令牌,以此保证足够的限流。
漏桶算法主要用途在于保护它人,而令牌桶算法主要目的在于保护自己,将请求压力交由目标服务处理。假设突然进来很多请求,只要拿到令牌这些请求会瞬时被处理调用目标服务。
添加依赖
Zuul 的限流保护需要额外依赖 spring-cloud-zuul-ratelimit 组件,限流数据采用 Redis 存储所以还要添加 Redis 组件。
RateLimit 官网文档:https://github.com/marcosbarbero/spring-cloud-zuul-ratelimit
1
2
3
4
5
6
7
8
9
10
11
12
13
14
15
16
<!-- spring cloud zuul ratelimit 依赖 -->
<dependency>
<groupId> com.marcosbarbero.cloud</groupId>
<artifactId> spring-cloud-zuul-ratelimit</artifactId>
<version> 2.3.0.RELEASE</version>
</dependency>
<!-- spring boot data redis 依赖 -->
<dependency>
<groupId> org.springframework.boot</groupId>
<artifactId> spring-boot-starter-data-redis</artifactId>
</dependency>
<!-- commons-pool2 对象池依赖 -->
<dependency>
<groupId> org.apache.commons</groupId>
<artifactId> commons-pool2</artifactId>
</dependency>
全局限流配置
使用全局限流配置,Zuul 会对代理的所有服务提供限流保护。
1
2
3
4
5
6
7
8
9
10
11
12
13
14
15
16
17
18
19
20
21
22
23
24
25
26
27
28
29
30
31
32
33
34
35
36
37
38
39
40
41
42
43
44
server :
port : 9000 # 端口
spring :
application :
name : zuul-server # 应用名称
# redis 缓存
redis :
timeout : 10000 # 连接超时时间
host : 192.168.10.101 # Redis服务器地址
port : 6379 # Redis服务器端口
password : root # Redis服务器密码
database : 0 # 选择哪个库,默认0库
lettuce :
pool :
max-active : 1024 # 最大连接数,默认 8
max-wait : 10000 # 最大连接阻塞等待时间,单位毫秒,默认 -1
max-idle : 200 # 最大空闲连接,默认 8
min-idle : 5 # 最小空闲连接,默认 0
# 配置 Eureka Server 注册中心
eureka :
instance :
prefer-ip-address : true # 是否使用 ip 地址注册
instance-id : ${spring.cloud.client.ip-address}:${server.port} # ip:port
client :
service-url : # 设置服务注册中心地址
defaultZone : http://localhost:8761/eureka/,http://localhost:8762/eureka/
zuul :
# 服务限流
ratelimit :
# 开启限流保护
enabled : true
# 限流数据存储方式
repository : REDIS
# default-policy-list 默认配置,全局生效
default-policy-list :
- limit : 3
refresh-interval : 60 # 60s 内请求超过 3 次,服务端就抛出异常,60s 后可以恢复正常请求
type :
- origin
- url
- user
Zuul-RateLimiter 基本配置项:
配置项
可选值
说明
enabled
true/false
是否启用限流
repository
REDIS:基于 Redis,使用时必须引入 Redis 相关依赖
限流数据的存储方式,无默认值必填项
key-prefix
String
限流 key 前缀
default-policy-list
List of Policy
默认策略
policy-list
Map of Lists of Policy
自定义策略
post-filter-order
-
postFilter 过滤顺序
pre-filter-order
-
preFilter 过滤顺序
Bucket4j 实现需要相关的 bean @Qualifier(“RateLimit”):
JCache - javax.cache.Cache
Hazelcast - com.hazelcast.core.IMap
Ignite - org.apache.ignite.IgniteCache
Infinispan - org.infinispan.functional.ReadWriteMap
Policy 限流策略配置项说明:
项
说明
limit
单位时间内请求次数限制
quota
单位时间内累计请求时间限制(秒),非必要参数
refresh-interval
单位时间(秒),默认 60 秒
type
限流方式:
访问
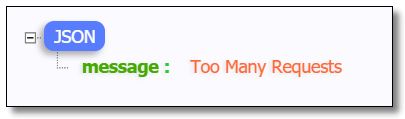
访问:http://localhost:9000/product-service/product/1?token=abc123 控制台结果如下:
1
ErrorFilter...com.netflix.zuul.exception.ZuulException: 429 TOO_MANY_REQUESTS
查看 Redis
1
2
3
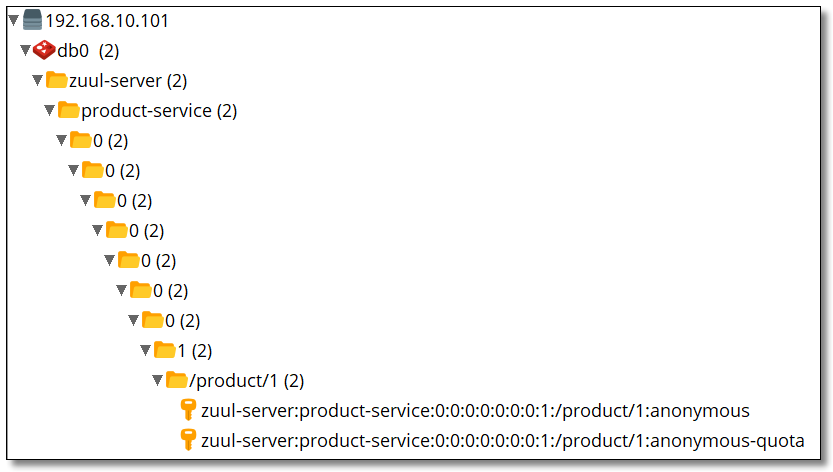
127.0.0.1:6379> keys *
1) "zuul-server:product-service:0:0:0:0:0:0:0:1:/product/1:anonymous"
2) "zuul-server:product-service:0:0:0:0:0:0:0:1:/product/1:anonymous-quota"
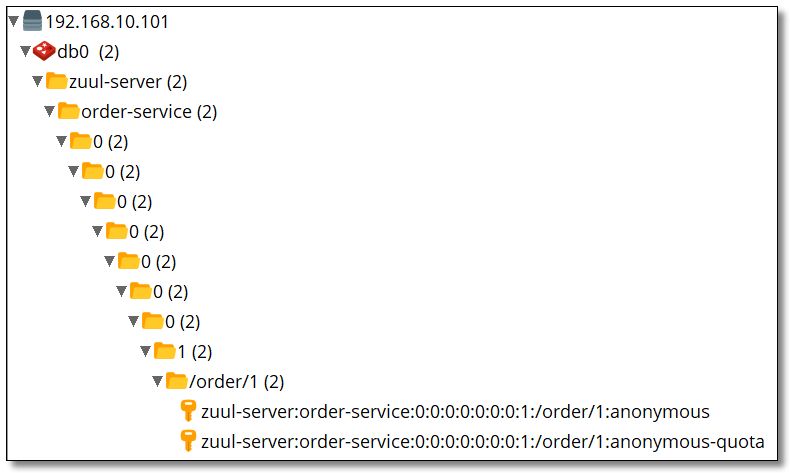
局部限流配置
使用局部限流配置,Zuul 仅针对配置的服务提供限流保护。
1
2
3
4
5
6
7
8
9
10
11
12
13
14
15
16
17
zuul :
# 服务限流
ratelimit :
# 开启限流保护
enabled : true
# 限流数据存储方式
repository : REDIS
# policy-list 自定义配置,局部生效
policy-list :
# 指定需要被限流的服务名称
order-service :
- limit : 5
refresh-interval : 60 # 60s 内请求超过 5 次,服务端就抛出异常,60s 后可以恢复正常请求
type :
- origin
- url
- user
访问:http://localhost:9000/order-service/order/1?token=abc123 控制台结果如下:
1
ErrorFilter...com.netflix.zuul.exception.ZuulException: 429 TOO_MANY_REQUESTS
查看 Redis
1
2
3
127.0.0.1:6379> keys *
1) "zuul-server:order-service:0:0:0:0:0:0:0:1:/order/1:anonymous-quota"
2) "zuul-server:order-service:0:0:0:0:0:0:0:1:/order/1:anonymous"
自定义限流策略
如果希望自己控制限流策略,可以通过自定义 RateLimitKeyGenerator 的实现来增加自己的策略逻辑。
修改商品服务控制层代码如下,添加 /product/single:
1
2
3
4
5
6
7
8
9
10
11
12
13
14
15
16
17
18
19
20
21
22
23
24
25
26
27
28
29
30
31
32
33
34
35
36
37
38
39
40
package com.example.controller ;
import com.example.pojo.Product ;
import com.example.service.ProductService ;
import org.springframework.beans.factory.annotation.Autowired ;
import org.springframework.web.bind.annotation.GetMapping ;
import org.springframework.web.bind.annotation.PathVariable ;
import org.springframework.web.bind.annotation.RequestMapping ;
import org.springframework.web.bind.annotation.RestController ;
@RestController
@RequestMapping ( "/product" )
public class ProductController {
@Autowired
private ProductService productService ;
/**
* 根据主键查询商品
*
* @param id
* @return
*/
@GetMapping ( "/{id}" )
public Product selectProductById ( @PathVariable ( "id" ) Integer id ) {
return productService . selectProductById ( id );
}
/**
* 根据主键查询商品
*
* @param id
* @return
*/
@GetMapping ( "/single" )
public Product selectProductSingle ( Integer id ) {
return productService . selectProductById ( id );
}
}
自定义限流策略类。
1
2
3
4
5
6
7
8
9
10
11
12
13
14
15
16
17
18
19
20
21
22
23
24
25
26
27
28
29
30
31
32
33
34
35
package com.example.ratelimit ;
import com.marcosbarbero.cloud.autoconfigure.zuul.ratelimit.config.RateLimitUtils ;
import com.marcosbarbero.cloud.autoconfigure.zuul.ratelimit.config.properties.RateLimitProperties ;
import com.marcosbarbero.cloud.autoconfigure.zuul.ratelimit.support.DefaultRateLimitKeyGenerator ;
import org.springframework.cloud.netflix.zuul.filters.Route ;
import org.springframework.stereotype.Component ;
import javax.servlet.http.HttpServletRequest ;
/**
* 自定义限流策略
*/
@Component
public class RateLimitKeyGenerator extends DefaultRateLimitKeyGenerator {
public RateLimitKeyGenerator ( RateLimitProperties properties , RateLimitUtils rateLimitUtils ) {
super ( properties , rateLimitUtils );
}
/**
* 限流逻辑
*
* @param request
* @param route
* @param policy
* @return
*/
@Override
public String key ( HttpServletRequest request , Route route , RateLimitProperties . Policy policy ) {
// 对请求参数中相同的 id 值进行限流
return super . key ( request , route , policy ) + ":" + request . getParameter ( "id" );
}
}
多次访问:http://localhost:9000/api/product-service/product/single?token=abc123&id=1 被限流后,马上更换 id=2 重新访问发现服务任然可用,再继续多次访问,发现更换过的 id=2 也被限流了。Redis 信息如下:
1
2
3
127.0.0.1:6379> keys *
1) "zuul-server:product-service:0:0:0:0:0:0:0:1:/product/single:anonymous:1"
2) "zuul-server:product-service:0:0:0:0:0:0:0:1:/product/single:anonymous:2"
错误处理
配置 error 类型的网关过滤器进行处理即可。修改之前的 ErrorFilter 让其变的通用。
 1
 2
 3
 4
 5
 6
 7
 8
 9
10
11
12
13
14
15
16
17
18
19
20
21
22
23
24
25
26
27
28
29
30
31
32
33
34
35
36
37
38
39
40
41
42
43
44
45
46
47
48
49
50
51
52
53
54
55
56
57
58
59
60
61
62
63
64
65
66
67
68
69
70
71
72
73
74
75
76
77
78
79
80
81
82
package com.example.filter ;
import com.netflix.zuul.ZuulFilter ;
import com.netflix.zuul.context.RequestContext ;
import com.netflix.zuul.exception.ZuulException ;
import org.slf4j.Logger ;
import org.slf4j.LoggerFactory ;
import org.springframework.cloud.netflix.zuul.util.ZuulRuntimeException ;
import org.springframework.http.HttpStatus ;
import org.springframework.stereotype.Component ;
import javax.servlet.http.HttpServletResponse ;
import java.io.IOException ;
import java.io.PrintWriter ;
/**
* 异常过滤器
*/
@Component
public class ErrorFilter extends ZuulFilter {
private static final Logger logger = LoggerFactory . getLogger ( ErrorFilter . class );
@Override
public String filterType () {
return "error" ;
}
@Override
public int filterOrder () {
return 0 ;
}
@Override
public boolean shouldFilter () {
return true ;
}
@Override
public Object run () throws ZuulException {
RequestContext rc = RequestContext . getCurrentContext ();
ZuulException exception = this . findZuulException ( rc . getThrowable ());
logger . error ( "ErrorFilter..." + exception . errorCause , exception );
HttpStatus httpStatus = null ;
if ( 429 == exception . nStatusCode )
httpStatus = HttpStatus . TOO_MANY_REQUESTS ;
if ( 500 == exception . nStatusCode )
httpStatus = HttpStatus . INTERNAL_SERVER_ERROR ;
// 响应状态码
rc . setResponseStatusCode ( httpStatus . value ());
// 响应类型
rc . getResponse (). setContentType ( "application/json; charset=utf-8" );
PrintWriter writer = null ;
try {
writer = rc . getResponse (). getWriter ();
// 响应内容
writer . print ( "{\"message\":\"" + httpStatus . getReasonPhrase () + "\"}" );
} catch ( IOException e ) {
e . printStackTrace ();
} finally {
if ( null != writer )
writer . close ();
}
return null ;
}
private ZuulException findZuulException ( Throwable throwable ) {
if ( throwable . getCause () instanceof ZuulRuntimeException )
return ( ZuulException ) throwable . getCause (). getCause ();
if ( throwable . getCause () instanceof ZuulException )
return ( ZuulException ) throwable . getCause ();
if ( throwable instanceof ZuulException )
return ( ZuulException ) throwable ;
return new ZuulException ( throwable , HttpServletResponse . SC_INTERNAL_SERVER_ERROR , null );
}
}
还有一种方法是实现 org.springframework.boot.web.servlet.error.ErrorController 重写 getErrorPath() 本文中不做重点讲解。
多次访问:http://localhost:9000/product-service/product/1?token=abc123 结果如下:
网关调优
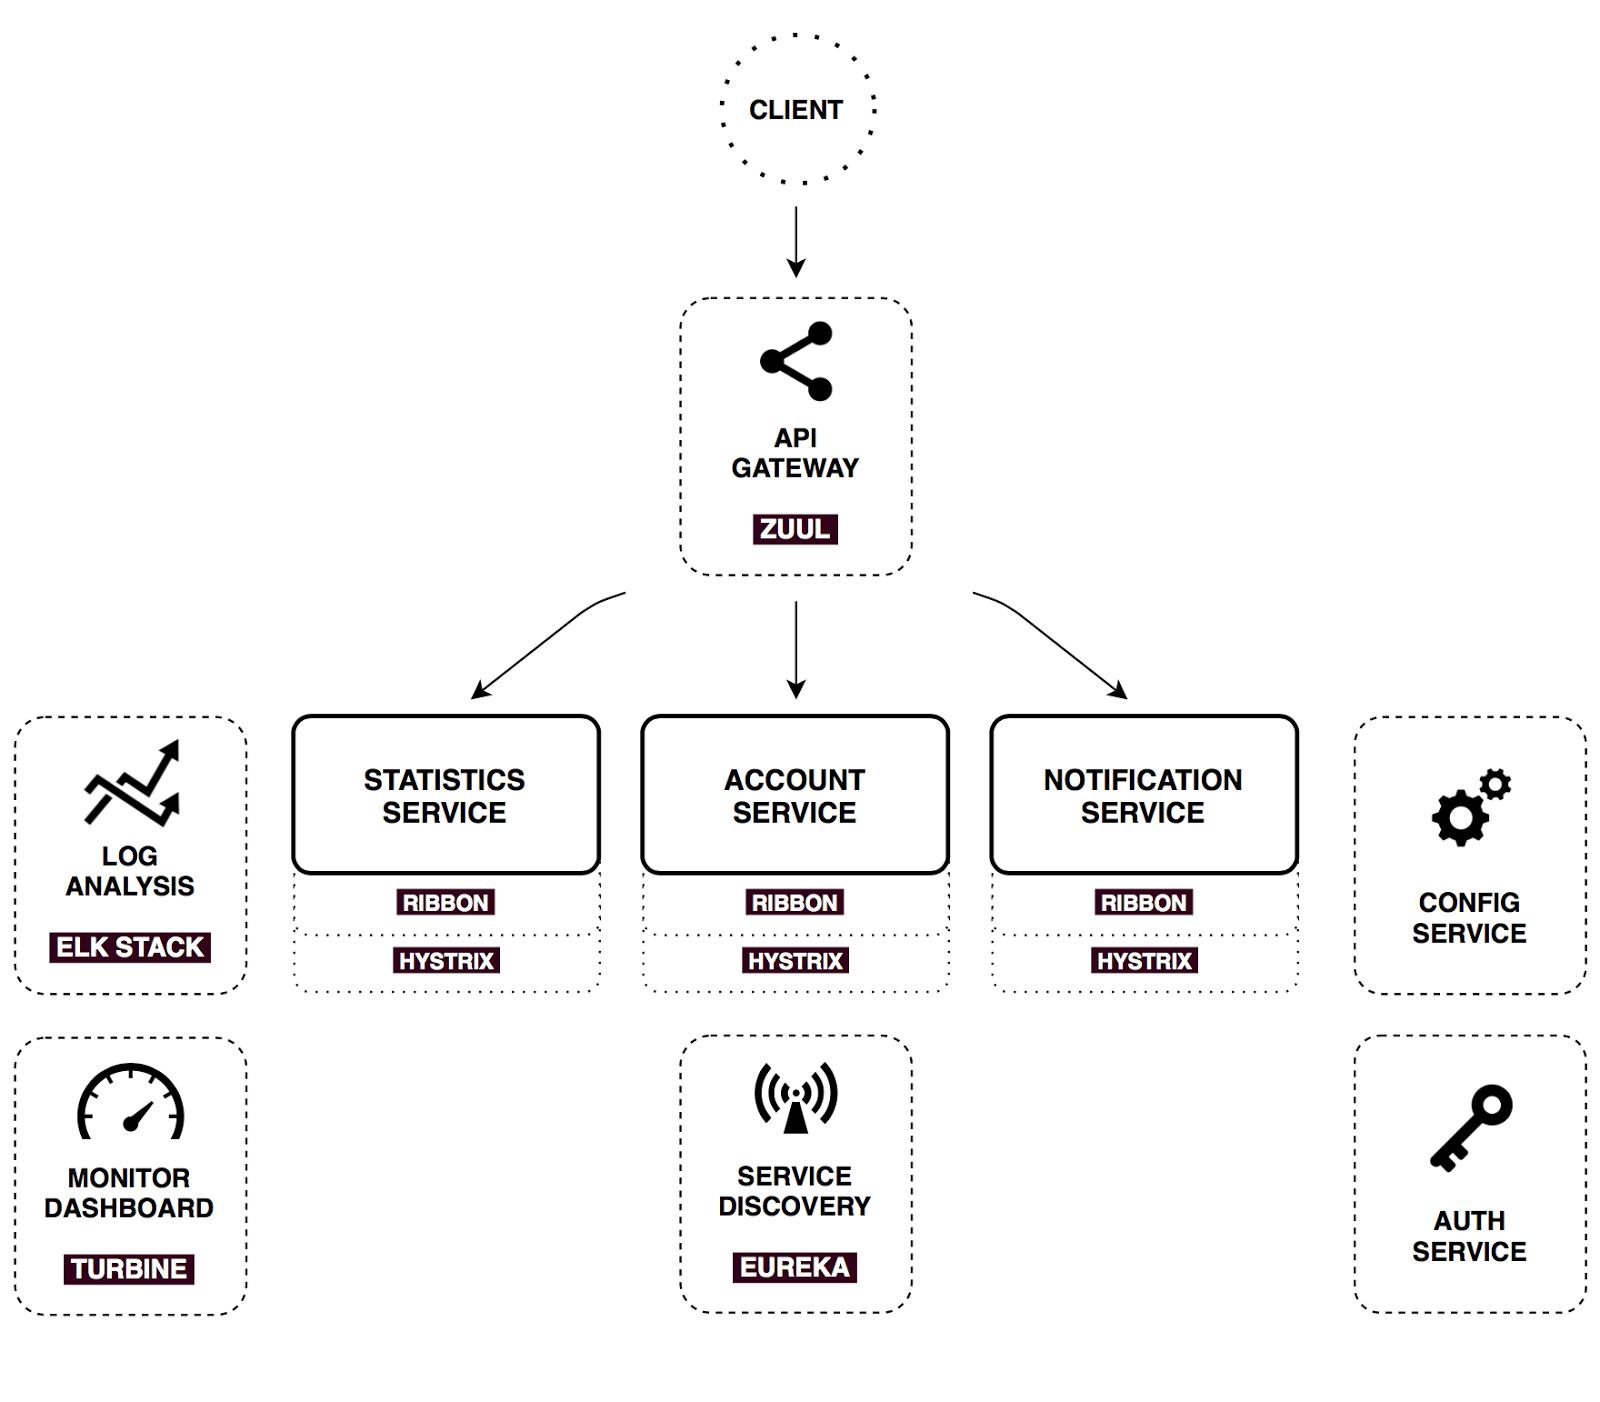
使用 Zuul 的 Spring Cloud 微服务结构图:
从上图中可以看出。整体请求逻辑还是比较复杂的,在没有 Zuul 网关的情况下,client 请求 service 的时候,也有请求超时的可能。那么当增加了 Zuul 网关的时候,请求超时的可能就更明显了。
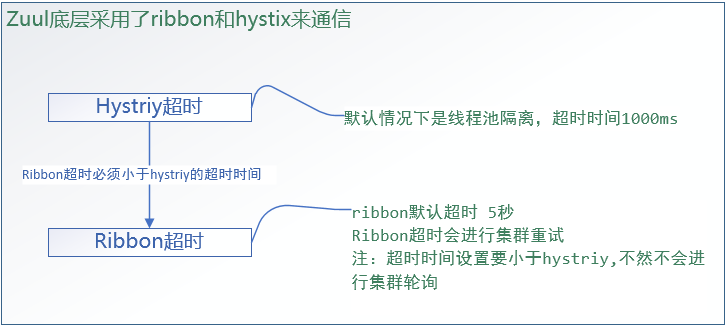
当请求通过 Zuul 网关路由到服务,并等待服务返回响应,这个过程中 Zuul 也有超时控制。Zuul 的底层使用的是 Hystrix + Ribbon 来实现请求路由。
Zuul 中的 Hystrix 内部使用线程池隔离机制提供请求路由实现,其默认的超时时长为 1000 毫秒。Ribbon 底层默认超时时长为 5000 毫秒。如果 Hystrix 超时,直接返回超时异常。如果 Ribbon 超时,同时 Hystrix 未超时,Ribbon 会自动进行服务集群轮询重试,直到 Hystrix 超时为止。如果 Hystrix 超时时长小于 Ribbon 超时时长,Ribbon 不会进行服务集群轮询重试。
配置文件
Zuul 中可配置的超时时长有两个位置:Hystrix 和 Ribbon。具体配置如下:
1
2
3
4
5
6
7
8
9
10
11
12
13
14
15
16
17
18
19
20
21
22
zuul :
# 开启 Zuul 网关重试
retryable : true
# Hystrix 超时时间设置
hystrix :
command :
default :
execution :
isolation :
thread :
timeoutInMilliseconds : 10000 # 线程池隔离,默认超时时间 1000ms
# Ribbon 超时时间设置:建议设置小于 Hystrix
ribbon :
ConnectTimeout: 5000 # 请求连接的超时时间 : 默认超时时间 1000ms
ReadTimeout: 5000 # 请求处理的超时时间 : 默认超时时间 1000ms
# 重试次数
MaxAutoRetries : 1 # MaxAutoRetries 表示访问服务集群下原节点(同路径访问)
MaxAutoRetriesNextServer : 1 # MaxAutoRetriesNextServer表示访问服务集群下其余节点(换台服务器)
# Ribbon 开启重试
OkToRetryOnAllOperations : true
添加依赖
Spring Cloud Netflix Zuul 网关重试机制需要使用 spring-retry 组件。
1
2
3
4
5
<!-- spring retry 依赖 -->
<dependency>
<groupId> org.springframework.retry</groupId>
<artifactId> spring-retry</artifactId>
</dependency>
启动类
启动类需要开启 @EnableRetry 重试注解。
1
2
3
4
5
6
7
8
9
10
11
12
13
14
15
16
17
18
19
20
21
22
23
24
package com.example ;
import org.springframework.boot.SpringApplication ;
import org.springframework.boot.autoconfigure.SpringBootApplication ;
import org.springframework.cloud.netflix.hystrix.dashboard.EnableHystrixDashboard ;
import org.springframework.cloud.netflix.zuul.EnableZuulProxy ;
import org.springframework.retry.annotation.EnableRetry ;
@SpringBootApplication
// 开启 Zuul 注解
@EnableZuulProxy
// 开启 EurekaClient 注解,目前版本如果配置了 Eureka 注册中心,默认会开启该注解
//@EnableEurekaClient
// 开启数据监控注解
@EnableHystrixDashboard
// 开启重试注解
@EnableRetry
public class ZuulServerApplication {
public static void main ( String [] args ) {
SpringApplication . run ( ZuulServerApplication . class , args );
}
}
模拟超时
商品服务模拟超时。
1
2
3
4
5
6
7
8
9
10
11
12
13
14
15
16
17
18
19
20
21
22
23
24
25
26
27
28
29
30
31
32
33
34
35
package com.example.controller ;
import com.example.pojo.Product ;
import com.example.service.ProductService ;
import org.springframework.beans.factory.annotation.Autowired ;
import org.springframework.web.bind.annotation.GetMapping ;
import org.springframework.web.bind.annotation.PathVariable ;
import org.springframework.web.bind.annotation.RequestMapping ;
import org.springframework.web.bind.annotation.RestController ;
@RestController
@RequestMapping ( "/product" )
public class ProductController {
@Autowired
private ProductService productService ;
/**
* 根据主键查询商品
*
* @param id
* @return
*/
@GetMapping ( "/{id}" )
public Product selectProductById ( @PathVariable ( "id" ) Integer id ) {
// 模拟超时
try {
Thread . sleep ( 2000L );
} catch ( InterruptedException e ) {
e . printStackTrace ();
}
return productService . selectProductById ( id );
}
}
访问
配置前访问:http://localhost:9000/product-service/product/1?token=abc123 结果如下(触发了网关服务降级):
配置后访问:http://localhost:9000/product-service/product/1?token=abc123 结果如下:
思考:根据目前的配置如果访问订单服务会怎么样?
Zuul 和 Sentinel 整合
Sentinel 支持对 Spring Cloud Gateway、Netflix Zuul 等主流的 API Gateway 进行限流。
官网文档:
网关限流
创建项目
创建 zuul-server-sentinel 项目。
添加依赖
单独使用添加 sentinel-zuul-adapter 依赖即可。
若想跟 Sentinel Starter 配合使用,需要加上 spring-cloud-alibaba-sentinel-gateway 依赖,同时需要添加 spring-cloud-starter-netflix-zuul 依赖来让 spring-cloud-alibaba-sentinel-gateway 模块里的 Zuul 自动化配置类生效。
同时请将 spring.cloud.sentinel.filter.enabled 配置项置为 false(若在网关流控控制台上看到了 URL 资源,就是此配置项没有置为 false)。
1
2
3
4
5
6
7
8
9
10
11
12
13
14
15
16
17
18
19
20
21
22
23
24
25
26
27
28
29
30
31
32
33
34
35
36
37
38
39
40
41
42
43
44
45
46
47
48
49
<?xml version="1.0" encoding="UTF-8"?>
<project xmlns= "http://maven.apache.org/POM/4.0.0" xmlns:xsi= "http://www.w3.org/2001/XMLSchema-instance"
xsi:schemaLocation= "http://maven.apache.org/POM/4.0.0 http://maven.apache.org/xsd/maven-4.0.0.xsd" >
<modelVersion> 4.0.0</modelVersion>
<groupId> com.example</groupId>
<artifactId> zuul-server-sentinel</artifactId>
<version> 1.0-SNAPSHOT</version>
<!-- 继承父依赖 -->
<parent>
<groupId> com.example</groupId>
<artifactId> zuul-demo</artifactId>
<version> 1.0-SNAPSHOT</version>
</parent>
<!-- 项目依赖 -->
<dependencies>
<!-- spring cloud netflix zuul 依赖 -->
<dependency>
<groupId> org.springframework.cloud</groupId>
<artifactId> spring-cloud-starter-netflix-zuul</artifactId>
</dependency>
<!-- netflix eureka client 依赖 -->
<dependency>
<groupId> org.springframework.cloud</groupId>
<artifactId> spring-cloud-starter-netflix-eureka-client</artifactId>
</dependency>
<!-- 单独使用 -->
<!-- sentinel zuul adapter 依赖 -->
<dependency>
<groupId> com.alibaba.csp</groupId>
<artifactId> sentinel-zuul-adapter</artifactId>
</dependency>
<!-- 和 Sentinel Starter 配合使用 -->
<!--
<dependency>
<groupId>com.alibaba.cloud</groupId>
<artifactId>spring-cloud-starter-alibaba-sentinel</artifactId>
</dependency>
<dependency>
<groupId>com.alibaba.cloud</groupId>
<artifactId>spring-cloud-alibaba-sentinel-gateway</artifactId>
</dependency>
-->
</dependencies>
</project>
配置文件
1
2
3
4
5
6
7
8
9
10
11
12
13
14
15
16
17
18
19
server :
port : 9001 # 端口
spring :
application :
name : zuul-server-sentinel # 应用名称
cloud :
sentinel :
filter :
enabled : false
# 配置 Eureka Server 注册中心
eureka :
instance :
prefer-ip-address : true # 是否使用 ip 地址注册
instance-id : ${spring.cloud.client.ip-address}:${server.port} # ip:port
client :
service-url : # 设置服务注册中心地址
defaultZone : http://localhost:8761/eureka/,http://localhost:8762/eureka/
网关服务配置类
配置网关服务过滤器和网关限流规则。
 1
 2
 3
 4
 5
 6
 7
 8
 9
10
11
12
13
14
15
16
17
18
19
20
21
22
23
24
25
26
27
28
29
30
31
32
33
34
35
36
37
38
39
40
41
42
43
44
45
46
47
48
49
50
51
52
53
54
55
56
57
58
59
60
61
62
63
64
65
66
67
68
package com.example.config ;
import com.alibaba.csp.sentinel.adapter.gateway.common.rule.GatewayFlowRule ;
import com.alibaba.csp.sentinel.adapter.gateway.common.rule.GatewayRuleManager ;
import com.alibaba.csp.sentinel.adapter.gateway.zuul.fallback.ZuulBlockFallbackManager ;
import com.alibaba.csp.sentinel.adapter.gateway.zuul.filters.SentinelZuulErrorFilter ;
import com.alibaba.csp.sentinel.adapter.gateway.zuul.filters.SentinelZuulPostFilter ;
import com.alibaba.csp.sentinel.adapter.gateway.zuul.filters.SentinelZuulPreFilter ;
import com.netflix.zuul.ZuulFilter ;
import org.springframework.context.annotation.Bean ;
import org.springframework.context.annotation.Configuration ;
import javax.annotation.PostConstruct ;
import java.util.HashSet ;
import java.util.Set ;
/**
* 网关服务配置类
*/
@Configuration
public class ZuulConfig {
// 底层继承了 ZuulFilter
@Bean
public ZuulFilter sentinelZuulPreFilter () {
// We can also provider the filter order in the constructor.
return new SentinelZuulPreFilter ();
}
// 底层继承了 ZuulFilter
@Bean
public ZuulFilter sentinelZuulPostFilter () {
return new SentinelZuulPostFilter ();
}
// 底层继承了 ZuulFilter
@Bean
public ZuulFilter sentinelZuulErrorFilter () {
return new SentinelZuulErrorFilter ();
}
/**
* Spring 容器初始化的时候执行该方法
*/
@PostConstruct
public void doInit () {
// 加载网关限流规则
initGatewayRules ();
}
/**
* 网关限流规则
*/
private void initGatewayRules () {
Set < GatewayFlowRule > rules = new HashSet <> ();
/*
resource:资源名称,可以是网关中的 route 名称或者用户自定义的 API 分组名称
count:限流阈值
intervalSec:统计时间窗口,单位是秒,默认是 1 秒
*/
rules . add ( new GatewayFlowRule ( "order-service" )
. setCount ( 3 ) // 限流阈值
. setIntervalSec ( 60 )); // 统计时间窗口,单位是秒,默认是 1 秒
// 加载网关限流规则
GatewayRuleManager . loadRules ( rules );
}
}
启动类
ZuulServerSentinelApplication.java
1
2
3
4
5
6
7
8
9
10
11
12
13
14
15
16
17
18
package com.example ;
import org.springframework.boot.SpringApplication ;
import org.springframework.boot.autoconfigure.SpringBootApplication ;
import org.springframework.cloud.netflix.zuul.EnableZuulProxy ;
@SpringBootApplication
// 开启 Zuul 注解
@EnableZuulProxy
// 开启 EurekaClient 注解,目前版本如果配置了 Eureka 注册中心,默认会开启该注解
//@EnableEurekaClient
public class ZuulServerSentinelApplication {
public static void main ( String [] args ) {
SpringApplication . run ( ZuulServerSentinelApplication . class , args );
}
}
访问
多次访问:http://localhost:9001/order-service/order/1 触发限流后会返回固定的提示:
自定义限流处理
发生限流之后的处理流程 :
发生限流之后可自定义返回参数,通过实现 ZuulBlockFallbackProvider 接口,默认的实现是 DefaultBlockFallbackProvider。
默认的 fallback route 的规则是 route ID 或自定义的 API 分组名称。
编写限流处理类
OrderBlockFallbackProvider.java
1
2
3
4
5
6
7
8
9
10
11
12
13
14
15
16
17
18
19
20
21
22
23
24
25
26
27
28
29
30
31
package com.example.fallback ;
import com.alibaba.csp.sentinel.adapter.gateway.zuul.fallback.BlockResponse ;
import com.alibaba.csp.sentinel.adapter.gateway.zuul.fallback.ZuulBlockFallbackProvider ;
import com.alibaba.csp.sentinel.slots.block.BlockException ;
import org.slf4j.Logger ;
import org.slf4j.LoggerFactory ;
/**
* 对订单服务做服务容错处理
*/
public class OrderBlockFallbackProvider implements ZuulBlockFallbackProvider {
private Logger logger = LoggerFactory . getLogger ( OrderBlockFallbackProvider . class );
@Override
public String getRoute () {
return "order-service" ; // 服务名称
}
@Override
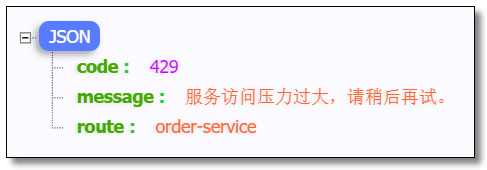
public BlockResponse fallbackResponse ( String route , Throwable cause ) {
logger . error ( "{} 服务触发限流" , route );
if ( cause instanceof BlockException ) {
return new BlockResponse ( 429 , "服务访问压力过大,请稍后再试。" , route );
} else {
return new BlockResponse ( 500 , "系统错误,请联系管理员。" , route );
}
}
}
将限流处理类注册至 Zuul 容器
ZuulConfig.java
1
2
3
4
5
6
7
8
// Spring 容器初始化的时候执行该方法
@PostConstruct
public void doInit () {
// 注册 FallbackProvider
ZuulBlockFallbackManager . registerProvider ( new OrderBlockFallbackProvider ());
// 加载网关限流规则
initGatewayRules ();
}
多次访问:http://localhost:9001/order-service/order/1 触发限流后返回自定义提示:
高可用网关
业内通常用多少 9 来衡量网站的可用性,例如 QQ 的可用性是 4 个 9,就是说 QQ 能够保证在一年里,服务在 99.99% 的时间是可用的,只有 0.01% 的时间不可用,大约最多 53 分钟。
对于大多数网站,2 个 9 是基本可用;3 个 9 是叫高可用;4 个 9 是拥有自动恢复能力的高可用。
实现高可用的主要手段是数据的冗余备份 和服务的失效转移 ,这两种手段具体可以怎么做呢,在网关里如何体现?主要有以下几个方向:
集群部署
负载均衡
健康检查
节点自动重启
熔断
服务降级
接口重试
Nginx + 网关集群实现高可用网关
下载
官网:http://nginx.org/en/download.html 下载稳定版。为了方便学习,请下载 Windows 版本。
安装
解压文件后直接运行根路径下的 nginx.exe 文件即可。
Nginx 默认端口为 80,访问:http://localhost:80/ 看到下图说明安装成功。
配置网关集群
进入 Nginx 的 conf 目录,打开 nginx.conf 文件,配置网关集群:
1
2
3
4
5
6
7
8
9
10
11
12
13
14
15
16
17
18
19
20
21
22
23
24
25
26
27
http {

	...

    # 网关集群
	upstream gateway {
		server 127.0.0.1:9000;
		server 127.0.0.1:9001;
	}

    server {
        listen       80;
        server_name  localhost;

        ...

        # 代理网关集群,负载均衡调用
		location / {
            proxy_pass http://gateway;
        }

        ...
    }

    ...

}
访问
启动两台网关服务器 http://localhost:9000/,http://localhost:9001/ 和相关服务。
访问:http://localhost/product-service/product/1 实现高可用网关。
总结
一个请求过来,首先经过 Nginx 的一层负载,到达网关,然后由网关负载到真实后端,若后端有问题,网关会进行重试访问,多次访问后仍返回失败,可以通过熔断或服务降级立即返回结果。而且,由于是负载均衡,网关重试时不一定会访问到出错的后端。
至此 Zuul 服务网关所有的知识点就讲解结束了。
本文采用 知识共享「署名-非商业性使用-禁止演绎 4.0 国际」许可协议
大家可以通过 分类Spring Cloud
🤗 您的点赞和转发是对我最大的鼓励和支持。
📢 扫码关注 哈喽沃德先生「文档 + 视频」每篇文章都配有专门视频讲解,学习更轻松噢 ~