


全网最全 Hugo 静态网站部署及免费 HTTPS 证书配置
很久前就写了关于 Hugo 系列的文章,以为没人关注。直到最近越来越多小伙伴私信我希望出一篇部署教程,原来还是帮助到了大家,只是大家都沉默寡言,来了都不冒个泡悄悄学习完就溜啦😫。
为了满足大家的愿望,顺便把 Hugo 系列结个尾,部署教程来了。
我会写两篇关于部署的教程:
- 一篇直接将静态网站托管至对象存储,对象存储配置自定义域名。(本文为该篇)
- 一篇通过服务器反向代理至对象存储,域名解析服务器。
默认大家已经购买了对象存储,拥有一个已备案的域名。还不知道如何操作的请先阅读《手把手教大家选购服务器和域名(域名备案)及对象存储》
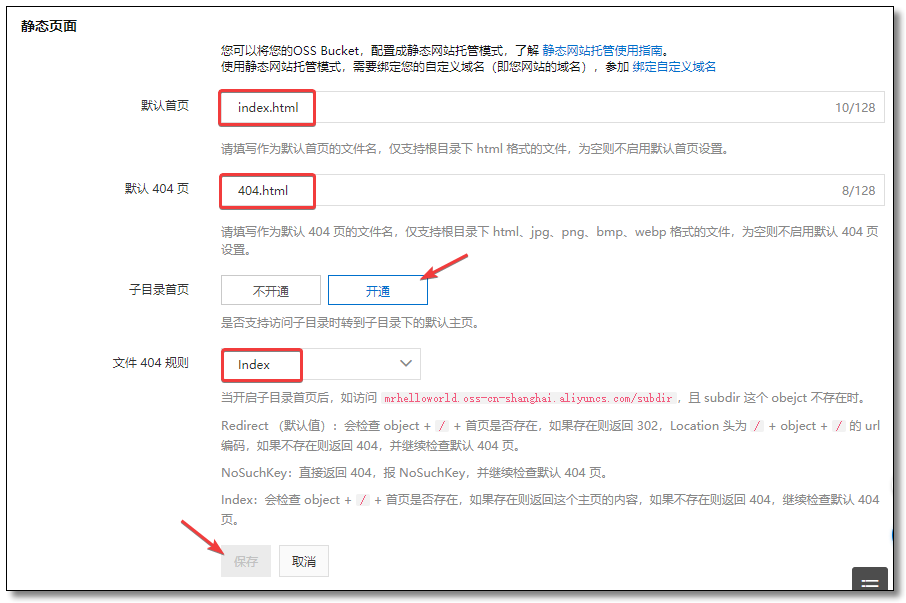
静态页面
首先我们先配置对象存储的自定义域名,本文使用 阿里云 OSS 举例。具体步骤如下:
- 登录
阿里云进入控制台 - 选择
对象存储 OSS - 通过
Bucket 列表选择一个空间 - 选择
静态页面进行设置

阿里已经写的很详细了,仔细阅读灰色小字部分,有问题留言。
这里的 index.html 对应 Hugo 生成的静态页面 index.html,404.html 对应 Hugo 生成的静态页面 404.html,Hugo 生成静态页面的规则是:名称生成子目录,具体的内容通过子目录内的 index.html 渲染,所以开通子目录首页功能。
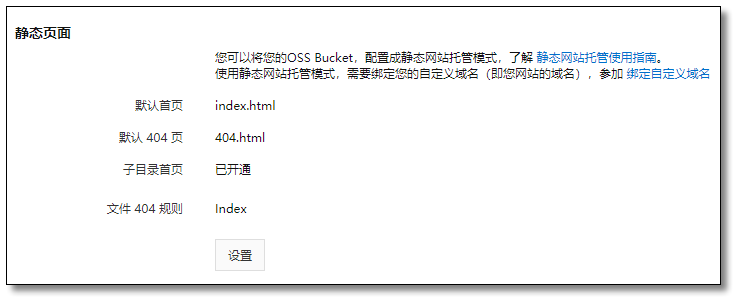
配置成功以后显示结果如下。
配置域名
前提条件
-
使用静态网站托管模式,需要绑定您的自定义域名(即您网站的域名)。 -
已完成域名备案。
-
已创建存储空间。
还不知道如何操作的请先阅读《手把手教大家选购服务器和域名(域名备案)及对象存储》
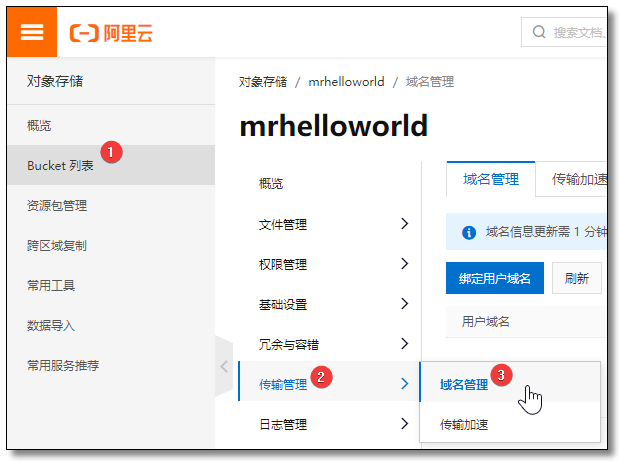
配置域名
官方链接:https://help.aliyun.com/knowledge_detail/31902.html
- 登录
阿里云进入控制台 - 选择
对象存储 OSS - 通过
Bucket 列表选择一个空间 - 选择
域名管理进行设置
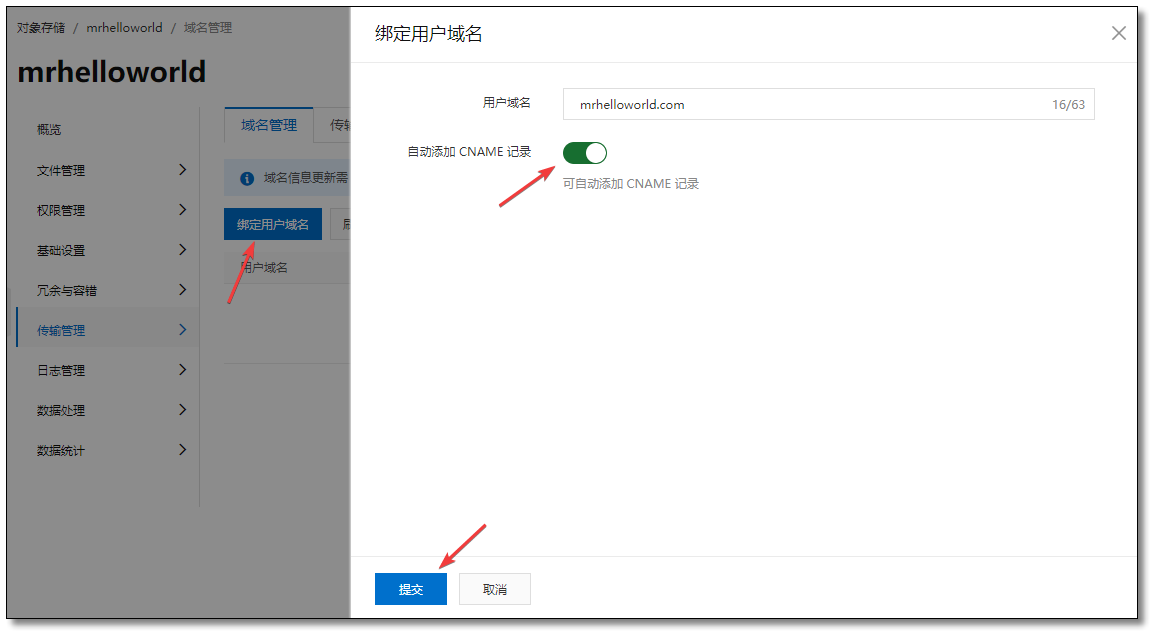
选择 绑定用户域名 输入域名后选择 自动添加 CNAME 记录,阿里会自动配置 CNAME。
申请证书添加 HTTPS
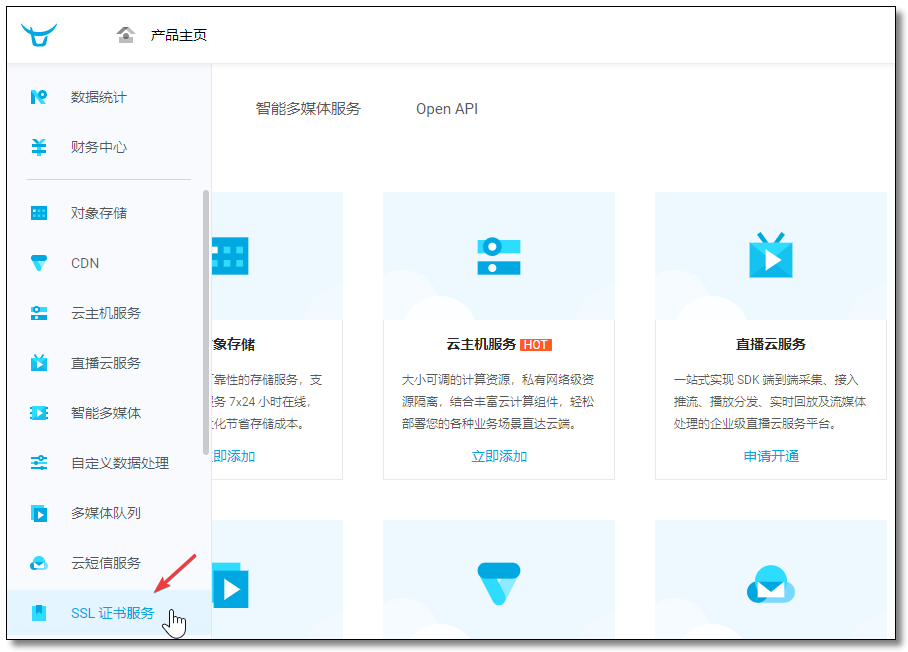
现在都全网 HTTPS,咱也不能落下,上 七牛云 免费申请一个一年的先用着。其实 阿里云 也有,我另一个域名就是阿里云的免费证书。
登录七牛云后台,侧边栏菜单选择 SSL证书服务。
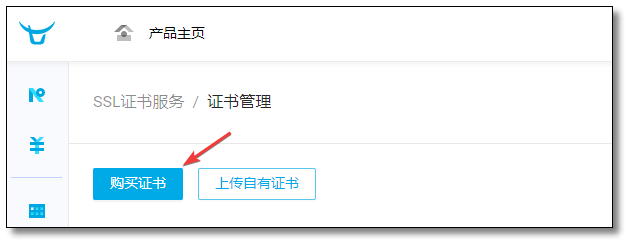
购买证书
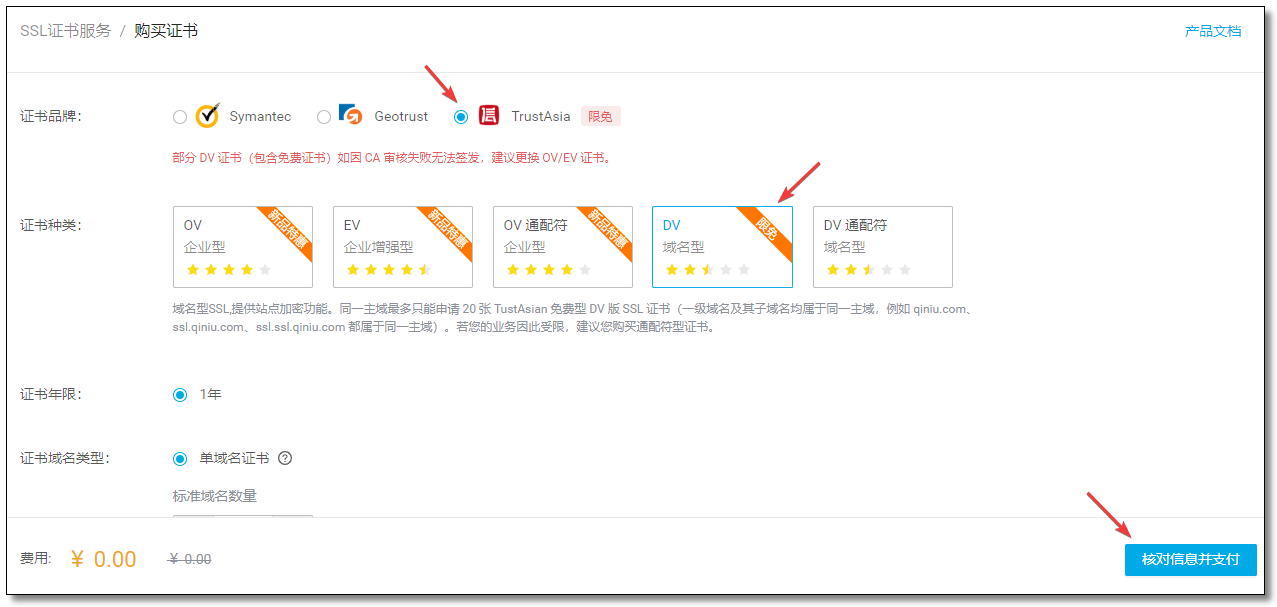
选择 TrustAsia 下的免费证书 DV域名型。
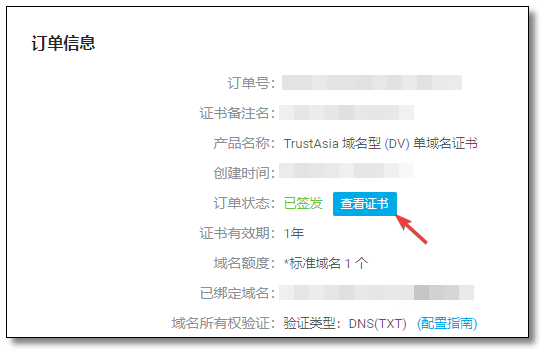
购买成功后点击 详情。
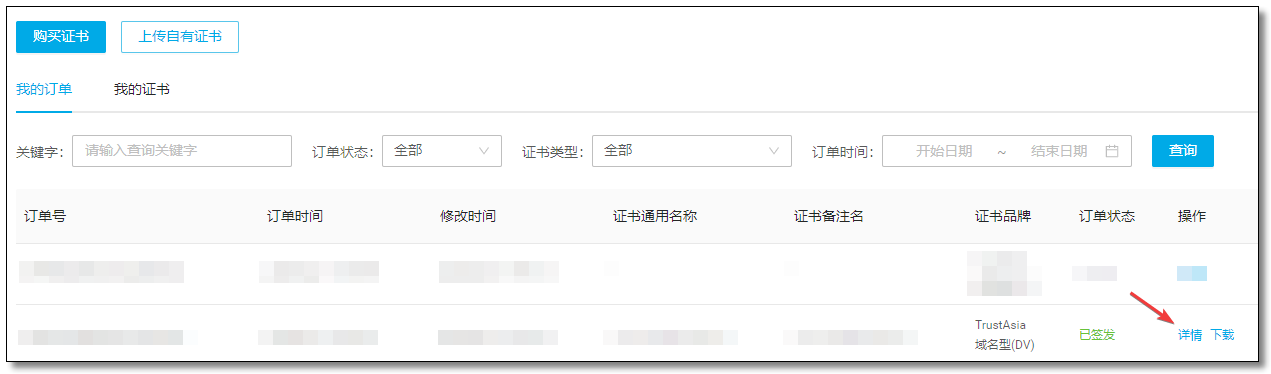
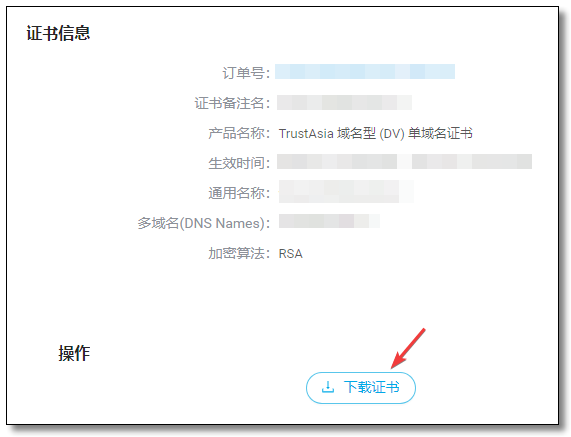
查看证书。
下载证书。
设置一个证书密码(下载后是个压缩包,这里指的就是压缩包的解压密码)。
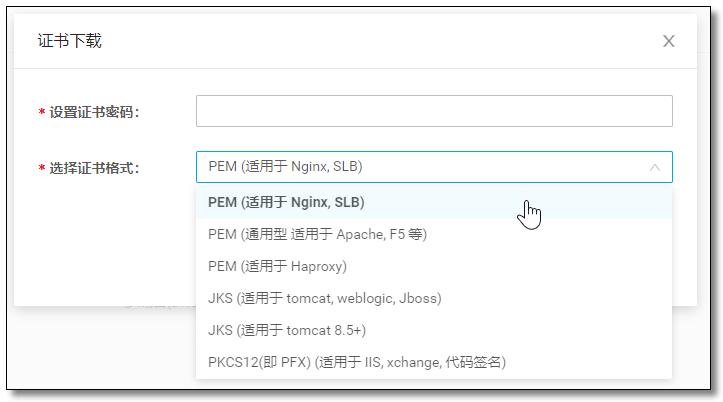
解压后得到以下两个文件。

配置证书
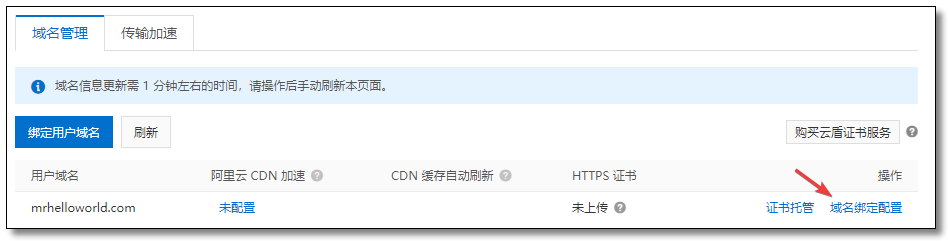
返回 阿里云 OSS → Bucket 列表 → 传输管理 → 域名管理,点击 证书管理。

将刚才那两文件使用记事本打开,把 *.crt 结尾文件的内容复制到 公钥,*.key 结尾文件的内容复制到 私钥。

域名信息更新只需 1 分钟左右的时间,快去给空间存储点东西,随便传张照片试试通过
域名/照片名称比如:mrhelloworld.com/test.jpg能否访问,能访问即表示配置成功。
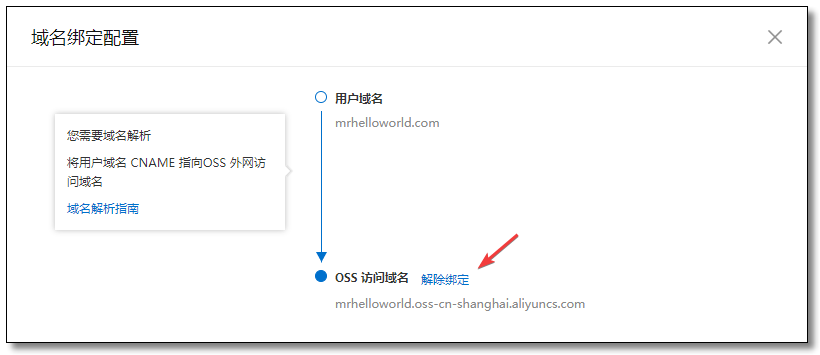
取消配置
如果想更换域名或者取消域名配置,按以下步骤操作。
文件上传工具
通过 hugo 命令可以将我们的博客生成为静态网站。
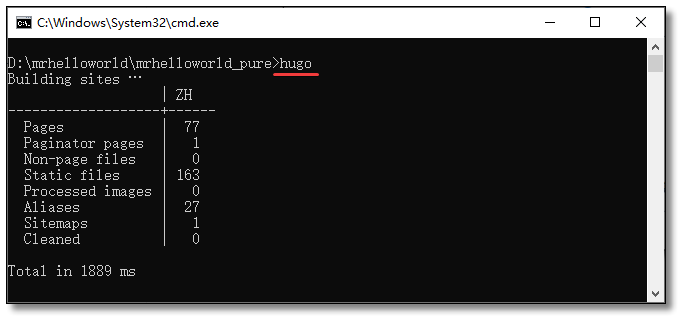
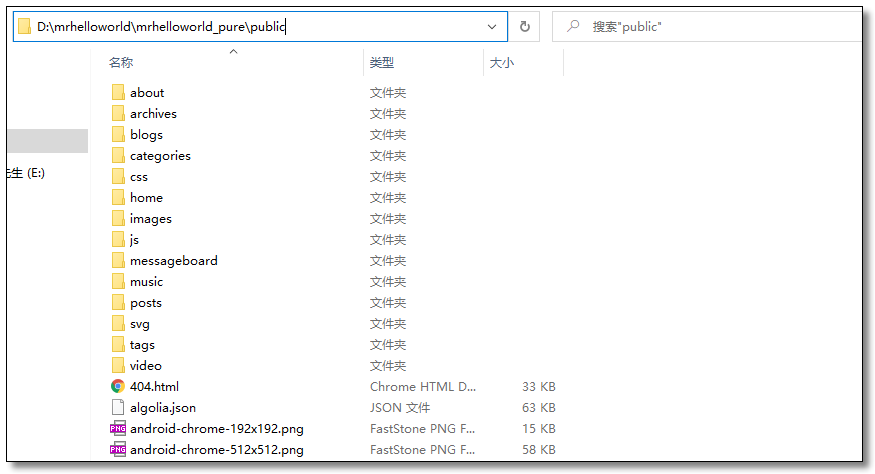
生成的静态页面都在 public 目录下。
我们总不能手动一个一个通过阿里云网站传上去吧,当然不是,可以借助以下几款工具。
阿里提供了 多款工具 和 SDK,我一般使用以下两种,下面就详细介绍下这两种。
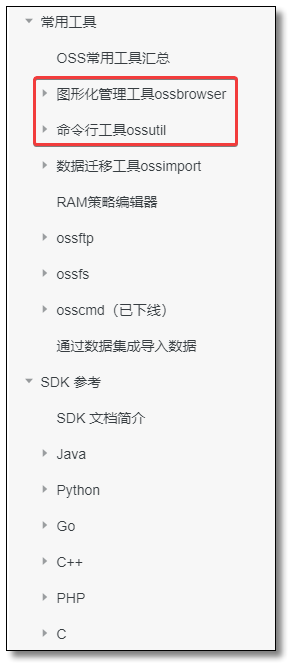
图形化管理工具 ossbrowser
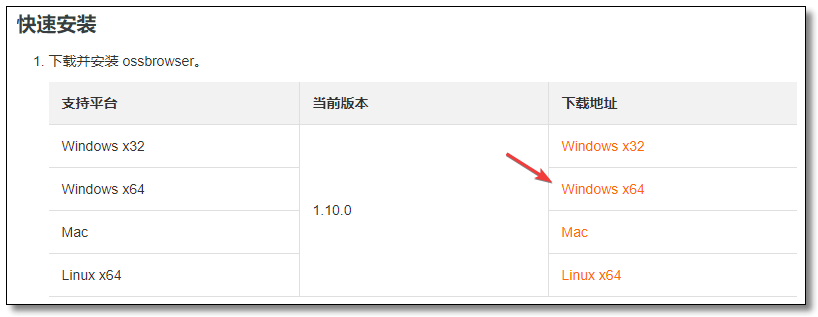
下载
官方链接:https://help.aliyun.com/document_detail/61872.html?spm=a2c4g.11186623.6.693.36381c7a0DIqDX
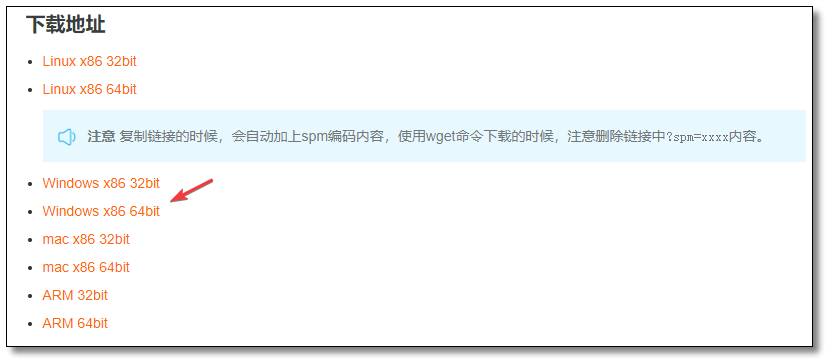
我的 Hugo 安装在 Windows 系统上,选择 Windows x64。
创建 AK
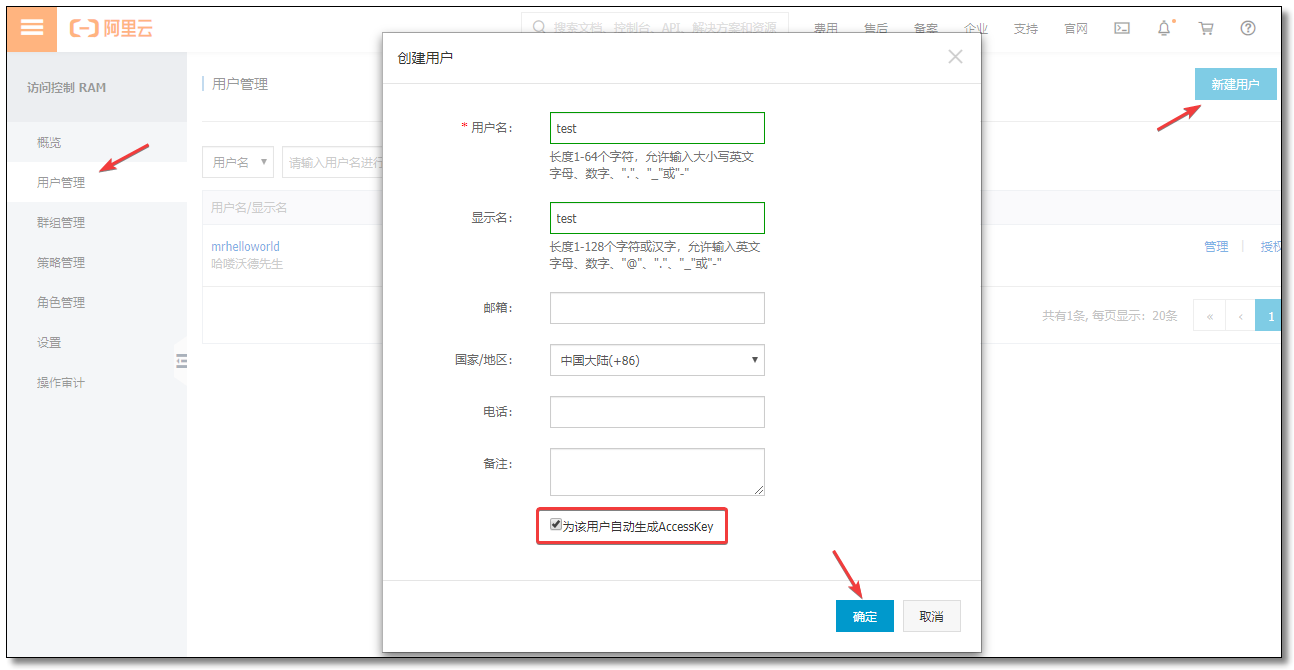
通过 阿里云RAM后台 创建用户,链接:https://ram.console.aliyun.com/?spm=a2c4g.11186623.2.13.53bd5f81r2t2Qq
- 云账号登录
RAM控制台。 - 选择左侧导航栏
用户管理菜单。 新建用户然后生成AK再授权。
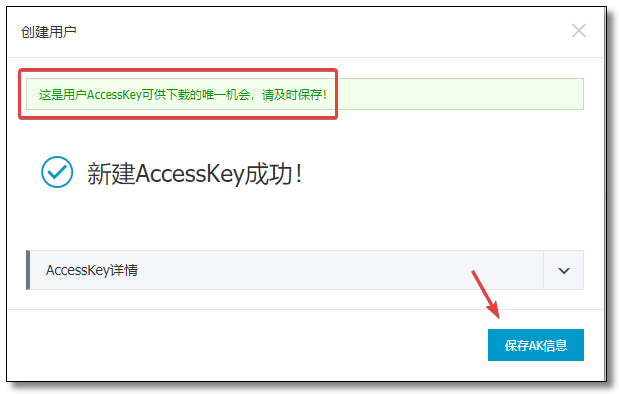
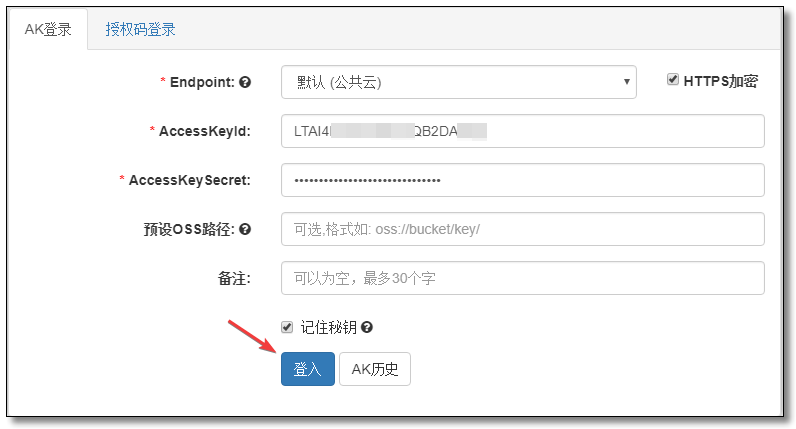
创建成功以后会弹出一个窗口要求你保存 AK 切记这是 用户AccessKey可供下载的唯一机会,请及时保存!
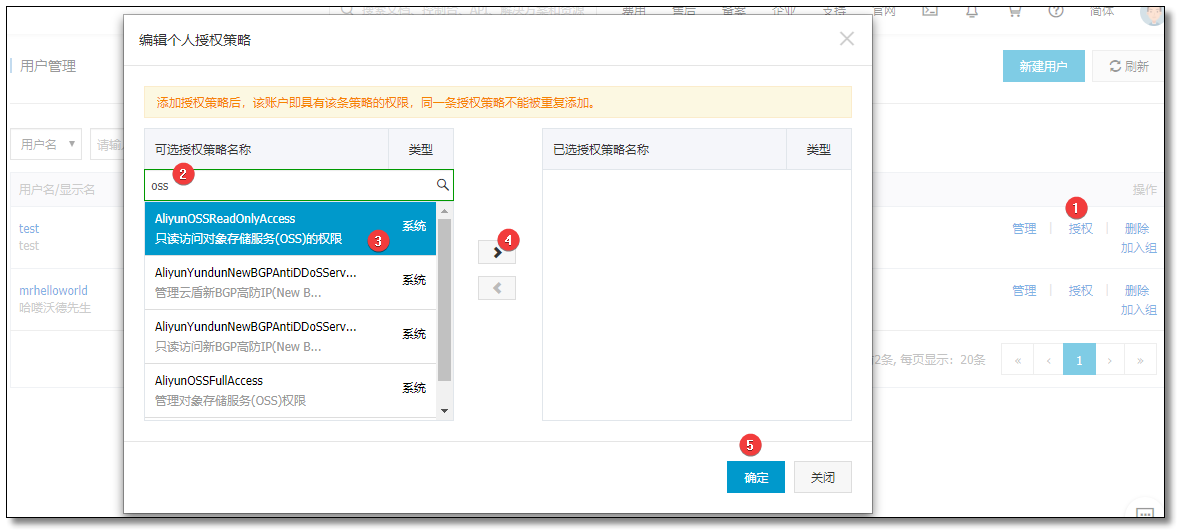
授权对象存储
给新创建的用户 授权 阿里云 OSS 所有权限,不授权 AK 无法操作 OSS。
安装并登录
安装 ossbrowser 以后打开,按要求填写信息并登入。
Endpoint:默认即可AccessKeyId/AccessKeySecret:填写账号的 AccessKey 信息(就是刚才你保存的那玩意)。
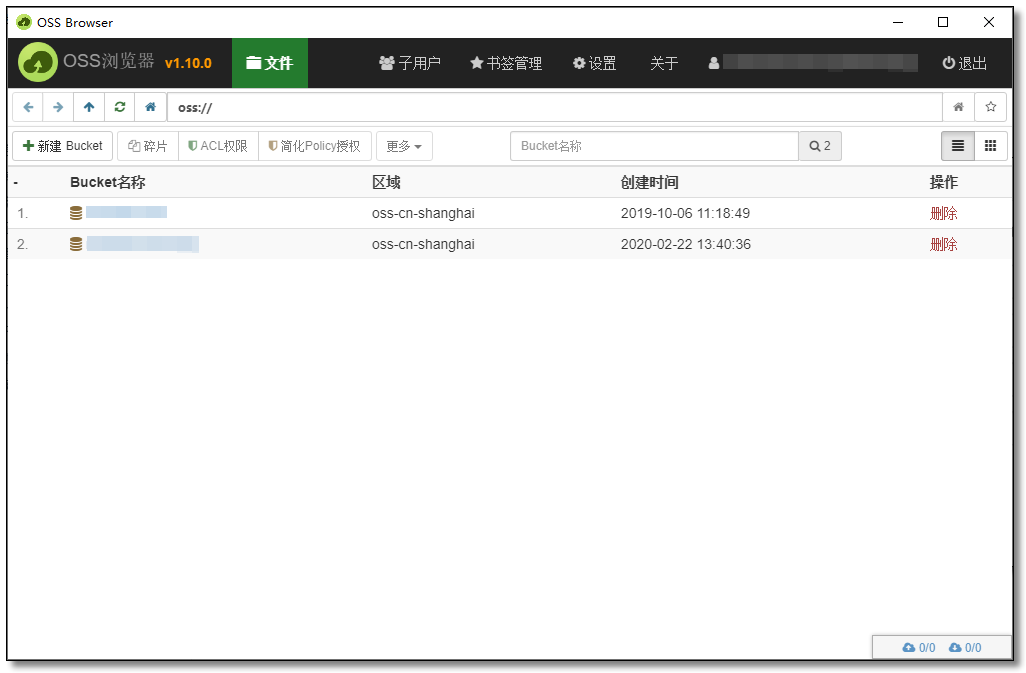
登录以后长这样。然后选择你自己的空间,直接将文件夹或文件拖拽至 OSS 即可。操作非常简单自己玩两下就明白了。
部署
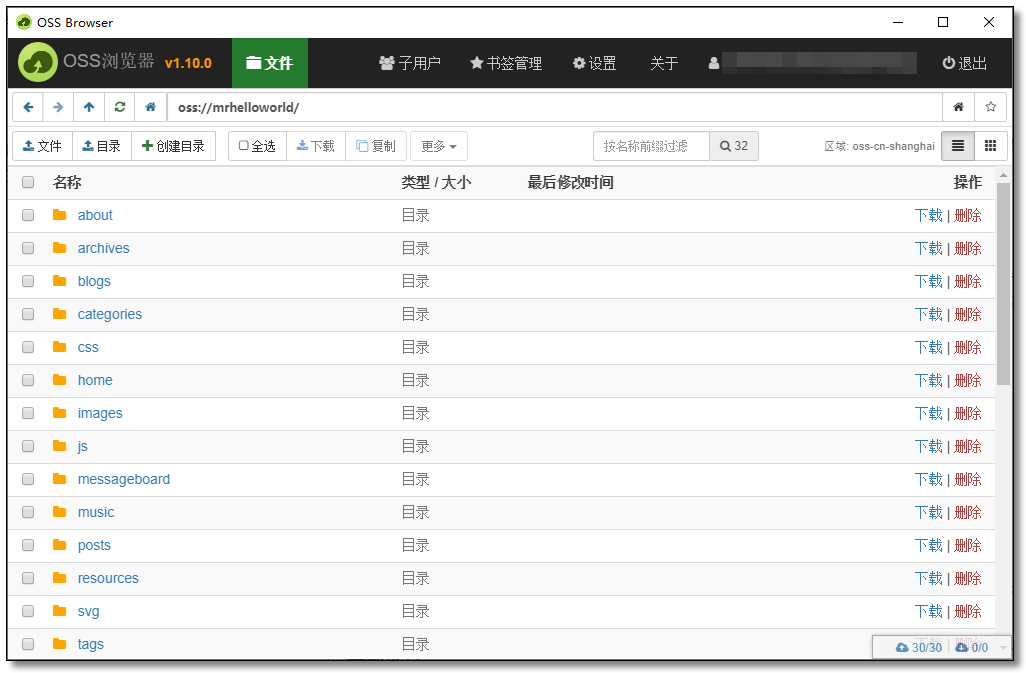
使用 hugo 命令将已开发好的博客生成静态文件至 public 目录,然后将整个 public 目录拖拽至配置了域名的空间根路径下即可。至此,静态网站部署至 阿里云 OSS 完成。以后每次修改了网站,只需重复此操作即可,相同文件名会选择覆盖。
打开浏览器,访问自己的域名,不出意外你已经看到自己的网站了,恭喜你又成长了。
如果不喜欢图形化操作,我们可以使用逼格更高,更接近程序员行为的命令行方式。
命令行工具 ossutil
下载
官方链接:https://help.aliyun.com/document_detail/120075.html?spm=a2c4g.11186623.6.698.3d561c7ajiBukC
我的 Hugo 安装在 Windows 系统上,选择 Windows x64。
配置 AK
将工具解压到指定的文件夹,并双击运行 ossutil.bat 文件,假设解压至 D 盘根路径。
CMD 窗口运行以下命令:
|
|
使用交互式配置生成配置文件:
|
|
我教大家一种最简单的方式,运行 ossutil64.exe config 命令以后:
-
先
按一次回车使用默认配置文件名,以后每次使用命令无需指定--config-file。 -
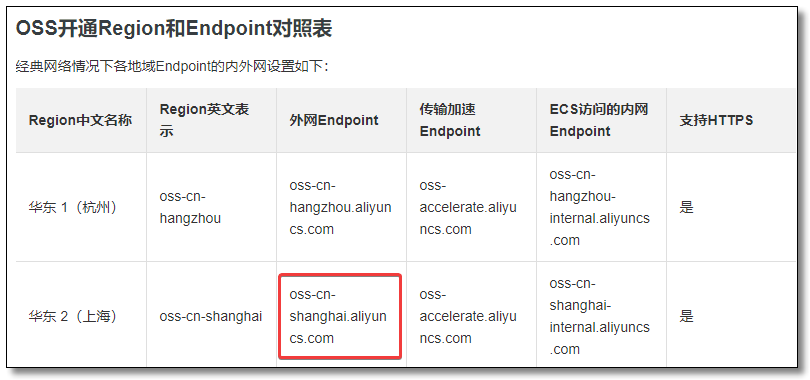
endpoint:通过该链接:https://help.aliyun.com/document_detail/31837.html?spm=a2c4g.11186623.2.19.781b448aNLDcRr#concept-zt4-cvy-5db 找到你空间所在地域的域名信息,比如我的是上海,那么就是红色框中的内容。
-
AccessKeyId**/**AccessKeySecret:填写账号的 AccessKey 信息。
编写脚本
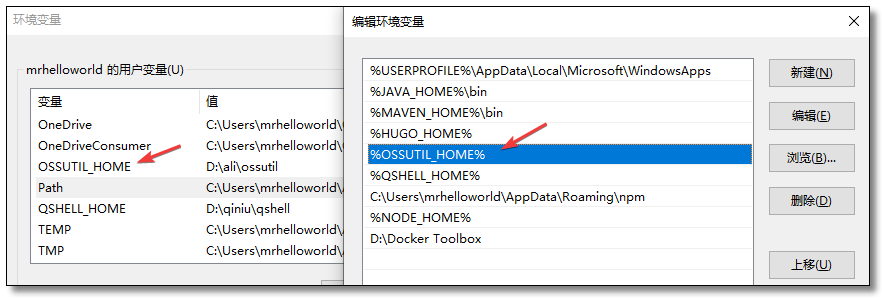
为了方便使用,先把 ossutil 配置为环境变量。此电脑 → 右键属性 → 高级系统设置 → 环境变量。
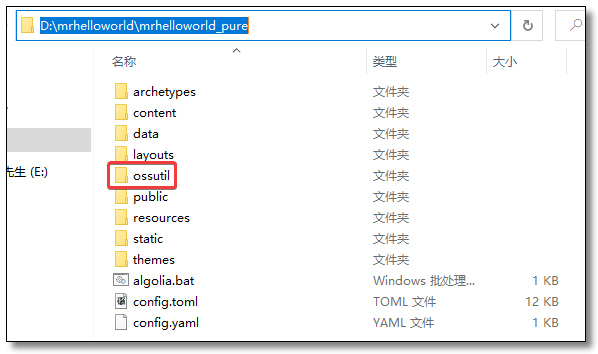
与 public 目录同级创建 ossutil 目录,然后创建 ossutil.bat 脚本。
官方命令:https://help.aliyun.com/document_detail/50455.html?spm=a2c4g.11186623.6.734.1f3e34afZTG4NQ
通过参考官方命令,编写一个脚本防止每次敲一堆代码 ossutil.bat 文件内容如下:
|
|
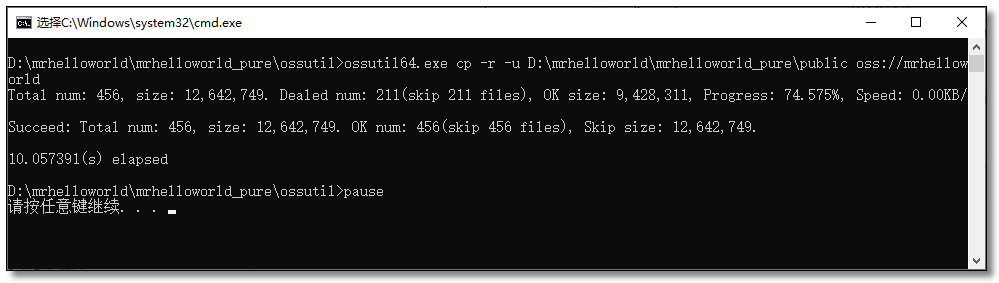
cp:用于上传、下载、拷贝文件。-r: 递归进行操作。-u:更新操作。D:\mrhelloworld\mrhelloworld_pure\public:需要上传的资源地址oss://mrhelloworld:上传到哪个空间
部署
使用 hugo 命令将已开发好的博客生成静态文件至 public 目录,然后进入 ossutil 目录执行 ossutil.bat 脚本,至此,静态网站部署至 阿里云 OSS 完成。以后每次修改了网站,只需重复此操作即可,修改过的文件会选择覆盖。
打开浏览器,访问自己的域名,不出意外你已经看到自己的网站了,恭喜你又成长了。
直接将静态网站托管至对象存储,对象存储配置自定义域名的教程到这里就结束了,下一篇教大家通过服务器反向代理至对象存储,域名解析服务器的方式。

本文采用 知识共享「署名-非商业性使用-禁止演绎 4.0 国际」许可协议。
大家可以通过 分类 查看更多关于 Spring Cloud 的文章。
🤗 您的点赞和转发是对我最大的鼓励和支持。
📢 扫码关注 哈喽沃德先生「文档 + 视频」每篇文章都配有专门视频讲解,学习更轻松噢 ~

「 感谢支持 」


- 文章链接:https://mrhelloworld.com/hugo-oss-install/
- 版权声明:本站所有文章除特别声明外,均采用 CC BY-NC-ND 4.0 转载请注明来自 哈喽沃德先生