Nacos 注册中心
前言
从本章节开始,我们学习 Spring Cloud Alibaba 相关微服务组件。
Spring Cloud Alibaba 介绍
Spring Cloud Alibaba 致力于提供微服务开发的一站式解决方案。此项目包含开发分布式应用微服务的必需组件,方便开发者通过 Spring Cloud 编程模型轻松使用这些组件来开发分布式应用服务。
依托 Spring Cloud Alibaba,只需要添加一些注解和少量配置,就可以将 Spring Cloud 应用接入阿里微服务解决方案,通过阿里中间件来迅速搭建分布式应用系统。
Spring Cloud Alibaba 功能
服务限流降级 Sentinel :支持 WebServlet,WebFlux,OpenFeign,RestTemplate,Dubbo,Gateway,Zuul 限流降级功能的接入。可以在运行时通过控制台实时修改限流降级规则,并且还支持限流降级度量指标监控。服务注册与发现 Nacos :适配 Spring Cloud 服务注册与发现标准,默认集成了 Ribbon 的支持。分布式配置管理 Nacos :支持分布式系统中的外部化配置,配置更改时自动刷新。RPC 服务 Dubbo :扩展 Spring Cloud 客户端 RestTemplate 和 OpenFeign 以支持调用 Dubbo RPC 服务。消息驱动 RocketMQ :基于 Spring Cloud Stream 为微服务应用构建消息驱动能力。分布式事务 Seata :支持高性能且易于使用的分布式事务解决方案。阿里云对象存储 OSS :大规模,安全,低成本,高度可靠的云存储服务。支持随时随地在任何应用程序中存储和访问任何类型的数据。分布式任务调度 SchedulerX :提供秒级、精准、高可靠、高可用的定时(基于 Cron 表达式)任务调度服务。同时提供分布式的任务执行模型,如网格任务。网格任务支持海量子任务均匀分配到所有 Worker(schedulerx-client)上执行。阿里云短信服务 SMS :覆盖全球的短信服务,友好、高效、智能的通讯能力,帮助企业迅速搭建客户触达通道。
Spring Cloud Alibaba 组件
Nacos:阿里巴巴开源产品,一个更易于构建云原生应用的动态服务发现、配置管理和服务管理平台。Sentinel:面向分布式服务架构的轻量级流量控制产品,把流量作为切入点,从流量控制、熔断降级、系统负载保护等多个维度保护服务的稳定性。RocketMQ:一款开源的分布式消息系统,基于高可用分布式集群技术,提供低延时的、高可靠的消息发布与订阅服务。Dubbo:Apache Dubbo™ 是一款高性能 Java RPC 框架。Seata:阿里巴巴开源产品,一个易于使用的高性能微服务分布式事务解决方案。Alibaba Cloud ACM:一款在分布式架构环境中对应用配置进行集中管理和推送的应用配置中心产品。Alibaba Cloud OSS:阿里云对象存储服务(Object Storage Service,简称 OSS),是阿里云提供的海量、安全、低成本、高可靠的云存储服务。您可以在任何应用、任何时间、任何地点存储和访问任意类型的数据。Alibaba Cloud SchedulerX:阿里中间件团队开发的一款分布式任务调度产品,提供秒级、精准、高可靠、高可用的定时(基于 Cron 表达式)任务调度服务。Alibaba Cloud SMS:覆盖全球的短信服务,友好、高效、智能的互联化通讯能力,帮助企业迅速搭建客户触达通道。
什么是注册中心
服务注册中心是服务实现服务化管理的核心组件,类似于目录服务的作用,主要用来存储服务信息,譬如提供者 url 串、路由信息等。服务注册中心是微服务架构中最基础的设施之一。
注册中心可以说是微服务架构中的“通讯录”,它记录了服务和服务地址的映射关系。在分布式架构中,服务会注册到这里,当服务需要调用其它服务时,就到这里找到服务的地址,进行调用。
简单理解就是:在没有注册中心时候,服务间调用需要知道被当服务调方的具体地址(写死的 ip:port)。更换部署地址,就不得不修改调用当中指定的地址。而有了注册中心之后,每个服务在调用别人的时候只需要知道服务名称(软编码)就好,地址都会通过注册中心根据服务名称获取到具体的服务地址进行调用。
举个现实生活中的例子,比如说,我们手机中的通讯录的两个使用场景:
当我想给张三打电话时,那我需要在通讯录中按照名字找到张三,然后就可以找到他的手机号拨打电话。—— 服务发现
李四办了手机号并把手机号告诉了我,我把李四的号码存进通讯录,后续,我就可以从通讯录找到他。—— 服务注册
通讯录 —— ?什么角色(服务注册中心)
总结:服务注册中心的作用就是服务的注册 和服务的发现 。
常见的注册中心
Netflix Eureka
Alibaba Nacos
HashiCorp Consul
Apache ZooKeeper
CoreOS Etcd
CNCF CoreDNS
特性
Eureka
Nacos
Consul
Zookeeper
CAP
AP
CP + AP
CP
CP
健康检查
Client Beat
TCP/HTTP/MYSQL/Client Beat
TCP/HTTP/gRPC/Cmd
Keep Alive
雪崩保护
有
有
无
无
自动注销实例
支持
支持
不支持
支持
访问协议
HTTP
HTTP/DNS
HTTP/DNS
TCP
监听支持
支持
支持
支持
支持
多数据中心
支持
支持
支持
不支持
跨注册中心同步
不支持
支持
支持
不支持
SpringCloud集成
支持
支持
支持
支持
CAP 原则与 BASE 理论
CAP 原则
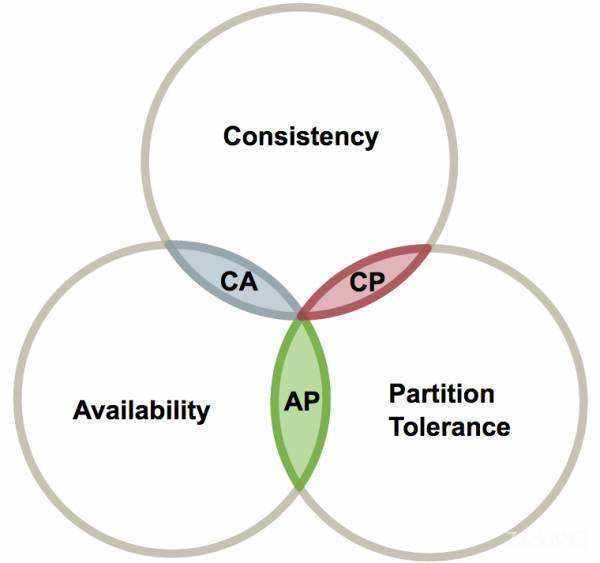
CAP 原则又称 CAP 定理,指的是在一个分布式系统中, Consistency(一致性)、 Availability(可用性)、Partition tolerance(分区容错性),三者不可得兼。
CAP 由 Eric Brewer 在 2000 年 PODC 会议上提出。该猜想在提出两年后被证明成立,成为我们熟知的 CAP 定理。CAP 三者不可兼得。
特性
定理
Consistency
一致性 ,也叫做数据原子性,系统在执行某项操作后仍然处于一致的状态。在分布式系统中,更新操作执行成功后所有的用户都应该读到最新的值,这样的系统被认为是具有强一致性的。等同于所有节点访问同一份最新的数据副本。
Availability
可用性 ,每一个操作总是能够在一定的时间内返回结果,这里需要注意的是"一定时间内"和"返回结果"。一定时间内指的是在可以容忍的范围内返回结果,结果可以是成功或者是失败,且不保证获取的数据为最新数据。
Partition tolerance
分区容错性 ,分布式系统在遇到任何网络分区故障的时候,仍然能够对外提供满足一致性和可用性的服务,除非整个网络环境都发生了故障。这里可以理解为是否可以对数据进行分区,这是考虑到性能和可伸缩性。
取舍策略
CAP 三个特性只能满足其中两个,那么取舍的策略就共有三种:
CA without P :如果不要求 P(不允许分区),则 C(强一致性)和 A(可用性)是可以保证的。但放弃 P 的同时也就意味着放弃了系统的扩展性,也就是分布式节点受限,没办法部署子节点,这是违背分布式系统设计的初衷的。CP without A :如果不要求 A(可用),相当于每个请求都需要在服务器之间保持强一致,而 P(分区)会导致同步时间无限延长(也就是等待数据同步完才能正常访问服务),一旦发生网络故障或者消息丢失等情况,就要牺牲用户的体验,等待所有数据全部一致了之后再让用户访问系统。设计成 CP 的系统其实不少,最典型的就是分布式数据库。对于分布式数据库来说,数据的一致性是最基本的要求,因为如果连这个标准都达不到,那么直接采用关系型数据库就好,没必要再浪费资源来部署分布式数据库。AP without C :要高可用并允许分区,则需放弃一致性。一旦产生分区,节点之间可能会失去联系,为了高可用,每个节点只能用本地数据提供服务,而这样会导致全局数据的不一致性。典型的应用就如某米的抢购手机场景,可能前几秒你浏览商品的时候页面提示是有库存的,当你选择完商品准备下单的时候,系统提示你下单失败,商品已售完。这其实就是先在 A(可用性)方面保证系统可以正常的服务,然后在数据的一致性方面做了些牺牲,虽然多少会影响一些用户体验,但也不至于造成用户购物流程的严重阻塞。
总结
现如今,对于多数大型互联网应用的场景,主机众多、部署分散,而且现在的集群规模越来越大,节点只会越来越多,所以节点故障、网络故障是常态,因此分区容错性 也就成为了一个分布式系统必然要面对的问题。那么就只能在 C 和 A 之间进行取舍。但对于传统的项目就可能有所不同,拿银行的转账系统来说,涉及到金钱的对于数据一致性不能做出一丝的让步,C 必须保证,出现网络故障的话,宁可停止服务。而互联网非金融项目普遍都是基于 AP 模式。
总而言之,没有最好的策略,好的系统应该是根据业务场景来进行架构设计的,只有适合的才是最好的。
BASE 理论
CAP 理论已经提出好多年了,难道真的没有办法解决这个问题吗?也许可以做些改变。比如 C 不必使用那么强的一致性,可以先将数据存起来,稍后再更新,实现所谓的 “最终一致性”。
这个思路又是一个庞大的问题,同时也引出了第二个理论 BASE 理论。
BASE:全称 Basically Available(基本可用),Soft state(软状态),和 Eventually consistent(最终一致性)三个短语的缩写,来自 ebay 的架构师提出。
BASE 理论是对 CAP 中一致性和可用性权衡的结果,其来源于对大型互联网分布式实践的总结,是基于 CAP 定理逐步演化而来的。其核心思想是:
既然无法做到强一致性(Strong consistency),但每个应用都可以根据自身的业务特点,采用适当的方式来使系统达到最终一致性(Eventual consistency)。
Basically Available(基本可用)
基本可用是指分布式系统在出现故障的时候,允许损失部分可用性(例如响应时间、功能上的可用性)。需要注意的是,基本可用绝不等价于系统不可用。
响应时间上的损失:正常情况下搜索引擎需要在 0.5 秒之内返回给用户相应的查询结果,但由于出现故障(比如系统部分机房发生断电或断网故障),查询结果的响应时间增加到了 1~2 秒。
功能上的损失:购物网站在购物高峰(如双十一)时,为了保护系统的稳定性,部分消费者可能会被引导到一个降级页面。
Soft state(软状态)
什么是软状态呢?相对于原子性而言,要求多个节点的数据副本都是一致的,这是一种 “硬状态”。
软状态是指允许系统存在中间状态,而该中间状态不会影响系统整体可用性。分布式存储中一般一份数据会有多个副本,允许不同副本数据同步的延时就是软状态的体现。
Eventually consistent(最终一致性)
系统不可能一直是软状态,必须有个时间期限。在期限过后,应当保证所有副本保持数据一致性。从而达到数据的最终一致性。这个时间期限取决于网络延时,系统负载,数据复制方案设计等等因素。
实际上,不只是分布式系统使用最终一致性,关系型数据库在某个功能上,也是使用最终一致性的,比如备份,数据库的复制都是需要时间的,这个复制过程中,业务读取到的值就是旧值。当然,最终还是达成了数据一致性。这也算是一个最终一致性的经典案例。
总结
总的来说,BASE 理论面向的是大型高可用可扩展的分布式系统,和传统事务的 ACID 是相反的,它完全不同于 ACID 的强一致性模型,而是通过牺牲强一致性来获得可用性,并允许数据在一段时间是不一致的。
为什么需要注册中心
了解了什么是注册中心,那么我们继续谈谈,为什么需要注册中心。在分布式系统中,我们不仅仅是需要在注册中心找到服务和服务地址的映射关系这么简单,我们还需要考虑更多更复杂的问题:
服务注册后,如何被及时发现
服务宕机后,如何及时下线
服务如何有效的水平扩展
服务发现时,如何进行路由
服务异常时,如何进行降级
注册中心如何实现自身的高可用
这些问题的解决都依赖于注册中心。简单看,注册中心的功能有点类似于 DNS 服务器或者负载均衡器,而实际上,注册中心作为微服务的基础组件,可能要更加复杂,也需要更多的灵活性和时效性。所以我们还需要学习更多 Spring Cloud 微服务组件协同完成应用开发。
注册中心解决了以下问题:
Nacos 介绍
Nacos 是 Alibaba 公司推出的开源工具,用于实现分布式系统的服务发现与配置管理。英文全称 Dynamic Naming and Configuration Service,Na 为 Naming/NameServer 即注册中心,co 为 Configuration 即配置中心,Service 是指该注册/配置中心都是以服务为核心。服务(Service)是 Nacos 世界的一等公民。
官网是这样说的:一个更易于构建云原生应用的动态服务发现、配置管理和服务管理平台。
Nacos 致力于发现、配置和管理微服务。Nacos 提供了一组简单易用的特性集,可以快速实现动态服务发现、服务配置、服务元数据及流量管理。
Nacos 可以更敏捷和容易地构建、交付和管理微服务平台。 Nacos 是构建以“服务”为中心的现代应用架构的服务基础设施。
使用 Nacos 简化服务发现、配置管理、服务治理及管理的解决方案,让微服务的发现、管理、共享、组合更加容易。
Nacos 官网:https://nacos.io/zh-cn/
Github:https://github.com/alibaba/nacos
Nacos 安装
环境准备
Nacos 依赖 Java 环境来运行。如果您是从代码开始构建并运行 Nacos,还需要为此配置 Maven 环境,请确保是在以下版本环境中安装使用:
下载源码或者安装包
可以通过源码和发行包两种方式来获取 Nacos。
源码方式
从 Github 上下载源码方式。
1
2
3
4
5
6
7
git clone https://github.com/alibaba/nacos.git
cd nacos/
mvn -Prelease-nacos -Dmaven.test.skip= true clean install -U
ls -al distribution/target/
// change the $version to your actual path
cd distribution/target/nacos-server-$version /nacos/bin
发行包方式
您可以从 https://github.com/alibaba/nacos/releases 下载最新稳定版本的 nacos-server 包。
启动服务器
Linux/Unix/Mac
在 Nacos 的解压目录 nacos/bin 目录下启动。
启动命令(standalone 代表着单机模式运行,非集群模式):
1
sh startup.sh -m standalone
如果您使用的是 ubuntu 系统,或者运行脚本报错提示符号找不到,可尝试如下运行:
1
bash startup.sh -m standalone
Windows
启动命令:
或者双击 startup.cmd 运行文件。
访问
访问:http://localhost:8848/nacos/ ,默认用户名/密码是 nacos/nacos。
关闭服务器
Linux/Unix/Mac
Windows
或者双击 shutdown.cmd 运行文件。
Nacos 入门案例
nacos-demo 聚合工程。SpringBoot 2.3.0.RELEASE、Spring Cloud Hoxton.SR5。
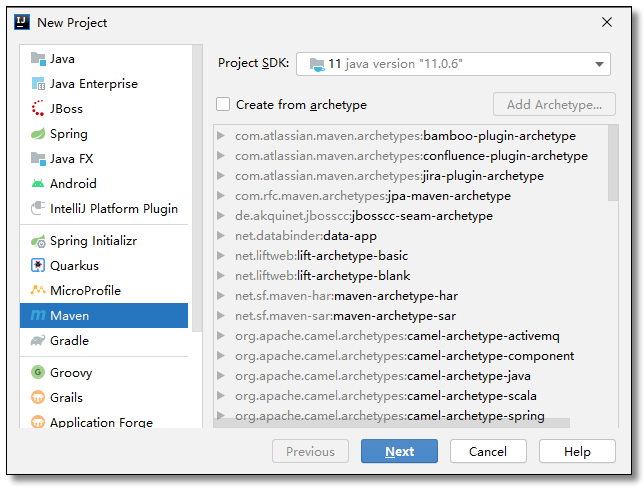
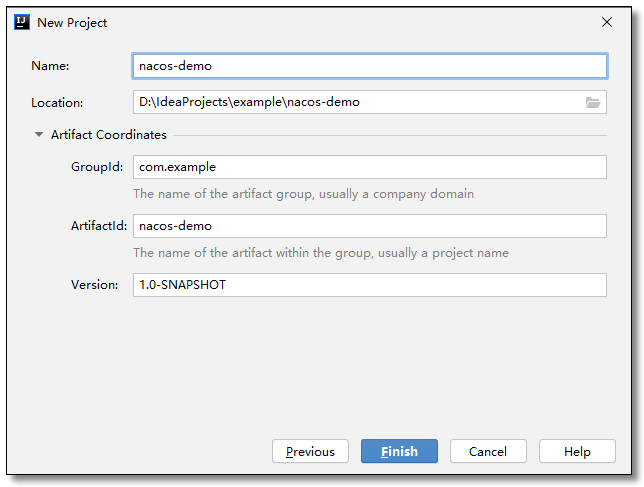
创建项目
我们创建聚合项目来讲解 Nacos,首先创建一个 pom 父工程。
添加依赖
pom.xml
 1
 2
 3
 4
 5
 6
 7
 8
 9
10
11
12
13
14
15
16
17
18
19
20
21
22
23
24
25
26
27
28
29
30
31
32
33
34
35
36
37
38
39
40
41
42
43
44
45
46
47
48
49
50
51
52
53
54
55
56
57
<?xml version="1.0" encoding="UTF-8"?>
<project xmlns= "http://maven.apache.org/POM/4.0.0"
xmlns:xsi= "http://www.w3.org/2001/XMLSchema-instance"
xsi:schemaLocation= "http://maven.apache.org/POM/4.0.0 http://maven.apache.org/xsd/maven-4.0.0.xsd" >
<modelVersion> 4.0.0</modelVersion>
<!-- 项目坐标地址 -->
<groupId> com.example</groupId>
<!-- 项目模块名称 -->
<artifactId> nacos-demo</artifactId>
<!-- 项目版本名称 快照版本SNAPSHOT、正式版本RELEASE -->
<version> 1.0-SNAPSHOT</version>
<!-- 继承 spring-boot-starter-parent 依赖 -->
<!-- 使用继承方式,实现复用,符合继承的都可以被使用 -->
<parent>
<groupId> org.springframework.boot</groupId>
<artifactId> spring-boot-starter-parent</artifactId>
<version> 2.3.0.RELEASE</version>
</parent>
<!--
集中定义依赖组件版本号,但不引入,
在子工程中用到声明的依赖时,可以不加依赖的版本号,
这样可以统一管理工程中用到的依赖版本
-->
<properties>
<!-- Spring Cloud Hoxton.SR5 依赖 -->
<spring-cloud.version> Hoxton.SR5</spring-cloud.version>
<!-- spring cloud alibaba 依赖 -->
<spring-cloud-alibaba.version> 2.1.0.RELEASE</spring-cloud-alibaba.version>
</properties>
<!-- 项目依赖管理 父项目只是声明依赖,子项目需要写明需要的依赖(可以省略版本信息) -->
<dependencyManagement>
<dependencies>
<!-- spring cloud 依赖 -->
<dependency>
<groupId> org.springframework.cloud</groupId>
<artifactId> spring-cloud-dependencies</artifactId>
<version> ${spring-cloud.version}</version>
<type> pom</type>
<scope> import</scope>
</dependency>
<!-- spring cloud alibaba 依赖 -->
<dependency>
<groupId> com.alibaba.cloud</groupId>
<artifactId> spring-cloud-alibaba-dependencies</artifactId>
<version> ${spring-cloud-alibaba.version}</version>
<type> pom</type>
<scope> import</scope>
</dependency>
</dependencies>
</dependencyManagement>
</project>
商品服务 product-service
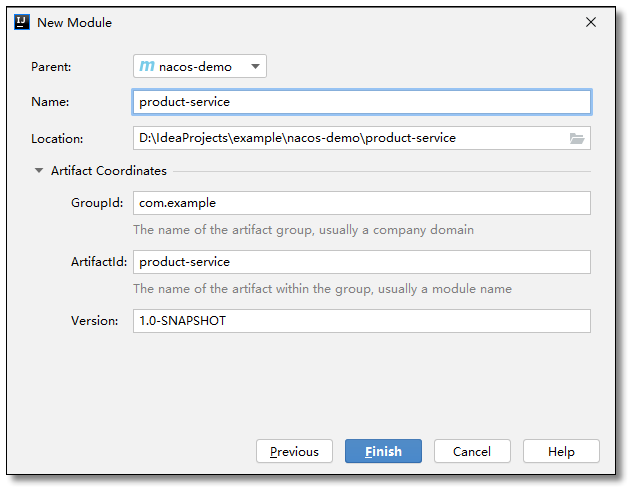
创建项目
在刚才的父工程下创建一个 product-service 项目。
添加依赖
主要添加 spring-cloud-starter-alibaba-nacos-discovery 依赖。
1
2
3
4
5
<!-- spring cloud alibaba nacos discovery 依赖 -->
<dependency>
<groupId> com.alibaba.cloud</groupId>
<artifactId> spring-cloud-starter-alibaba-nacos-discovery</artifactId>
</dependency>
完整依赖如下:
 1
 2
 3
 4
 5
 6
 7
 8
 9
10
11
12
13
14
15
16
17
18
19
20
21
22
23
24
25
26
27
28
29
30
31
32
33
34
35
36
37
38
39
40
41
42
43
44
45
46
47
48
49
<?xml version="1.0" encoding="UTF-8"?>
<project xmlns= "http://maven.apache.org/POM/4.0.0"
xmlns:xsi= "http://www.w3.org/2001/XMLSchema-instance"
xsi:schemaLocation= "http://maven.apache.org/POM/4.0.0 http://maven.apache.org/xsd/maven-4.0.0.xsd" >
<!-- 继承父依赖 -->
<parent>
<artifactId> nacos-demo</artifactId>
<groupId> com.example</groupId>
<version> 1.0-SNAPSHOT</version>
</parent>
<modelVersion> 4.0.0</modelVersion>
<artifactId> product-service</artifactId>
<!-- 项目依赖 -->
<dependencies>
<!-- spring cloud alibaba nacos discovery 依赖 -->
<dependency>
<groupId> com.alibaba.cloud</groupId>
<artifactId> spring-cloud-starter-alibaba-nacos-discovery</artifactId>
</dependency>
<!-- spring boot web 依赖 -->
<dependency>
<groupId> org.springframework.boot</groupId>
<artifactId> spring-boot-starter-web</artifactId>
</dependency>
<!-- lombok 依赖 -->
<dependency>
<groupId> org.projectlombok</groupId>
<artifactId> lombok</artifactId>
<scope> provided</scope>
</dependency>
<!-- spring boot test 依赖 -->
<dependency>
<groupId> org.springframework.boot</groupId>
<artifactId> spring-boot-starter-test</artifactId>
<scope> test</scope>
<exclusions>
<exclusion>
<groupId> org.junit.vintage</groupId>
<artifactId> junit-vintage-engine</artifactId>
</exclusion>
</exclusions>
</dependency>
</dependencies>
</project>
配置文件
application.yml
 1
 2
 3
 4
 5
 6
 7
 8
 9
10
11
12
server :
port : 7070 # 端口
spring :
application :
name : product-service # 应用名称
# 配置 Nacos 注册中心
cloud :
nacos :
discovery :
enabled : true # 如果不想使用 Nacos 进行服务注册和发现,设置为 false 即可
server-addr : 127.0.0.1 : 8848 # Nacos 服务器地址
实体类
Product.java
 1
 2
 3
 4
 5
 6
 7
 8
 9
10
11
12
13
14
15
16
17
18
19
package com.example.pojo ;
import lombok.AllArgsConstructor ;
import lombok.Data ;
import lombok.NoArgsConstructor ;
import java.io.Serializable ;
@Data
@NoArgsConstructor
@AllArgsConstructor
public class Product implements Serializable {
private Integer id ;
private String productName ;
private Integer productNum ;
private Double productPrice ;
}
编写服务
ProductService.java
 1
 2
 3
 4
 5
 6
 7
 8
 9
10
11
12
13
14
15
16
17
18
19
package com.example.service ;
import com.example.pojo.Product ;
import java.util.List ;
/**
* 商品服务
*/
public interface ProductService {
/**
* 查询商品列表
*
* @return
*/
List < Product > selectProductList ();
}
ProductServiceImpl.java
 1
 2
 3
 4
 5
 6
 7
 8
 9
10
11
12
13
14
15
16
17
18
19
20
21
22
23
24
25
26
27
28
29
30
31
32
33
package com.example.service.impl ;
import com.example.pojo.Product ;
import com.example.service.ProductService ;
import lombok.extern.slf4j.Slf4j ;
import org.springframework.stereotype.Service ;
import java.util.Arrays ;
import java.util.List ;
/**
* 商品服务
*/
@Slf4j
@Service
public class ProductServiceImpl implements ProductService {
/**
* 查询商品列表
*
* @return
*/
@Override
public List < Product > selectProductList () {
log . info ( "商品服务查询商品信息..." );
return Arrays . asList (
new Product ( 1 , "华为手机" , 1 , 5800D ),
new Product ( 2 , "联想笔记本" , 1 , 6888D ),
new Product ( 3 , "小米平板" , 5 , 2020D )
);
}
}
控制层
ProductController.java
 1
 2
 3
 4
 5
 6
 7
 8
 9
10
11
12
13
14
15
16
17
18
19
20
21
22
23
24
25
26
27
28
29
package com.example.controller ;
import com.example.pojo.Product ;
import com.example.service.ProductService ;
import org.springframework.beans.factory.annotation.Autowired ;
import org.springframework.web.bind.annotation.GetMapping ;
import org.springframework.web.bind.annotation.RequestMapping ;
import org.springframework.web.bind.annotation.RestController ;
import java.util.List ;
@RestController
@RequestMapping ( "/product" )
public class ProductController {
@Autowired
private ProductService productService ;
/**
* 查询商品列表
*
* @return
*/
@GetMapping ( "/list" )
public List < Product > selectProductList () {
return productService . selectProductList ();
}
}
该项目我们可以通过单元测试进行测试,也可以直接通过 url 使用 postman 或者浏览器来进行测试。
启动类
通过 Spring Cloud 原生注解 @EnableDiscoveryClient 开启服务注册发现功能。
 1
 2
 3
 4
 5
 6
 7
 8
 9
10
11
12
13
14
15
package com.example ;
import org.springframework.boot.SpringApplication ;
import org.springframework.boot.autoconfigure.SpringBootApplication ;
// 开启 @EnableDiscoveryClient 注解,当前版本默认会开启该注解
//@EnableDiscoveryClient
@SpringBootApplication
public class ProductServiceApplication {
public static void main ( String [] args ) {
SpringApplication . run ( ProductServiceApplication . class , args );
}
}
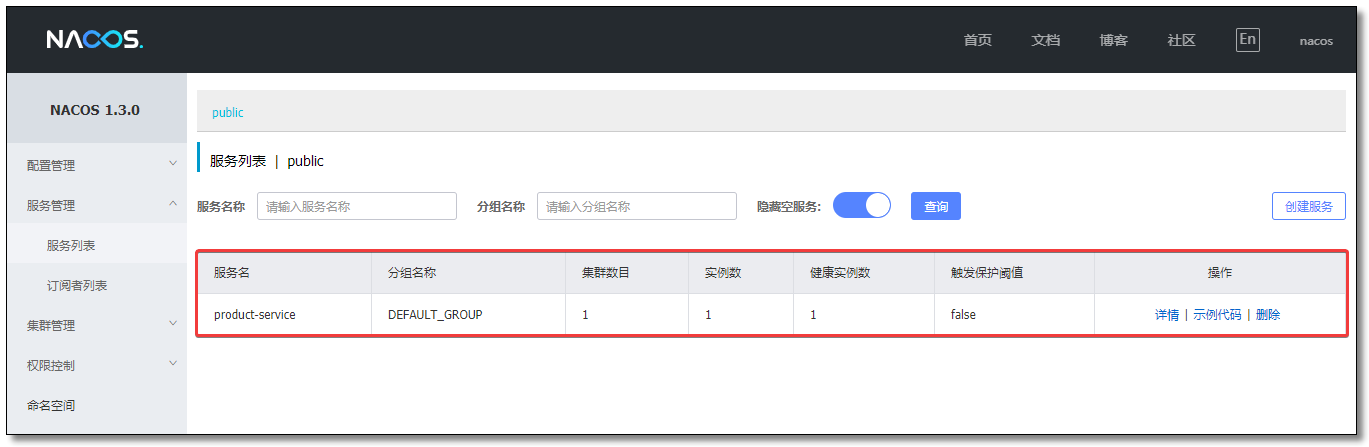
注册中心
刷新 Nacos 服务器,可以看到服务已注册至 Nacos。
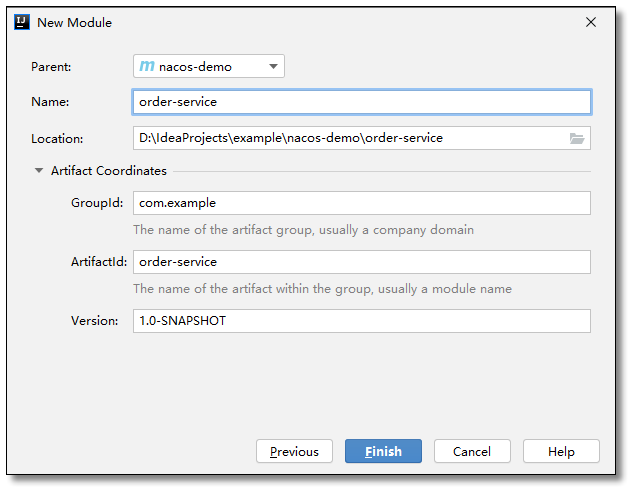
订单服务 order-service
创建项目
在刚才的父工程下创建一个 order-service 项目。
添加依赖
pom.xml
 1
 2
 3
 4
 5
 6
 7
 8
 9
10
11
12
13
14
15
16
17
18
19
20
21
22
23
24
25
26
27
28
29
30
31
32
33
34
35
36
37
38
39
40
41
42
43
44
45
46
47
48
49
<?xml version="1.0" encoding="UTF-8"?>
<project xmlns= "http://maven.apache.org/POM/4.0.0"
xmlns:xsi= "http://www.w3.org/2001/XMLSchema-instance"
xsi:schemaLocation= "http://maven.apache.org/POM/4.0.0 http://maven.apache.org/xsd/maven-4.0.0.xsd" >
<!-- 继承父依赖 -->
<parent>
<artifactId> nacos-demo</artifactId>
<groupId> com.example</groupId>
<version> 1.0-SNAPSHOT</version>
</parent>
<modelVersion> 4.0.0</modelVersion>
<artifactId> order-service</artifactId>
<!-- 项目依赖 -->
<dependencies>
<!-- spring cloud alibaba nacos discovery 依赖 -->
<dependency>
<groupId> com.alibaba.cloud</groupId>
<artifactId> spring-cloud-starter-alibaba-nacos-discovery</artifactId>
</dependency>
<!-- spring boot web 依赖 -->
<dependency>
<groupId> org.springframework.boot</groupId>
<artifactId> spring-boot-starter-web</artifactId>
</dependency>
<!-- lombok 依赖 -->
<dependency>
<groupId> org.projectlombok</groupId>
<artifactId> lombok</artifactId>
<scope> provided</scope>
</dependency>
<!-- spring boot test 依赖 -->
<dependency>
<groupId> org.springframework.boot</groupId>
<artifactId> spring-boot-starter-test</artifactId>
<scope> test</scope>
<exclusions>
<exclusion>
<groupId> org.junit.vintage</groupId>
<artifactId> junit-vintage-engine</artifactId>
</exclusion>
</exclusions>
</dependency>
</dependencies>
</project>
配置文件
application.yml
 1
 2
 3
 4
 5
 6
 7
 8
 9
10
11
12
server :
port : 9090 # 端口
spring :
application :
name : order-service # 应用名称
# 配置 Nacos 注册中心
cloud :
nacos :
discovery :
enabled : true # 如果不想使用 Nacos 进行服务注册和发现,设置为 false 即可
server-addr : 127.0.0.1 : 8848 # Nacos 服务器地址
实体类
Product.java
 1
 2
 3
 4
 5
 6
 7
 8
 9
10
11
12
13
14
15
16
17
18
19
package com.example.pojo ;
import lombok.AllArgsConstructor ;
import lombok.Data ;
import lombok.NoArgsConstructor ;
import java.io.Serializable ;
@Data
@NoArgsConstructor
@AllArgsConstructor
public class Product implements Serializable {
private Integer id ;
private String productName ;
private Integer productNum ;
private Double productPrice ;
}
Order.java
 1
 2
 3
 4
 5
 6
 7
 8
 9
10
11
12
13
14
15
16
17
18
19
20
21
package com.example.pojo ;
import lombok.AllArgsConstructor ;
import lombok.Data ;
import lombok.NoArgsConstructor ;
import java.io.Serializable ;
import java.util.List ;
@Data
@NoArgsConstructor
@AllArgsConstructor
public class Order implements Serializable {
private Integer id ;
private String orderNo ;
private String orderAddress ;
private Double totalPrice ;
private List < Product > productList ;
}
消费服务
OrderService.java
 1
 2
 3
 4
 5
 6
 7
 8
 9
10
11
12
13
14
15
package com.example.service ;
import com.example.pojo.Order ;
public interface OrderService {
/**
* 根据主键查询订单
*
* @param id
* @return
*/
Order selectOrderById ( Integer id );
}
对于服务的消费我们这里讲三种实现方式:
DiscoveryClient:通过元数据获取服务信息
LoadBalancerClient:Ribbon 的负载均衡器
@LoadBalanced:通过注解开启 Ribbon 的负载均衡器
DiscoveryClient
Spring Boot 不提供任何自动配置的RestTemplate bean,所以需要在启动类中注入 RestTemplate。
 1
 2
 3
 4
 5
 6
 7
 8
 9
10
11
12
13
14
15
16
17
18
19
20
21
22
package com.example ;
import org.springframework.boot.SpringApplication ;
import org.springframework.boot.autoconfigure.SpringBootApplication ;
import org.springframework.context.annotation.Bean ;
import org.springframework.web.client.RestTemplate ;
// 开启 @EnableDiscoveryClient 注解,当前版本默认会开启该注解
//@EnableDiscoveryClient
@SpringBootApplication
public class OrderServiceApplication {
@Bean
public RestTemplate restTemplate () {
return new RestTemplate ();
}
public static void main ( String [] args ) {
SpringApplication . run ( OrderServiceApplication . class , args );
}
}
OrderServiceImpl.java
 1
 2
 3
 4
 5
 6
 7
 8
 9
10
11
12
13
14
15
16
17
18
19
20
21
22
23
24
25
26
27
28
29
30
31
32
33
34
35
36
37
38
39
40
41
42
43
44
45
46
47
48
49
50
51
52
53
54
55
56
57
58
59
60
61
62
63
64
65
66
67
68
69
70
71
72
73
74
package com.example.service.impl ;
import com.alibaba.fastjson.JSON ;
import com.example.pojo.Order ;
import com.example.pojo.Product ;
import com.example.service.OrderService ;
import lombok.extern.slf4j.Slf4j ;
import org.springframework.beans.factory.annotation.Autowired ;
import org.springframework.cloud.client.ServiceInstance ;
import org.springframework.cloud.client.discovery.DiscoveryClient ;
import org.springframework.core.ParameterizedTypeReference ;
import org.springframework.http.HttpMethod ;
import org.springframework.http.ResponseEntity ;
import org.springframework.stereotype.Service ;
import org.springframework.util.CollectionUtils ;
import org.springframework.web.client.RestTemplate ;
import java.util.List ;
@Slf4j
@Service
public class OrderServiceImpl implements OrderService {
@Autowired
private RestTemplate restTemplate ;
@Autowired
private DiscoveryClient discoveryClient ;
/**
* 根据主键查询订单
*
* @param id
* @return
*/
@Override
public Order selectOrderById ( Integer id ) {
log . info ( "订单服务查询订单信息..." );
return new Order ( id , "order-001" , "中国" , 22788D ,
selectProductListByDiscoveryClient ());
}
private List < Product > selectProductListByDiscoveryClient () {
StringBuffer sb = null ;
// 获取服务列表
List < String > serviceIds = discoveryClient . getServices ();
if ( CollectionUtils . isEmpty ( serviceIds ))
return null ;
// 根据服务名称获取服务
List < ServiceInstance > serviceInstances = discoveryClient . getInstances ( "product-service" );
if ( CollectionUtils . isEmpty ( serviceInstances ))
return null ;
// 构建远程服务调用地址
ServiceInstance si = serviceInstances . get ( 0 );
sb = new StringBuffer ();
sb . append ( "http://" + si . getHost () + ":" + si . getPort () + "/product/list" );
log . info ( "订单服务调用商品服务..." );
log . info ( "从注册中心获取到的商品服务地址为:{}" , sb . toString ());
// 远程调用服务
// ResponseEntity: 封装了返回数据
ResponseEntity < List < Product >> response = restTemplate . exchange (
sb . toString (),
HttpMethod . GET ,
null ,
new ParameterizedTypeReference < List < Product >> () {});
log . info ( "商品信息查询结果为:{}" , JSON . toJSONString ( response . getBody ()));
return response . getBody ();
}
}
LoadBalancerClient
OrderServiceImpl.java
 1
 2
 3
 4
 5
 6
 7
 8
 9
10
11
12
13
14
15
16
17
18
19
20
21
22
23
24
25
26
27
28
29
30
31
32
33
34
35
36
37
38
39
40
41
42
43
44
45
46
47
48
49
50
51
52
53
54
55
56
57
58
59
60
61
62
63
64
65
package com.example.service.impl ;
import com.alibaba.fastjson.JSON ;
import com.example.pojo.Order ;
import com.example.pojo.Product ;
import com.example.service.OrderService ;
import lombok.extern.slf4j.Slf4j ;
import org.springframework.beans.factory.annotation.Autowired ;
import org.springframework.cloud.client.ServiceInstance ;
import org.springframework.cloud.client.loadbalancer.LoadBalancerClient ;
import org.springframework.core.ParameterizedTypeReference ;
import org.springframework.http.HttpMethod ;
import org.springframework.http.ResponseEntity ;
import org.springframework.stereotype.Service ;
import org.springframework.web.client.RestTemplate ;
import java.util.List ;
@Slf4j
@Service
public class OrderServiceImpl implements OrderService {
@Autowired
private RestTemplate restTemplate ;
@Autowired
private LoadBalancerClient loadBalancerClient ; // Ribbon 负载均衡器
/**
* 根据主键查询订单
*
* @param id
* @return
*/
@Override
public Order selectOrderById ( Integer id ) {
log . info ( "订单服务查询订单信息..." );
return new Order ( id , "order-001" , "中国" , 22788D ,
selectProductListByLoadBalancerClient ());
}
private List < Product > selectProductListByLoadBalancerClient () {
StringBuffer sb = null ;
// 根据服务名称获取服务
ServiceInstance si = loadBalancerClient . choose ( "product-service" );
if ( null == si )
return null ;
sb = new StringBuffer ();
sb . append ( "http://" + si . getHost () + ":" + si . getPort () + "/product/list" );
log . info ( "订单服务调用商品服务..." );
log . info ( "从注册中心获取到的商品服务地址为:{}" , sb . toString ());
// ResponseEntity: 封装了返回数据
ResponseEntity < List < Product >> response = restTemplate . exchange (
sb . toString (),
HttpMethod . GET ,
null ,
new ParameterizedTypeReference < List < Product >> () {});
log . info ( "商品信息查询结果为:{}" , JSON . toJSONString ( response . getBody ()));
return response . getBody ();
}
}
@LoadBalanced
启动类注入 RestTemplate 时添加 @LoadBalanced 负载均衡注解,表示这个 RestTemplate 在请求时拥有客户端负载均衡的能力。
 1
 2
 3
 4
 5
 6
 7
 8
 9
10
11
12
13
14
15
16
17
18
19
20
21
22
23
24
package com.example ;
import org.springframework.boot.SpringApplication ;
import org.springframework.boot.autoconfigure.SpringBootApplication ;
import org.springframework.cloud.client.discovery.EnableDiscoveryClient ;
import org.springframework.cloud.client.loadbalancer.LoadBalanced ;
import org.springframework.context.annotation.Bean ;
import org.springframework.web.client.RestTemplate ;
@EnableDiscoveryClient
@SpringBootApplication
public class OrderServiceApplication {
@Bean
@LoadBalanced // 负载均衡注解
public RestTemplate restTemplate () {
return new RestTemplate ();
}
public static void main ( String [] args ) {
SpringApplication . run ( OrderServiceApplication . class , args );
}
}
OrderServiceImpl.java
 1
 2
 3
 4
 5
 6
 7
 8
 9
10
11
12
13
14
15
16
17
18
19
20
21
22
23
24
25
26
27
28
29
30
31
32
33
34
35
36
37
38
39
40
41
42
43
44
45
46
47
48
49
50
51
package com.example.service.impl ;
import com.alibaba.fastjson.JSON ;
import com.example.pojo.Order ;
import com.example.pojo.Product ;
import com.example.service.OrderService ;
import lombok.extern.slf4j.Slf4j ;
import org.springframework.beans.factory.annotation.Autowired ;
import org.springframework.core.ParameterizedTypeReference ;
import org.springframework.http.HttpMethod ;
import org.springframework.http.ResponseEntity ;
import org.springframework.stereotype.Service ;
import org.springframework.web.client.RestTemplate ;
import java.util.List ;
@Slf4j
@Service
public class OrderServiceImpl implements OrderService {
@Autowired
private RestTemplate restTemplate ;
/**
* 根据主键查询订单
*
* @param id
* @return
*/
@Override
public Order selectOrderById ( Integer id ) {
log . info ( "订单服务查询订单信息..." );
return new Order ( id , "order-001" , "中国" , 22788D ,
selectProductListByLoadBalancerAnnotation ());
}
private List < Product > selectProductListByLoadBalancerAnnotation () {
String url = "http://product-service/product/list" ;
log . info ( "订单服务调用商品服务..." );
log . info ( "从注册中心获取到的商品服务地址为:{}" , url );
// ResponseEntity: 封装了返回数据
ResponseEntity < List < Product >> response = restTemplate . exchange (
url ,
HttpMethod . GET ,
null ,
new ParameterizedTypeReference < List < Product >> () {});
log . info ( "商品信息查询结果为:{}" , JSON . toJSONString ( response . getBody ()));
return response . getBody ();
}
}
控制层
OrderController.java
 1
 2
 3
 4
 5
 6
 7
 8
 9
10
11
12
13
14
15
16
17
18
19
20
21
22
23
24
25
26
27
28
29
package com.example.controller ;
import com.example.pojo.Order ;
import com.example.service.OrderService ;
import org.springframework.beans.factory.annotation.Autowired ;
import org.springframework.web.bind.annotation.GetMapping ;
import org.springframework.web.bind.annotation.PathVariable ;
import org.springframework.web.bind.annotation.RequestMapping ;
import org.springframework.web.bind.annotation.RestController ;
@RestController
@RequestMapping ( "/order" )
public class OrderController {
@Autowired
private OrderService orderService ;
/**
* 根据主键查询订单
*
* @param id
* @return
*/
@GetMapping ( "/{id}" )
public Order selectOrderById ( @PathVariable ( "id" ) Integer id ) {
return orderService . selectOrderById ( id );
}
}
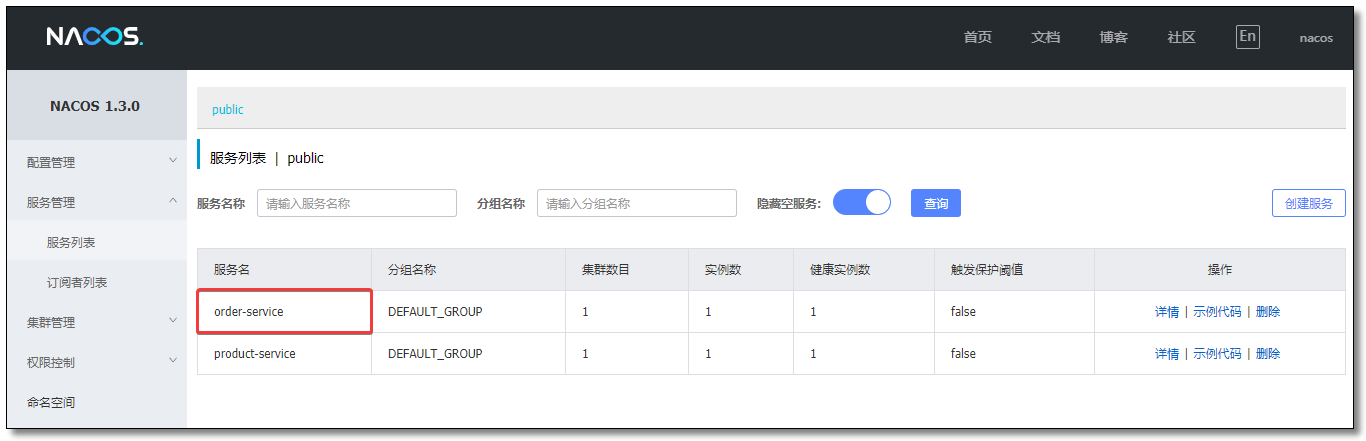
访问
刷新 Nacos 服务器,可以看到服务已注册至 Nacos。
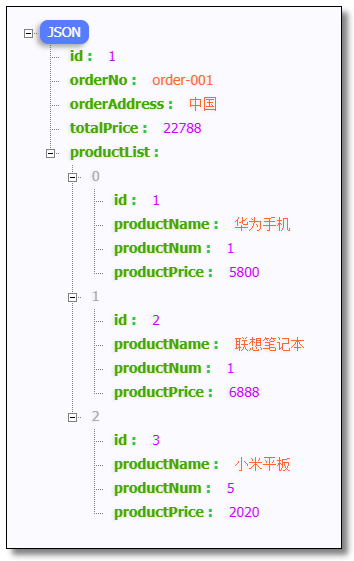
访问:http://localhost:9090/order/1 结果如下:
配置 MySQL 数据库
Nacos 在 0.7 版本之前,默认使用的是嵌入式数据库 Apache Derby 来存储数据(内嵌的数据库会随着 Nacos 一起启动,无需额外安装);0.7 版本及以后,增加了对 MySQL 数据源的支持。
MySQL数据源
环境要求:MySQL 5.6.5+(生产使用建议至少主备模式,或者采用高可用数据库);
初始化 MySQL 数据库
创建数据库 nacos_config。
SQL源文件地址:https://github.com/alibaba/nacos/blob/master/distribution/conf/nacos-mysql.sql ,或者在 nacos-server 解压目录 conf 下,找到 nacos-mysql.sql 文件,运行该文件,结果如下:
application.properties 配置
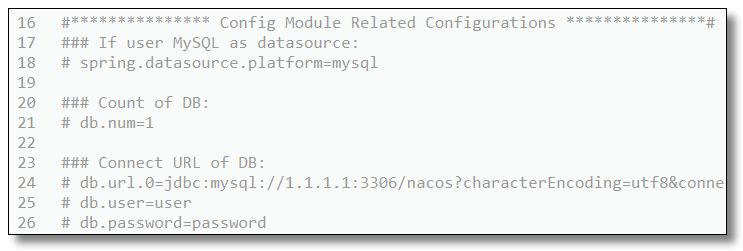
修改 nacos/conf/application.properties 文件的以下内容。
最终修改结果如下:
 1
 2
 3
 4
 5
 6
 7
 8
 9
10
11
12
13
14
#*************** Config Module Related Configurations ***************#
### If user MySQL as datasource:
# 指定数据源为 MySQL
spring.datasource.platform = mysql
### Count of DB:
# 数据库实例数量
db.num = 1
# 数据库连接信息,如果是 MySQL 8.0+ 版本需要添加 serverTimezone=Asia/Shanghai
### Connect URL of DB:
db.url.0 = jdbc:mysql://127.0.0.1:3306/nacos_config?characterEncoding=utf8&connectTimeout=1000&socketTimeout=3000&autoReconnect=true&serverTimezone=Asia/Shanghai
db.user = root
db.password = 1234
如果你和我一样使用的是 MySQL 8.0+ 版本,那么启动 Nacos 时肯定会报错。莫慌,在 Nacos 安装目录下新建 plugins/mysql 文件夹,并放入 8.0+ 版本的 mysql-connector-java-8.0.xx.jar,重启 Nacos 即可,启动时会提示更换了 MySQL 的 driver-class 类。
Nacos 集群环境搭建
集群模式跟我们平时进行扩容是一样的,可以通过 Nginx 转发到多个节点,如下图:
如果为了方便省事,可以使用直连 ip 模式,配置中按如下编写即可:
1
2
3
4
5
6
7
spring :
# 配置 Nacos 注册中心
cloud :
nacos :
discovery :
enabled : true # 如果不想使用 Nacos 进行服务注册和发现,设置为 false 即可
server-addr : 192.168.10.101 : 8848 , 192.168.10.102 : 8848 , 192.168.10.103 : 8848 # Nacos 服务器地址
PS:如果只是为了学习的话直接在本地启动 3 个实例,通过修改端口的方式即可。本文使用三台服务器的方式带大家搭建环境,其实这种方式反而更简单。
环境准备
Nacos 单节点,也就是我们刚才使用的 standalone 模式,默认使用嵌入式数据库实现数据的存储,不方便观察数据存储的基本情况,0.7 版本以后增加了支持 MySQL 数据源能力。集群搭建的时候我们需要将 Nacos 对接 Mysql 进行数据存储。如果要搭建高可用的集群环境,至少要满足以下条件:
JDK 1.8+;
Maven 3.2.x+;
MySQL 5.6.5+(生产使用建议至少主备模式,或者采用高可用数据库);
3个或3个以上Nacos节点才能构成集群。
下载源码或者安装包
可以通过源码和发行包两种方式来获取 Nacos。
源码方式
从 Github 上下载源码方式。
1
2
3
4
5
6
7
git clone https://github.com/alibaba/nacos.git
cd nacos/
mvn -Prelease-nacos -Dmaven.test.skip= true clean install -U
ls -al distribution/target/
// change the $version to your actual path
cd distribution/target/nacos-server-$version /nacos/bin
发行包方式
您可以从 https://github.com/alibaba/nacos/releases 下载最新稳定版本的 nacos-server 包。
配置集群配置文件
将安装包解压。
1
tar -zxvf nacos-server-1.2.1.tar.gz -C /usr/local/ # 解压文件至 local 目录
在 Nacos 的解压目录 nacos/conf 目录下,复制配置文件 cluster.conf.example 并重命名为 cluster.conf,每行配置成 ip:port。(请配置3个或3个以上节点)
1
2
3
192.168.10.101:8848
192.168.10.102:8848
192.168.10.103:8848
配置 MySQL 数据库
Nacos 在 0.7 版本之前,默认使用的是嵌入式数据库 Apache Derby 来存储数据(内嵌的数据库会随着 Nacos 一起启动,无需额外安装);0.7 版本及以后,增加了对 MySQL 数据源的支持。
MySQL数据源
环境要求:MySQL 5.6.5+(生产使用建议至少主备模式,或者采用高可用数据库);
初始化 MySQL 数据库
创建数据库 nacos_config。
SQL源文件地址:https://github.com/alibaba/nacos/blob/master/distribution/conf/nacos-mysql.sql ,或者在 nacos-server 解压目录 conf 下,找到 nacos-mysql.sql 文件,运行该文件,结果如下:
application.properties 配置
修改 nacos/conf/application.properties 文件的以下内容。
最终修改结果如下:
 1
 2
 3
 4
 5
 6
 7
 8
 9
10
11
12
13
14
#*************** Config Module Related Configurations ***************#
### If user MySQL as datasource:
# 指定数据源为 MySQL
spring.datasource.platform = mysql
### Count of DB:
# 数据库实例数量
db.num = 1
# 数据库连接信息,如果是 MySQL 8.0+ 版本需要添加 serverTimezone=Asia/Shanghai
### Connect URL of DB:
db.url.0 = jdbc:mysql://127.0.0.1:3306/nacos_config?characterEncoding=utf8&connectTimeout=1000&socketTimeout=3000&autoReconnect=true&serverTimezone=Asia/Shanghai
db.user = root
db.password = 1234
如果你和我一样使用的是 MySQL 8.0+ 版本,那么启动 Nacos 时肯定会报错。莫慌,在 Nacos 安装目录下新建 plugins/mysql 文件夹,并放入 8.0+ 版本的 mysql-connector-java-8.0.xx.jar,重启 Nacos 即可,启动时会提示更换了 MySQL 的 driver-class 类。
启动服务器
Linux/Unix/Mac
在 Nacos 的解压目录 nacos/bin 目录下启动。
启动命令(在没有参数模式,是集群模式):
查看启动记录
可通过 /nacos/logs/nacos.log(详细日志)或 /nacos/conf/start.out(启动记录)的输出内容查看是否启动成功。
查看命令:
1
tail -f /usr/local/nacos/logs/start.out
启动成功输出结果:
1
2
3
4
5
6
7
8
9
2020-04-29 22:47:56,204 INFO Nacos is starting...

2020-04-29 22:47:56,556 INFO Nacos logs files: /usr/local/nacos/logs/

2020-04-29 22:47:56,556 INFO Nacos conf files: /usr/local/nacos/conf/

2020-04-29 22:47:56,556 INFO Nacos data files: /usr/local/nacos/data/

2020-04-29 22:47:56,556 INFO Nacos started successfully in cluster mode.
访问
访问以下链接,默认用户名/密码是 nacos/nacos :
http://192.168.10.101:8848/nacos/
http://192.168.10.102:8848/nacos/
http://192.168.10.103:8848/nacos/
关闭服务器
Linux/Unix/Mac
测试
直连 ip 模式
商品服务 application. yml 配置文件。
 1
 2
 3
 4
 5
 6
 7
 8
 9
10
11
12
server :
port : 7070 # 端口
spring :
application :
name : product-service # 应用名称
# 配置 Nacos 注册中心
cloud :
nacos :
discovery :
enabled : true # 如果不想使用 Nacos 进行服务注册和发现,设置为 false 即可
server-addr : 192.168.10.101 : 8848 , 192.168.10.102 : 8848 , 192.168.10.103 : 8848 # Nacos 服务器地址,集群版直连 ip 模式
订单服务 application. yml 配置文件。
 1
 2
 3
 4
 5
 6
 7
 8
 9
10
11
12
server :
port : 9090 # 端口
spring :
application :
name : order-service # 应用名称
# 配置 Nacos 注册中心
cloud :
nacos :
discovery :
enabled : true # 如果不想使用 Nacos 进行服务注册和发现,设置为 false 即可
server-addr : 192.168.10.101 : 8848 , 192.168.10.102 : 8848 , 192.168.10.103 : 8848 # Nacos 服务器地址,集群版直连 ip 模式
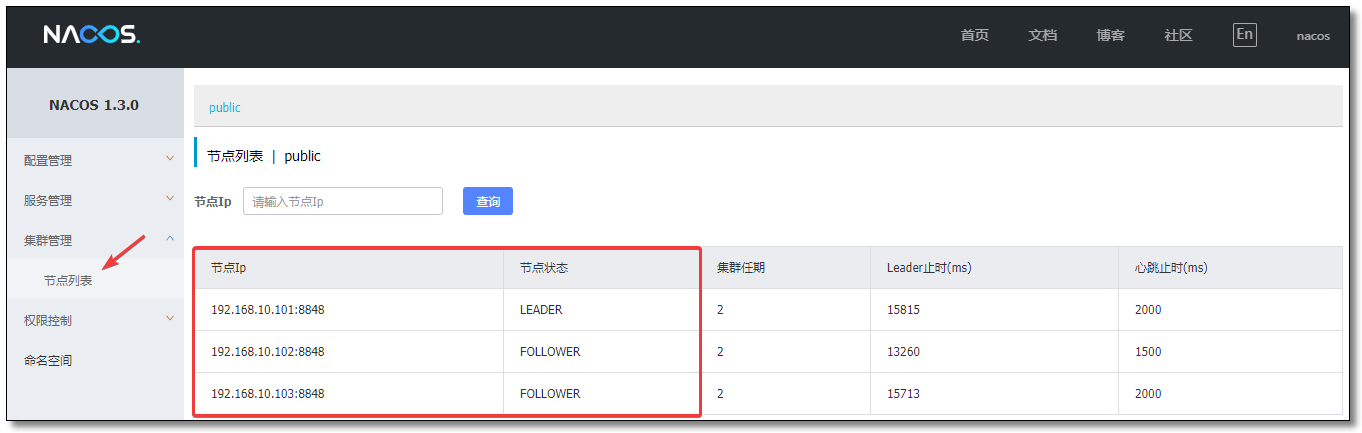
启动 Nacos 集群,从下图可以看到集群节点共有三个,其中 192.168.10.101:8848 为 leader。
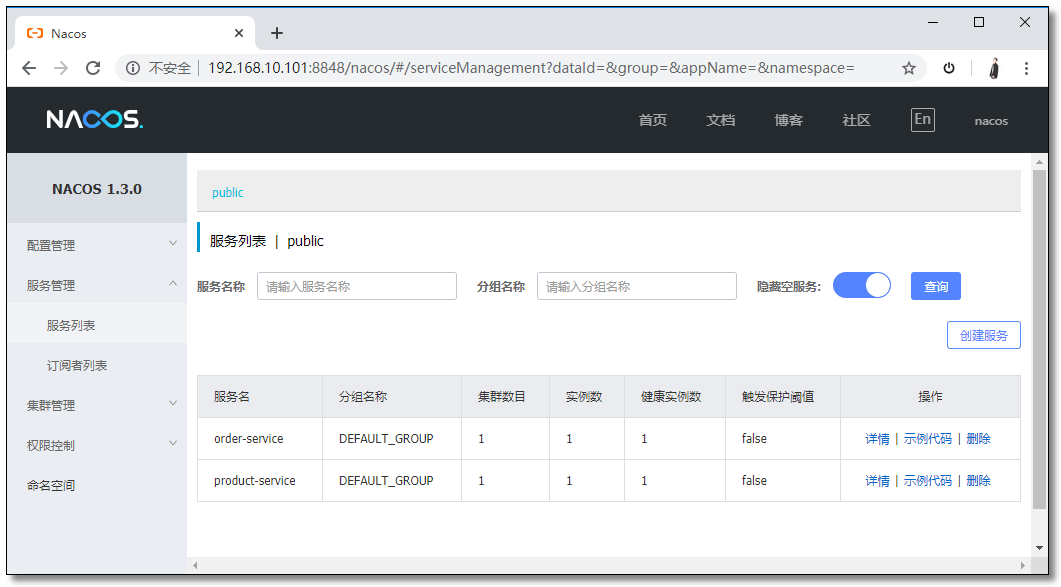
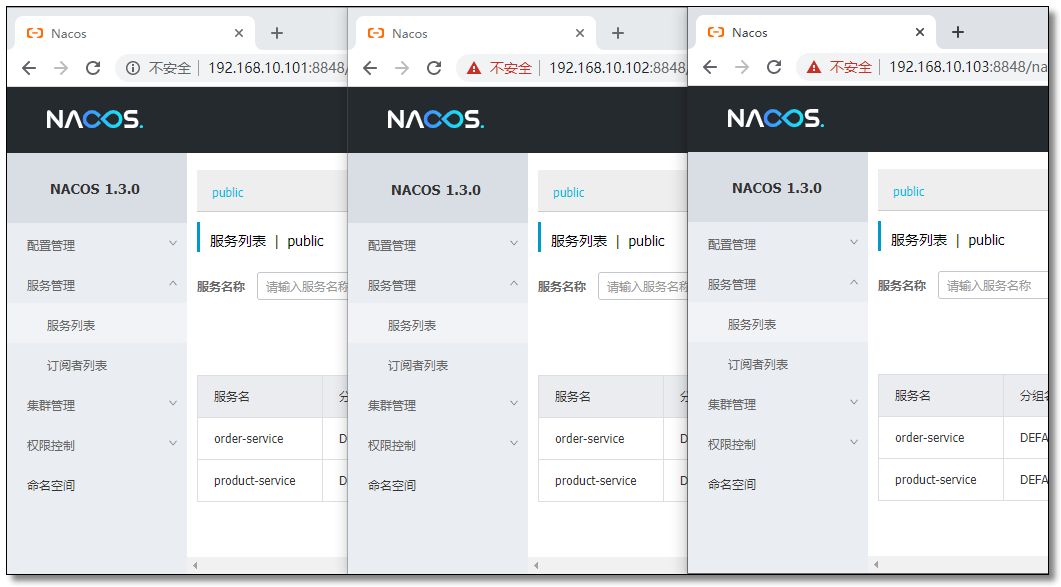
通过服务列表可以看到服务已注册至 Nacos。
访问:http://localhost:9090/order/1 结果如下:
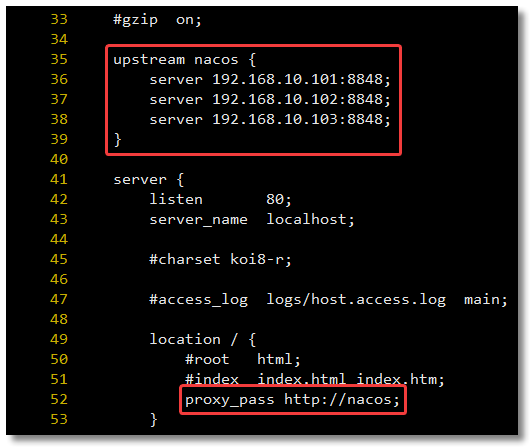
Nginx 转发
再启动一台服务器 192.168.10.100,安装 Nginx,配置代理转发规则。
1
2
3
4
5
upstream nacos {
    server 192.168.10.101:8848;
    server 192.168.10.102:8848;
    server 192.168.10.103:8848;
}
商品服务 application. yml 配置文件。
 1
 2
 3
 4
 5
 6
 7
 8
 9
10
11
12
server :
port : 7070 # 端口
spring :
application :
name : product-service # 应用名称
# 配置 Nacos 注册中心
cloud :
nacos :
discovery :
enabled : true # 如果不想使用 Nacos 进行服务注册和发现,设置为 false 即可
server-addr : 192.168.10.100 : 80 # Nacos 服务器地址,集群版 Nginx 转发
订单服务 application. yml 配置文件。
 1
 2
 3
 4
 5
 6
 7
 8
 9
10
11
12
server :
port : 9090 # 端口
spring :
application :
name : order-service # 应用名称
# 配置 Nacos 注册中心
cloud :
nacos :
discovery :
enabled : true # 如果不想使用 Nacos 进行服务注册和发现,设置为 false 即可
server-addr : 192.168.10.100 : 80 # Nacos 服务器地址,集群版 Nginx 转发
启动 Nacos 集群,从下图可以看到集群节点共有三个,其中 192.168.10.101:8848 为 leader。
通过服务列表可以看到服务已注册至 Nacos。
访问:http://localhost:9090/order/1 结果如下:
至此 Nacos 注册中心所有的知识点就讲解结束了。
本文采用 知识共享「署名-非商业性使用-禁止演绎 4.0 国际」许可协议
大家可以通过 分类Spring Cloud
🤗 您的点赞和转发是对我最大的鼓励和支持。
📢 扫码关注 哈喽沃德先生「文档 + 视频」每篇文章都配有专门视频讲解,学习更轻松噢 ~